—–|——-|——–|
| Start SSH listening | systemctl start ssh | systemctl start ssh.socket |
| Stop SSH listening | systemctl stop ssh | systemctl stop ssh.socket |
| Restart after editing sshd_config | systemctl restart ssh | systemctl restart ssh.service |
| Check if it’s listening | systemctl status ssh | systemctl status ssh.socket |
| Disable SSH entirely | systemctl disable --now ssh | systemctl disable --now ssh.socket ssh.service |
The shorthand systemctl enable --now ssh (no .service or .socket suffix) still works on both versions and does the right thing: enables and starts whatever activation method the package set up. That’s why the four-command Quick Path above is version-agnostic.
Quick check on your version:
lsb_release -dstells you which Ubuntu you’re on. Anything 24.04 or newer uses socket activation; anything 22.04 or older uses the classic service model.

Step-by-step setup (verbose path)
If you’ve not set up SSH on Ubuntu before, here’s the version with explanations.
1. Update package lists
sudo apt update
This pulls the latest package information from Ubuntu’s archive servers. Without it, you might install an outdated openssh-server that has known security fixes available.
2. Install OpenSSH server
sudo apt install openssh-server
The openssh-server package gives you the sshd daemon (which accepts incoming connections) and a default /etc/ssh/sshd_config configuration file. Most Ubuntu Server installs already have this; Ubuntu Desktop installs typically don’t.
The package install will also install openssh-client if it isn’t already present, which gives you the ssh, scp, and sftp commands for outbound connections.
3. Verify the service is running
sudo systemctl status ssh
What you want to see depends on your version:
On 22.04:
● ssh.service - OpenBSD Secure Shell server
     Loaded: loaded (/lib/systemd/system/ssh.service; enabled; vendor preset: enabled)
     Active: active (running) since [date]
On 24.04 and newer:
● ssh.socket - OpenBSD Secure Shell server socket
     Loaded: loaded (/lib/systemd/system/ssh.socket; enabled; preset: enabled)
     Active: active (listening) since [date]
Either output means SSH is reachable. If it says inactive or dead, run:
sudo systemctl enable --now ssh
This enables SSH to start at boot and starts it now, regardless of which activation method your version uses.
4. Configure the firewall
If you have ufw enabled (Ubuntu’s default firewall front-end), you need to explicitly allow SSH or all your inbound connections will be blocked.
sudo ufw allow ssh
sudo ufw enable
ufw allow ssh adds a rule for TCP port 22. ufw enable activates the firewall if it isn’t already on. If ufw was already enabled and you skipped the allow ssh step before turning it on, you’ll lock yourself out the moment your current session ends.
If you are remote (e.g. SSH’d in from another machine to set up SSH): the order matters. Run
ufw allow sshBEFOREufw enable. Otherwise the next command can drop your existing session.
Verify your rules:
sudo ufw status
You should see 22/tcp ALLOW Anywhere in the output.
5. Find your IP address
hostname -I
This prints all the machine’s IP addresses on one line, separated by spaces. The first is usually the LAN IP you want (e.g. 192.168.1.50). For cloud servers with public IPs, the public address will appear here too; you can also confirm with curl ifconfig.me.
6. Connect from another machine
From a Linux or macOS terminal:
ssh [email protected]
Replace username with your Ubuntu account username (run whoami on the Ubuntu server if you don’t know it) and the IP with what hostname -I reported.
The first time you connect, SSH asks you to verify the server’s host key:
The authenticity of host '192.168.1.50' can't be established.
ED25519 key fingerprint is SHA256:...
Are you sure you want to continue connecting (yes/no)?
Type yes. The fingerprint is saved to ~/.ssh/known_hosts on the client; on subsequent connections SSH verifies the server is the same one and warns you if the key has changed (which usually means you re-installed the OS or someone is doing something nefarious).
You’ll then be prompted for your Ubuntu user’s password. After that, you have a shell on the server.
Connect from each major OS
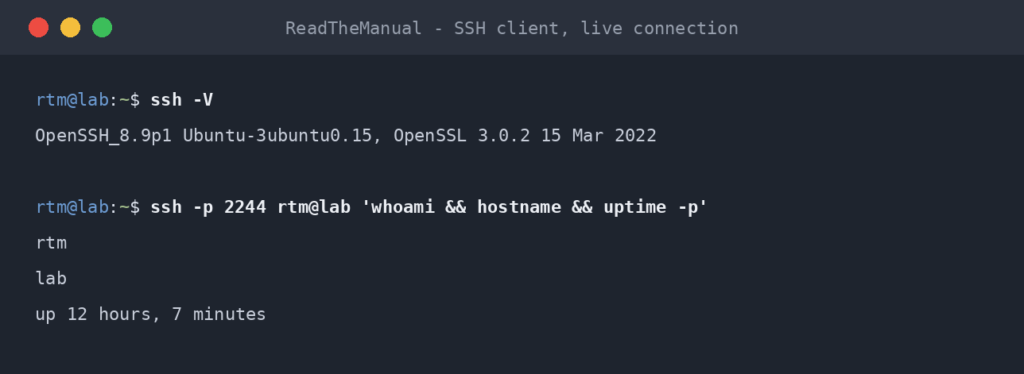
Linux / macOS
OpenSSH client is pre-installed on every modern Linux distribution and on macOS. Just use ssh username@host from a terminal.
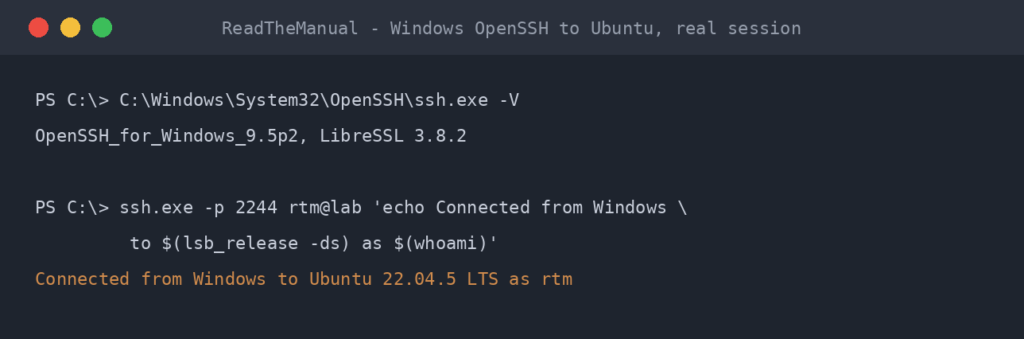
Windows 10 and 11
Windows 10 (build 1809 or newer) and Windows 11 ship with OpenSSH client pre-installed. From PowerShell or Command Prompt:
ssh [email protected]
If ssh: command not found, install OpenSSH Client via Settings -> Apps -> Optional features -> Add a feature -> OpenSSH Client.
Older Windows or environments without OpenSSH
PuTTY is the long-standing alternative. Download, run, enter the IP and port 22, click Open. Slightly different key format — if you generated keys for OpenSSH later, use puttygen to convert.
Phones / tablets
Termius, Blink Shell (iOS), JuiceSSH (Android). Useful for emergency reboots from the pub.
Five errors that account for almost every SSH problem
If your SSH setup isn’t working, one of these is almost certainly the cause.
“Connection refused”
The server is reachable on the network but nothing is listening on the port you’re hitting.
- Check the service is actually running:
sudo systemctl status sshon the server. - On 24.04+, check the socket specifically:
sudo systemctl status ssh.socket. - Verify SSH is listening on port 22:
sudo ss -tnlp | grep :22. - If you changed the port in
/etc/ssh/sshd_config, are you connecting to the new port? Usessh -p 2222 user@hostto specify a non-default port.
“Connection timed out”
The packet isn’t reaching the server. Almost always a firewall issue.
- Did you run
sudo ufw allow ssh? - Is there an upstream firewall between you and the server (router, cloud provider security group, ISP block on inbound 22)?
- For cloud VMs: check the cloud provider’s security group / network ACL allows port 22 from your IP.
“Permission denied (publickey)”
The server only accepts SSH key authentication and your key isn’t being offered or accepted.
- Default Ubuntu permits both password and key auth. If this error fires on a fresh install, check
/etc/ssh/sshd_configforPasswordAuthentication no— something disabled passwords. - On the client, ensure your key is in
~/.ssh/and named correctly (id_ed25519orid_rsa). - Run with
ssh -v user@hostto see exactly which keys are being tried.
The companion guide on SSH key authentication covers key generation, permissions, and the ~/.ssh/authorized_keys file in depth.
“Host key verification failed”
The server’s identity has changed since the last time you connected.
- Most innocent explanation: the server was rebuilt or reinstalled, so its host key changed.
- Less innocent: someone is doing a man-in-the-middle attack.
- To clear the old key for a known IP:
ssh-keygen -R 192.168.1.50then reconnect. - Verify the new host key fingerprint matches what the server actually has before accepting.
“Connection reset by peer”
The TCP connection was established and then immediately killed. Usually a server-side issue.
- Most common:
fail2banbanned your IP after too many failed login attempts. Wait the configured ban time, or unban yourself from another machine:sudo fail2ban-client unban 1.2.3.4. - Less common: a misconfigured
sshd_configcausessshdto crash on connect. Checkjournalctl -u ssh.service(orssh.socket@*.serviceon 24.04+) for clues.
What to do next
Enabling SSH is the first step. Run any internet-facing server with default config and you’ll be picking brute-force attempts out of the logs within hours.
The follow-on tasks, in order of priority:
- Switch to SSH key authentication — much harder to brute-force than passwords. Companion guide: SSH Key Authentication on Ubuntu.
- Disable password authentication once your keys are working — closes off the brute-force vector entirely. Covered in the SSH hardening guide.
- Add fail2ban — bans IPs that fail too many times in a row. Helpful even with key-only auth, mostly because it cleans up your logs.
- Change the SSH port — mild security-by-obscurity, mostly useful for noise reduction. Many sysadmins consider this theatre; we cover the case for and against in the hardening guide.
If you’re running this on a Raspberry Pi instead of standard Ubuntu Server, see the companion Enable SSH on Raspberry Pi guide — the mechanics differ enough to warrant their own post.
Frequently asked questions
Does this work on Ubuntu Server vs Desktop?
Yes, identical. The difference is that Ubuntu Server installs openssh-server by default in many cases; Ubuntu Desktop usually doesn’t, so the apt install openssh-server step is required either way unless you explicitly opted in during install.
Why is SSH on port 22 by default? Should I change it?
Port 22 was assigned to SSH by IANA when the protocol was standardised in the mid-1990s. Every SSH client tries port 22 unless you tell it otherwise.
Changing the port is a debated practice. The argument for: brute-force scanners hitting port 22 won’t see your service, so authentication logs stay clean. The argument against: anyone who actually wants in will scan all 65,535 ports anyway, so this is “security through obscurity.”
In practice, the noise reduction is genuinely useful. A non-standard port plus key-only auth plus fail2ban produces a server you basically never have to look at. If your only defence is “I’m on port 2222,” you have a problem.
Can I run SSH on multiple ports at once?
Yes. Edit /etc/ssh/sshd_config and add multiple Port lines:
Port 22
Port 2222
Then sudo systemctl restart ssh.service (note: .service, not .socket, when reloading config). Don’t forget to allow the new port in ufw.
Why do I see ssh.socket not ssh.service in 24.04?
Ubuntu 24.04 enables systemd socket activation for SSH by default. See “Why your tutorial probably didn’t work on Ubuntu 24.04” earlier in this guide for the full explanation.
I’m getting “permission denied” — what’s wrong?
If it says Permission denied (publickey), password auth is disabled and your key isn’t being accepted. See the companion SSH key authentication guide.
If it says Permission denied, please try again after you enter the password, you’re typing the wrong password OR the username doesn’t exist. Run whoami on the server itself to confirm the username; remember Ubuntu is case-sensitive.
Can I SSH from my phone?
Yes. Termius, Blink Shell (iOS), and JuiceSSH (Android) all work well. Generate a key on the phone, add the public key to ~/.ssh/authorized_keys on the server, and you have a portable terminal in your pocket. Useful when something needs rebooting and you’re not at a desk.
How do I disable SSH again?
# 22.04
sudo systemctl disable --now ssh.service

# 24.04+
sudo systemctl disable --now ssh.socket ssh.service
You may also want to remove the firewall rule: sudo ufw delete allow ssh.
Is SSH safe to expose to the internet?
With default settings: not really. With key-only authentication, fail2ban, and a non-default port, it’s been the standard way to administer Linux servers since the late 1990s and remains fine in 2026. The hardening guide covers exactly what to change.
Same Skill, Different Scale
Enabling SSH on an Ubuntu VM in your homelab is the exact same process as provisioning a cloud VM on Azure or AWS. The commands are identical. apt install openssh-server works the same whether the box is under your desk or in a data centre in Dublin. Cloud providers just hide the initial setup behind a web console checkbox, but the underlying mechanics are what you just did here.
If you can SSH into a Proxmox VM on your home network, you can SSH into an EC2 instance or an Azure VM. The protocol, the config files, the troubleshooting are all the same. Your homelab is not a toy version of production. It IS production, just at a smaller scale. Every hour you spend here transfers directly to the day job.
This is the canonical setup guide. Companion posts cover SSH Key Authentication, SSH Hardening, Fail2ban for SSH, SCP and SFTP, SSH Tunneling, Common SSH Errors, and SSH from Windows — linked from the relevant sections above as each ships.
If you found a gotcha not covered here, drop it in the comments — I update this post as new versions of Ubuntu and OpenSSH ship.
The Complete SSH Series
Getting connected
- Enable SSH on Ubuntu Server (you are here)
- Enable SSH on Raspberry Pi
- SSH Essentials: Remote Administration
- SSH from Windows to Ubuntu
Authentication and hardening
File transfer and tunnelling
Reference

ReadTheManual is run, written and curated by Eric Lonsdale.
Eric has over 20 years of professional experience in IT infrastructure, cloud architecture, and cybersecurity, but started with PCs long before that.
He built his first machine from parts bought off tables at the local college campus, hoping they worked. He learned on BBC Micros and Atari units in the early 90s, and has built almost every PC he’s used between 1995 and now.
From helpdesk to infrastructure architect, Eric has worked across enterprise datacentres, Azure environments, and security operations. He’s managed teams, trained engineers, and spent two decades solving the problems this site teaches you to solve.
ReadTheManual exists because Eric believes the best way to learn IT is to build things, break things, and actually read the manual. Every guide on this site runs on infrastructure he owns and maintains.
Enjoyed this guide?
New articles on Linux, homelab, cloud, and automation every 2 days. No spam, unsubscribe anytime.