If you came up through the Linux-and-macOS world, the assumption is “everyone has ssh in their terminal.” Windows changed that mid-2018: OpenSSH client became a built-in Windows feature, and you no longer need PuTTY for the basic case. But PuTTY’s still around because it has features Windows OpenSSH doesn’t, and WSL is a third option that bridges the two worlds.
This guide covers all three on Windows 10 / 11.
Tested on: Windows 11 (built-in OpenSSH client) and WSL 2 with Ubuntu. PuTTY steps follow its current documented interface. Windows 11 23H2, Windows 10 22H2, OpenSSH client included with Windows, PuTTY 0.81, WSL 2 with Ubuntu 24.04.

Method 1: Native Windows OpenSSH (the modern default)
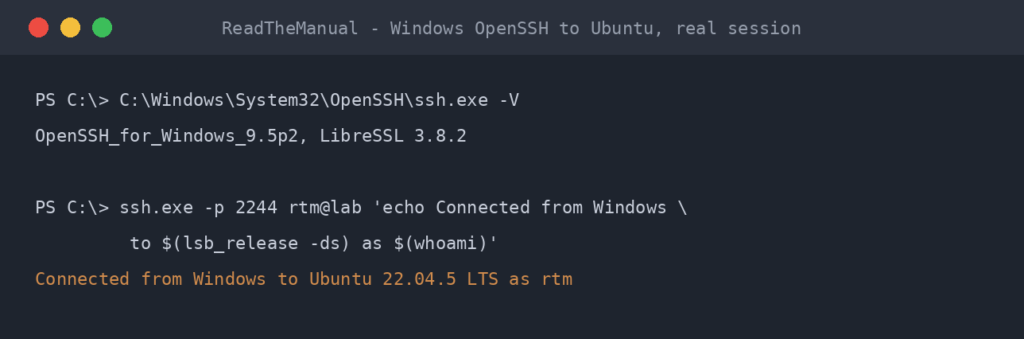
Windows 10 build 1809 (October 2018) and every Windows 11 build ship with OpenSSH client pre-installed. From PowerShell or Command Prompt:
ssh [email protected]
Same syntax as Linux/macOS. Works.
If ssh: command not found
Older Windows 10 builds may not have it pre-installed. Add it:
Settings -> Apps -> Optional features -> Add a feature -> OpenSSH Client
Or via PowerShell as admin:
Add-WindowsCapability -Online -Name OpenSSH.Client~~~~0.0.1.0
Generate SSH keys on Windows
ssh-keygen -t ed25519 -C "[email protected]"
By default, keys are saved in C:\Users\YOUR-USER\.ssh\ (the Windows equivalent of ~/.ssh). Same file names: id_ed25519 and id_ed25519.pub.
Copy the public key to your Ubuntu server. There’s no built-in ssh-copy-id on Windows, so the easiest method:
type $env:USERPROFILE\.ssh\id_ed25519.pub | ssh user@server "mkdir -p ~/.ssh && cat >> ~/.ssh/authorized_keys && chmod 600 ~/.ssh/authorized_keys"
Reads the public key, pipes it via SSH to the server, appends to authorized_keys, fixes permissions.
Use the Windows ssh-agent
Windows OpenSSH includes a Windows Service for ssh-agent. Enable it once:
# Run as Administrator
Set-Service -Name ssh-agent -StartupType Automatic
Start-Service ssh-agent
Add your key:
ssh-add $env:USERPROFILE\.ssh\id_ed25519
Now you can SSH without typing the passphrase each time. The agent persists across reboots once the service is set to Automatic.
Method 2: WSL (Windows Subsystem for Linux)
If you’re a developer regularly working with Linux toolchains, WSL gives you a real Ubuntu environment inside Windows. SSH from WSL is identical to SSH from a real Ubuntu machine — because it IS a real Ubuntu environment.
Install WSL
# Run as Administrator
wsl --install
Reboots, installs WSL 2 with Ubuntu by default. After reboot, set up your Ubuntu user when prompted.
From WSL Ubuntu:
ssh [email protected]
WSL key file location
WSL has its own ~/.ssh/ separate from Windows’ C:\Users\YOUR-USER\.ssh\. If you want to share keys between native Windows and WSL, symlink WSL’s directory to the Windows one:
# In WSL
rm -rf ~/.ssh
ln -s /mnt/c/Users/YOUR-WIN-USER/.ssh ~/.ssh
Now both environments use the same keys. Beware: the symlink changes Linux permissions to whatever Windows file permissions translate to (usually 0777), which OpenSSH refuses. You may need to copy keys explicitly instead.
Why use WSL over native OpenSSH?
- You already have WSL for development (Docker, Linux build tools, etc.).
- You want full Linux tooling around SSH (rsync, scripted multi-host orchestration with
ansible, etc.). - Specific tools that don’t have Windows ports.
For “I just want to SSH into a server,” native Windows OpenSSH is simpler.
Method 3: PuTTY (the classic)
PuTTY pre-dates Windows OpenSSH by 20 years and is still widely used, especially in older corporate environments. Useful when:
- You’re on a managed Windows machine without admin rights to install OpenSSH.
- You want PuTTY’s session manager (saved sessions with all settings).
- You need specific features like Pageant (PuTTY’s agent), remote terminal logging, or specific tunneling UI.
Install
https://www.putty.org/ — download the MSI installer. Includes PuTTY itself, PuTTYgen (key generator), Pageant (agent), pscp/psftp.
Connect
- Open PuTTY.
- Host Name:
[email protected] - Port: 22
- Connection type: SSH
- Click Open.
First time prompts for the host key fingerprint. Click “Accept” if you trust it. Then enter your password.
Save the session
After entering the host details:
- Session category (top of the left tree).
- Type a name in Saved Sessions field (e.g. “homelab”).
- Click Save.
Now double-clicking “homelab” connects with all those settings.
PuTTY key format vs OpenSSH key format
PuTTY uses .ppk files. OpenSSH uses no-extension files (id_ed25519).
If you generated an OpenSSH key and want to use it in PuTTY, convert with PuTTYgen:
- Open PuTTYgen.
- Conversions menu -> Import key.
- Browse to your OpenSSH private key.
- Enter passphrase if set.
- Click Save private key, save as
.ppk.
In PuTTY, attach the .ppk to a session: Connection -> SSH -> Auth -> Credentials -> Private key file.
Pageant (PuTTY’s agent)
If you don’t want to enter the key passphrase every connection:
- Open Pageant (it sits in the system tray).
- Right-click tray icon -> Add Key -> select your
.ppkfile. - Enter passphrase once.
- PuTTY now uses the agent automatically.
Set Pageant to start with Windows: drop a shortcut in shell:startup, with the .ppk path as a command-line argument so it auto-loads:
"C:\Program Files\PuTTY\pageant.exe" "C:\Users\you\.ssh\id_ed25519.ppk"
Which to use?
| You want… | Best tool |
|---|---|
| Quickest setup, modern Windows | Native OpenSSH (PowerShell ssh user@host) |
| Full Linux dev environment alongside SSH | WSL with Ubuntu |
| Saved-sessions GUI, locked-down corporate Windows | PuTTY |
| All three (because you alternate between contexts) | All three. They don’t conflict. |
For a normal homelab user on Windows 11, native OpenSSH is the right answer.
Common Windows-specific issues
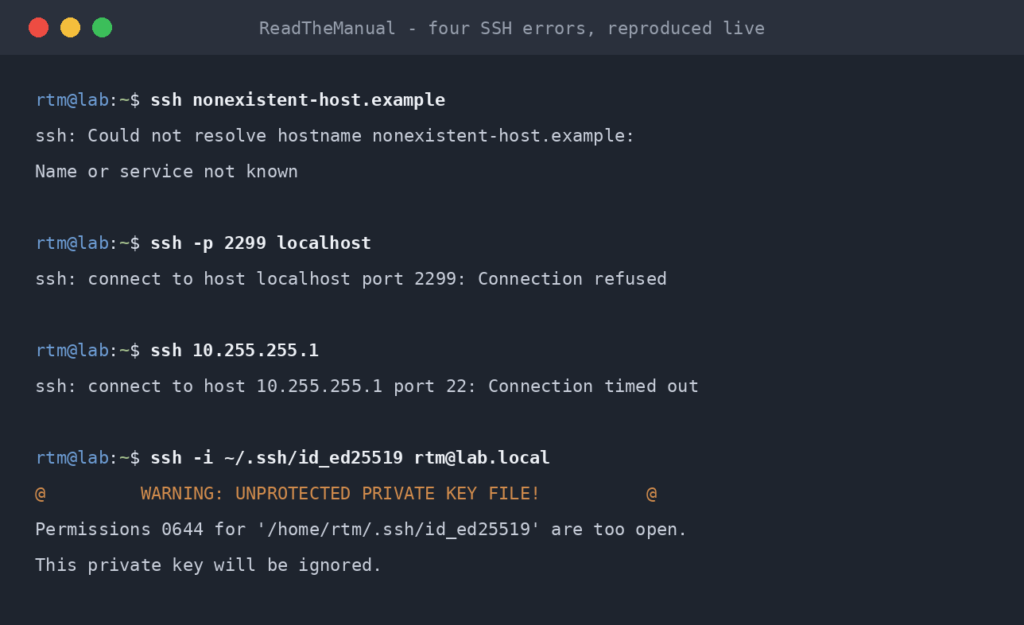
“ssh: Could not resolve hostname server.local”
Windows mDNS support (Bonjour) varies by version. Windows 10 1903+ has it built in, older versions need iTunes or Bonjour Print Services installed. If .local resolution fails, use the IP address directly.
Permissions warning on key files
Windows file permissions don’t map cleanly to Unix 0600. OpenSSH on Windows is more tolerant than Linux but you may still see warnings.
To explicitly set Windows ACLs equivalent to 0600:
icacls $env:USERPROFILE\.ssh\id_ed25519 /inheritance:r /grant:r "$env:USERNAME:(R,W)"
Removes inherited permissions and grants only your user read+write.
Line endings in SSH commands
If you copy SSH commands from web tutorials, sometimes you get Windows CRLF line endings instead of Unix LF. This rarely matters for the SSH client itself but can break shell scripts you copy from the web.
Fix in PowerShell:
(Get-Content file.sh -Raw) -replace "`r`n","`n" | Set-Content file.sh -NoNewline
WSL can’t connect to a service exposed on localhost
WSL 2 runs in its own network namespace. localhost from WSL doesn’t reach Windows-side services bound to 127.0.0.1. Use the host’s actual IP from WSL: cat /etc/resolv.conf shows the Windows host as nameserver.
For SSH’ing OUT of WSL to a remote server, this is irrelevant — works normally.
Building the Muscle Memory That Pays
WSL plus SSH is how most Windows-based IT professionals connect to Linux servers daily. Whether you are managing a homelab from your gaming PC or administering production Ubuntu VMs from a corporate Windows laptop, the workflow is the same. Open a terminal, type ssh user@host, get to work.
Your homelab is where you build that muscle memory without pressure. You learn which tool fits which situation (native OpenSSH for quick access, WSL for full Linux tooling, PuTTY when corporate policy demands it). That fluency across all three methods is what makes you effective on day one of any infrastructure role.
Companion guides: Enable SSH on Ubuntu Server, SSH Key Authentication on Ubuntu, SSH Hardening, SSH Tunneling.
The Complete SSH Series
Getting connected
- Enable SSH on Ubuntu Server
- Enable SSH on Raspberry Pi
- SSH Essentials: Remote Administration
- SSH from Windows to Ubuntu (you are here)
Authentication and hardening
File transfer and tunnelling
Reference

ReadTheManual is run, written and curated by Eric Lonsdale.
Eric has over 20 years of professional experience in IT infrastructure, cloud architecture, and cybersecurity, but started with PCs long before that.
He built his first machine from parts bought off tables at the local college campus, hoping they worked. He learned on BBC Micros and Atari units in the early 90s, and has built almost every PC he’s used between 1995 and now.
From helpdesk to infrastructure architect, Eric has worked across enterprise datacentres, Azure environments, and security operations. He’s managed teams, trained engineers, and spent two decades solving the problems this site teaches you to solve.
ReadTheManual exists because Eric believes the best way to learn IT is to build things, break things, and actually read the manual. Every guide on this site runs on infrastructure he owns and maintains.
Enjoyed this guide?
New articles on Linux, homelab, cloud, and automation every 2 days. No spam, unsubscribe anytime.