Nginx Proxy Manager on Raspberry Pi 5: Proper URLs and SSL for Your Homelab
You’ve got Docker running. Portainer’s giving you visibility. Pi-hole’s cleaning up your network. And you’re accessing everything by typing IP addresses and port numbers into a browser like it’s 2003.
http://192.168.1.100:8080 for Pi-hole. https://192.168.1.100:9443 for Portainer. Whatever port your next service uses. You’re maintaining a mental lookup table of numbers that changes every time you add something new. It doesn’t scale, it’s error-prone, and it’s not how production infrastructure works.
A reverse proxy fixes this. Instead of remembering ports, you type pihole.home.lab or portainer.home.lab and the proxy routes you to the right service. Add SSL certificates and you’ve eliminated browser security warnings too. Nginx Proxy Manager does all of this through a web interface that takes about ten minutes to set up.
More importantly, understanding reverse proxies is infrastructure 101. Every web application in every enterprise sits behind one. When something “isn’t accessible,” the first thing you troubleshoot is the proxy config. This project teaches you the concepts that underpin Kubernetes ingress controllers, AWS Application Load Balancers, Azure Application Gateway, and Cloudflare Workers — the exact technologies behind the highest-paid infrastructure roles in the industry.
Career Value: Reverse proxy configuration is a fundamental skill for every infrastructure role. Understanding host headers, upstream servers, SSL termination, and request routing maps directly to enterprise technologies: F5 load balancers, HAProxy, AWS ALB/NLB, Azure Application Gateway, Kubernetes Ingress/Gateway API, and CDN configurations. Infrastructure Engineers and SREs who understand traffic routing command £55-80k. Platform Engineers who can troubleshoot ingress issues in Kubernetes are among the most sought-after roles in the market at £65-90k+.
What a Reverse Proxy Actually Does
Before we install anything, let’s make sure the concept is clear, because understanding the “why” makes the configuration make sense.
Without a reverse proxy, each service on your Pi listens on its own port. Your browser connects directly to that port. The browser has to know the exact address and port number, and each service handles its own SSL (if it handles SSL at all).
A reverse proxy sits in front of all your services and listens on the standard web ports: 80 (HTTP) and 443 (HTTPS). When a request arrives, the proxy looks at the hostname in the request (the bit you typed in the address bar) and forwards it to the correct backend service. The client never communicates directly with the service — it only talks to the proxy.
The request flow:
- You type
https://pihole.home.labin your browser - DNS resolves
pihole.home.labto your Pi’s IP address - Your browser connects to port 443 on the Pi
- Nginx Proxy Manager receives the request, reads the hostname
- NPM looks up which backend service handles
pihole.home.lab - NPM forwards the request to
localhost:8080(Pi-hole’s actual port) - Pi-hole responds to NPM, NPM responds to your browser
This is the same pattern used everywhere in production. When you visit any website, you’re not connecting to the application server directly. You’re hitting a proxy, a load balancer, or a CDN edge node that forwards your request to the right place. Understanding this flow is one of those things that makes network diagrams suddenly make sense.
Prerequisites
This guide builds on the earlier projects in the series:
- Project 1: Docker — Docker and Docker Compose installed
- Project 3: Pi-hole — optional, but referenced for the port conflict discussion
- At least one service running on your Pi that you want to proxy (Portainer, Pi-hole, anything)
For SSL certificates with Let’s Encrypt, you’ll also need a domain name pointed at your Pi. For local-only setups without a public domain, we’ll cover self-signed certificates and internal DNS as well.
The Port 80 Conflict
If you followed the Pi-hole guide and mapped its web interface to port 8080, you’re already in good shape. If you mapped Pi-hole to port 80, you have a conflict — Nginx Proxy Manager needs port 80 (and 443) for itself.
This is one of the most common issues people hit when adding a reverse proxy to an existing setup. Two services cannot bind to the same port on the same IP. You have a few options:
Option 1: Change Pi-hole’s port (recommended)
If Pi-hole is currently on port 80, update its docker-compose.yml to map to a different host port:
# In Pi-hole's docker-compose.yml, change:
    ports:
      - "80:80/tcp"      # Old - conflicts with NPM

# To:
    ports:
      - "8080:80/tcp"    # New - frees port 80 for NPM
Then restart Pi-hole:
cd ~/services/pihole
docker compose up -d
Option 2: Use a different IP
If your Pi has multiple network interfaces or you’re comfortable adding a virtual IP, you can bind NPM and Pi-hole to different IPs on the same ports. This is more complex and usually overkill for a homelab.
Option 3: Put Pi-hole’s web interface behind NPM
This is the cleanest long-term solution: Pi-hole listens on an internal port (not exposed to the host network), and NPM proxies requests to it. We’ll set this up once NPM is running.
Plan your ports early. Every service you add needs a unique host port if you’re exposing it directly. I keep a simple text file listing which ports are in use on each host. In enterprise environments, this is called a port allocation document and it saves hours of troubleshooting. Start the habit now.
Installing Nginx Proxy Manager
Step 1: Create the project directory
mkdir -p ~/services/nginx-proxy-manager
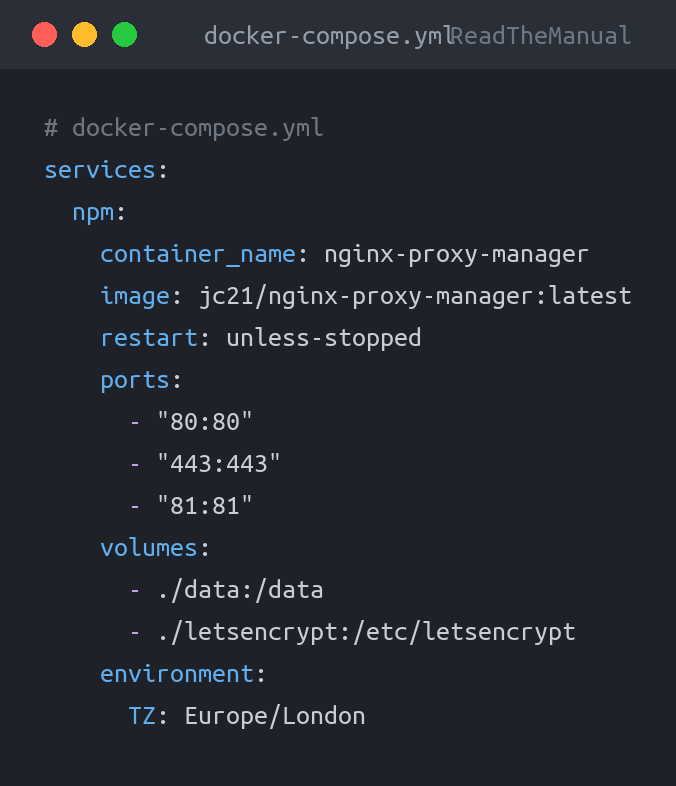
cd ~/services/nginx-proxy-managerStep 2: Create the Docker Compose file
# docker-compose.yml
services:
  npm:
    container_name: nginx-proxy-manager
    image: jc21/nginx-proxy-manager:latest
    restart: unless-stopped
    ports:
      - "80:80"
      - "443:443"
      - "81:81"
    volumes:
      - ./data:/data
      - ./letsencrypt:/etc/letsencrypt
    environment:
      TZ: Europe/London
Step 3: Start it
docker compose up -dStep 4: Check it’s running
docker compose ps

# You should see the container running with ports 80, 81, and 443 mapped
That’s it for the installation. Three ports are now in use:
- Port 80: HTTP traffic (will redirect to HTTPS once SSL is configured)
- Port 443: HTTPS traffic (where proxied services will be served)
- Port 81: NPM’s own admin interface
First Login and Initial Setup
Open a browser and go to http://YOUR-PI-IP:81.
The default credentials are:
- Email:
[email protected] - Password:
changeme
Change these immediately. NPM will prompt you to set new credentials on first login. Do it. If you skip this and your Pi is accessible on your network, anyone on your LAN can access the admin panel with the default credentials and reroute your traffic wherever they like. This is a reverse proxy — it controls where web requests go. Treat it as critical infrastructure.
After logging in, you’ll see a clean dashboard with sections for Proxy Hosts, Redirection Hosts, Streams, and 404 Hosts. We’re interested in Proxy Hosts — that’s where the magic happens.
Setting Up Internal DNS
Before adding proxy hosts, you need DNS entries that point your chosen hostnames at your Pi. Without this, typing pihole.home.lab in your browser goes nowhere because nothing knows that name resolves to your Pi’s IP.
Option A: Use Pi-hole for local DNS (recommended)
Since you’re already running Pi-hole, you can add local DNS records through its admin interface:
- Go to your Pi-hole admin panel
- Navigate to Local DNS > DNS Records
- Add entries for each service you want to proxy:
pihole.home.lab       → 192.168.1.100
portainer.home.lab    → 192.168.1.100
npm.home.lab          → 192.168.1.100
All entries point to the same IP (your Pi), because NPM uses the hostname in the request to decide where to route it, not the IP address.
Option B: Edit your hosts file (quick and dirty)
On each device you want to use the nice URLs from, edit the hosts file:
# Linux/Mac: /etc/hosts
# Windows: C:\Windows\System32\drivers\etc\hosts

192.168.1.100    pihole.home.lab
192.168.1.100    portainer.home.lab
192.168.1.100    npm.home.lab
Option A is better because it works for every device on your network automatically. Option B only works on devices where you’ve edited the hosts file.
Option C: You have a real domain
If you own a domain (say mylab.example.com), you can create DNS records pointing subdomains at your Pi’s local IP. This is the setup you’d use for Let’s Encrypt SSL certificates, which we’ll cover shortly.
The .home.lab convention: You can use any domain you like for internal services, but avoid using real TLDs (.com, .net) that might conflict with actual internet domains. Common homelab conventions include .home.lab, .local (though this can conflict with mDNS), and .internal. Pick one and stick with it. Consistency matters more than the specific choice.
Adding Your First Proxy Host
Let’s proxy Pi-hole’s admin interface as our first example. This turns http://192.168.1.100:8080/admin into http://pihole.home.lab.
- In NPM’s dashboard, click Proxy Hosts
- Click Add Proxy Host
- Fill in the details:
Domain Names:        pihole.home.lab
Scheme:              http
Forward Hostname/IP: 192.168.1.100
Forward Port:        8080
Cache Assets:        Off (for now)
Block Common Exploits: On
Websockets Support:  Off (Pi-hole doesn't need this)
Click Save. That’s it.
Now open a browser and go to http://pihole.home.lab (assuming you’ve set up the DNS entry). You should see the Pi-hole admin interface — served through the reverse proxy, on the standard HTTP port, with no port number in the URL.
What just happened under the hood:
- Your browser resolved
pihole.home.labto your Pi’s IP via Pi-hole’s local DNS - The browser connected to port 80 (the default HTTP port)
- NPM received the request, saw the
Host: pihole.home.labheader - NPM matched that header to your proxy host configuration
- NPM forwarded the request to
http://192.168.1.100:8080 - Pi-hole responded, NPM passed the response back to your browser
This is the Host header mechanism, and it’s how a single IP address can serve dozens or hundreds of different websites. Every web server and proxy since the late 1990s uses this. When you understand Host headers, you understand how shared hosting works, how CDNs route traffic, and why “just point the DNS at the server” isn’t the whole story.
Adding More Services
Repeat the process for each service. Here are the common ones from this series:
Portainer:
  Domain:    portainer.home.lab
  Scheme:    https          (Portainer uses HTTPS internally)
  Forward:   192.168.1.100:9443
  Websockets: On            (Portainer's console feature needs this)

Uptime Kuma (if installed):
  Domain:    status.home.lab
  Scheme:    http
  Forward:   192.168.1.100:3001
  Websockets: On            (real-time status updates)

n8n (if installed):
  Domain:    n8n.home.lab
  Scheme:    http
  Forward:   192.168.1.100:5678
  Websockets: On            (workflow editor)

NPM itself:
  Domain:    npm.home.lab
  Scheme:    http
  Forward:   192.168.1.100:81
  Websockets: Off
Portainer’s HTTPS scheme matters. Portainer serves its web interface over HTTPS (port 9443) by default. If you set the scheme to http in NPM, the proxy will try to connect to Portainer using HTTP, and Portainer will reject the connection or redirect, causing an infinite loop. Always match the scheme to what the backend service actually uses. This is one of the most common proxy configuration mistakes, and in enterprise environments, getting this wrong can take down an entire application.
When to enable Websockets: If the service has real-time updates (dashboards that refresh without page reload, terminal/console access, live logs, chat interfaces), it likely uses Websockets. Enable Websocket support for those services. If in doubt, enable it — it doesn’t hurt services that don’t use it, but missing it breaks services that do. You’ll know Websockets are the problem when a service loads but then “hangs” on real-time features or shows connection errors in the browser console.
SSL Certificates
Right now, everything is running over HTTP — unencrypted. For a local-only homelab, this is tolerable. But if you ever want to access services remotely, or if you just want to stop seeing browser security warnings, you need SSL.
Option 1: Let’s Encrypt (if you have a domain)
If you own a domain and can create DNS records for it, Let’s Encrypt provides free, automatically-renewing SSL certificates. This is the production-standard approach.
- Point a wildcard DNS record at your Pi:
*.lab.yourdomain.com → 192.168.1.100 - In NPM, go to SSL Certificates > Add SSL Certificate
- Choose Let’s Encrypt
- Enter your domain (e.g.,
*.lab.yourdomain.com) - Select DNS Challenge (required for internal/non-publicly-accessible servers)
- Choose your DNS provider and enter the API credentials
- Click Save
DNS Challenge is the key. The standard HTTP challenge requires your Pi to be reachable from the internet on port 80, which defeats the purpose of a local-only homelab. The DNS challenge verifies ownership by creating a TXT record in your domain’s DNS, which works regardless of whether your Pi is publicly accessible. Most domain registrars and DNS providers (Cloudflare, Route53, DigitalOcean) support this. Cloudflare is particularly easy — create a free account, move your domain’s nameservers to Cloudflare, and use the API token in NPM.
Once the certificate is issued, edit each proxy host and select it under the SSL tab. Enable Force SSL to redirect HTTP to HTTPS automatically.
Option 2: Self-Signed Certificates (local only, no domain)
If you don’t have a domain, you can generate self-signed certificates. Your browser will show a security warning (because the certificate isn’t signed by a trusted authority), but the connection will be encrypted.
Generate a self-signed certificate:
# Create a directory for certs
mkdir -p ~/services/nginx-proxy-manager/custom-certs

# Generate a self-signed wildcard cert for *.home.lab
openssl req -x509 -nodes -days 365 \
  -newkey rsa:2048 \
  -keyout ~/services/nginx-proxy-manager/custom-certs/home-lab.key \
  -out ~/services/nginx-proxy-manager/custom-certs/home-lab.crt \
  -subj "/CN=*.home.lab" \
  -addext "subjectAltName=DNS:*.home.lab,DNS:home.lab"
Upload this certificate in NPM under SSL Certificates > Add SSL Certificate > Custom. Then assign it to your proxy hosts.
To eliminate the browser warnings on your own devices, you can add the self-signed certificate to your operating system’s trusted certificate store. On Linux, copy the .crt file to /usr/local/share/ca-certificates/ and run sudo update-ca-certificates. On Windows, import it into the Trusted Root Certification Authorities store. On macOS, add it to Keychain Access.
Understanding SSL Termination
This is a concept worth understanding properly because it comes up constantly in enterprise environments.
When NPM handles SSL, the encrypted connection exists only between your browser and NPM. NPM then communicates with the backend service (Pi-hole, Portainer, etc.) over plain HTTP on the internal network. This is called SSL termination at the proxy — the proxy “terminates” (decrypts) the SSL connection.
In enterprise environments, this is standard practice. The proxy or load balancer handles SSL, and the backend servers run unencrypted on a trusted internal network. This simplifies certificate management (one place to manage certs, not dozens of backend servers) and reduces CPU overhead on application servers.
There are cases where end-to-end encryption is required (regulatory compliance, zero-trust environments), and NPM supports this too by proxying to HTTPS backends. But for a homelab, SSL termination at the proxy is the right approach.
Common Problems and How to Fix Them
Problem: 502 Bad Gateway
This is the error you’ll see most often, and it always means the same thing: NPM received your request but couldn’t connect to the backend service.
Check these in order:
- Is the backend service running?
docker psto check. - Is the port correct? Double-check the forward port in NPM matches the port the service is actually listening on.
- Is the scheme correct? If the service uses HTTPS internally (like Portainer on 9443), the scheme in NPM must be
https, nothttp. - Is the hostname/IP correct? If NPM and the service are on the same Docker host, use the host’s IP address, not
localhostor127.0.0.1(those refer to NPM’s own container, not the host).
The localhost trap: Inside a Docker container, localhost refers to the container itself, not the host machine. If you put localhost:8080 as the forward destination, NPM will try to connect to port 8080 inside its own container, which is nothing. Use your Pi’s actual IP address (e.g., 192.168.1.100) or the Docker host gateway IP (172.17.0.1 on most default Docker installations). This catches people out constantly, even experienced engineers. It’s the same concept that causes confusion with Docker networking in enterprise environments.
Problem: Proxy Timeouts
Symptoms: The proxy connects but the page loads slowly or times out after 60 seconds.
Some services take longer to respond, especially during initial load. You can increase timeout values in NPM by editing the proxy host’s Advanced tab:
# Add to the Advanced tab of the proxy host:
proxy_read_timeout 300;
proxy_connect_timeout 300;
proxy_send_timeout 300;
Problem: Websocket Connections Failing
Symptoms: A service loads but real-time features don’t work. Dashboards don’t update. Terminal access shows “connecting…” forever. The browser console shows Websocket connection errors.
Enable Websockets Support on the proxy host. If that doesn’t fix it, add custom Nginx config in the Advanced tab:
# Add to the Advanced tab:
proxy_set_header Upgrade $http_upgrade;
proxy_set_header Connection "upgrade";
Problem: Redirect Loops
Symptoms: Browser shows “too many redirects” or “ERR_TOO_MANY_REDIRECTS”.
This almost always means there’s a mismatch between what NPM is sending and what the backend expects. Common causes:
- NPM is sending HTTP to a backend that redirects to HTTPS, but NPM then sends HTTP again, creating an infinite loop. Fix: change the scheme to
httpsin NPM. - The backend application is configured with a base URL that includes a protocol (e.g.,
https://pihole.home.lab) but NPM is sendinghttp. Fix: match the scheme, or configure the application to trust the proxy headers. - Force SSL is enabled in NPM, but the backend is also trying to force SSL. Fix: let NPM handle SSL termination and configure the backend for plain HTTP.
Problem: Large File Uploads Failing
Symptoms: Uploading files to services like Nextcloud fails for files above a certain size (usually 1MB).
Nginx has a default maximum request body size. Increase it in the proxy host’s Advanced tab:
# Add to the Advanced tab:
client_max_body_size 1024m;
Adjust the value based on what you need. For Nextcloud, set this to match or exceed the upload limit you’ve configured in Nextcloud itself.
Understanding What You’ve Built
Step back for a moment and consider what you now have:
- A single entry point for all your services (ports 80 and 443)
- Name-based routing using Host headers — the same mechanism behind every web hosting platform
- SSL termination — encryption handled in one place, not per-service
- Centralised access control — NPM supports access lists and HTTP basic auth if you need to restrict access to certain services
This is a real infrastructure pattern. Stripped of the enterprise branding, an AWS Application Load Balancer does exactly this: receives traffic on ports 80/443, inspects the Host header, routes to the correct target group, and terminates SSL. Azure Application Gateway, Kubernetes Ingress controllers, Cloudflare Workers — they’re all variations on this same pattern. You’ve just built the concept from scratch on a £80 Raspberry Pi 5.
Securing NPM Itself
Your reverse proxy is now the front door to every service on your Pi. It deserves proper security attention.
Change the default credentials: Already done if you followed the setup. But verify — default credentials on infrastructure components are how breaches happen in real organisations.
Consider restricting access to port 81: The admin panel doesn’t need to be accessible from every device on your network. You can limit access using NPM’s built-in access lists, or by adding a firewall rule on the Pi:
# Only allow access to NPM admin from your management IP
sudo ufw allow from 192.168.1.50 to any port 81
sudo ufw deny 81
Keep it updated: Like Pi-hole, NPM updates are straightforward with Docker:
cd ~/services/nginx-proxy-manager
docker compose pull
docker compose up -d
Your proxy host configurations are stored in the mounted ./data volume and survive container updates.
NPM vs Raw Nginx vs Traefik: The Decision
You’ll see debates online about whether to use NPM, raw Nginx configs, Traefik, or Caddy. Here’s the honest take:
Nginx Proxy Manager is the right choice for this project because it has a web UI that makes the concepts visible. You can see the proxy hosts, the SSL certificates, the access lists. When you’re learning how reverse proxies work, being able to see and click through the configuration accelerates understanding.
Raw Nginx is what I use in production. No web UI — just config files, version-controlled in Git, deployed via Ansible. It’s more powerful, more flexible, and entirely inappropriate for someone who’s still learning what a Host header is. You’ll graduate to raw Nginx configs when NPM’s web interface starts feeling like a bottleneck rather than a help. That’s the right time to switch, not before.
Traefik integrates natively with Docker and automatically discovers services via container labels. It’s clever and powerful, but it hides the routing mechanics. You configure a label on a container and traffic magically works. For learning, I prefer NPM where you explicitly configure each route and understand every step.
Caddy has the simplest configuration syntax and handles SSL automatically. Excellent for production, less educational for understanding what’s actually happening.
Start with NPM. Understand the concepts. Then choose the tool that fits your workflow. The concepts transfer perfectly between all of them.
The Enterprise Connection
Reverse proxy skills translate to some of the most in-demand infrastructure roles:
| NPM Concept | Enterprise Equivalent | Where You’ll Use It |
|---|---|---|
| Proxy host configuration | Virtual server / listener rules | F5, HAProxy, AWS ALB, Azure App Gateway |
| Host header routing | Host-based routing rules | Kubernetes Ingress, Cloudflare Workers, CDN configs |
| SSL termination | TLS offloading | Every load balancer and WAF in existence |
| Let’s Encrypt automation | Certificate lifecycle management | cert-manager in K8s, ACM in AWS, Key Vault in Azure |
| Upstream server config | Backend pools / target groups | AWS target groups, Azure backend pools, K8s Services |
| Websocket proxying | Protocol upgrade handling | Real-time applications, SignalR, Socket.IO |
| Port conflict resolution | Service binding and port allocation | Every multi-service deployment ever |
In interviews, you’ll be able to explain the full request flow from DNS lookup to SSL handshake to proxy routing to backend response. That’s not something most candidates can articulate, and it’s exactly the understanding that senior infrastructure roles require.
When a Kubernetes ingress controller isn’t routing traffic correctly, the debugging process is identical to what you’d do with NPM: check the hostname mapping, verify the backend is reachable, confirm the port and protocol, check for certificate issues. The tools have different names. The concepts are the same.
What’s Next
You now have the infrastructure layer that every subsequent project will use. New services get a Docker Compose file, a proxy host entry in NPM, a DNS record in Pi-hole, and they’re accessible at a clean URL with SSL. That’s a deployment workflow that mirrors real-world infrastructure operations.
From here, the series branches based on your interests:
- Project 5: Home Assistant — event-driven automation that teaches enterprise integration patterns
- Project 6: Ollama — local AI model serving on your own hardware
- Project 7: Uptime Kuma — monitoring for everything you’ve built (recommended before adding more services)
- Project 8: K3s Kubernetes — container orchestration at the next level
If you haven’t set up version control yet, seriously consider jumping to Project 10: Gitea soon. You’ve now got four services configured with Docker Compose files, environment variables, and proxy rules. That’s real configuration that you don’t want to lose to a power cut or a corrupted SD card.

A reverse proxy is one of those infrastructure components that seems optional until you understand it, then seems essential forever. Once you’ve experienced clean URLs with SSL for every service, you’ll never go back to bookmarking port numbers. And when you see the same pattern in Kubernetes, AWS, or Azure, you’ll already know exactly what’s happening underneath the abstraction.

ReadTheManual is run, written and curated by Eric Lonsdale.
Eric has over 20 years of professional experience in IT infrastructure, cloud architecture, and cybersecurity, but started with PCs long before that.
He built his first machine from parts bought off tables at the local college campus, hoping they worked. He learned on BBC Micros and Atari units in the early 90s, and has built almost every PC he’s used between 1995 and now.
From helpdesk to infrastructure architect, Eric has worked across enterprise datacentres, Azure environments, and security operations. He’s managed teams, trained engineers, and spent two decades solving the problems this site teaches you to solve.
ReadTheManual exists because Eric believes the best way to learn IT is to build things, break things, and actually read the manual. Every guide on this site runs on infrastructure he owns and maintains.
Enjoyed this guide?
New articles on Linux, homelab, cloud, and automation every 2 days. No spam, unsubscribe anytime.