If you’re opening ports without protection, you’re doing it wrong. Let’s lock it down — the smart way.
How to Secure a Homelab Network (Short Answer)
Securing a homelab comes down to seven steps: stop port forwarding entirely (use an overlay VPN like Tailscale or WireGuard), run a default-deny firewall, treat containers as untrusted, harden the host OS with key-only SSH, keep 3-2-1 backups, monitor everything, and plan for failure. The interactive checklist at the end of this guide tracks all seven.
Overview
So you’ve got a Raspberry Pi, a home server, maybe even a Proxmox cluster. You’re self-hosting apps, building your skills, and running containers like a pro. But here’s the thing no one tells you:
Your homelab is a tiny data centre — and it needs real-world security.
This guide walks you through modern, practical security for your homelab in 2026. We’ll keep it beginner-friendly, but this isn’t just fluff — you’ll learn habits that translate directly to enterprise DevOps and cybersecurity jobs.
🧠 What We’ll Cover
- Why security matters (even for “just a Pi”)
- Firewalls and network segmentation
- Safe remote access (no open ports)
- Container and OS hardening
- Backups, monitoring, and what to do if things go wrong
Let’s get started.

🔥 Step 1: Stop Port Forwarding. Forever.
Opening port 80 or 22 on your router? That’s an open door to your house.
Hackers constantly scan the internet for exposed ports. Instead, use Zero Trust methods:
✅ Use These Instead:
- Cloudflare Tunnel – Secure, encrypted reverse proxy to access apps
- Twingate – Enterprise-grade, Zero Trust network access
- Tailscale – Easy-to-deploy mesh VPN, uses WireGuard
We’ll publish full setup guides for each — but for now, pick one and start learning it.
🧱 Step 2: Use a Firewall (or VLANs if You’re Fancy)
Even if you’re just running everything on one Pi, segment your network.
Bare Minimum:
- Log into your router and block inbound ports by default
- Put your homelab devices on a separate IP range or guest network
Better:
- Use a Unifi, OPNSense, or pfSense firewall
- Create VLANs to isolate lab gear, smart devices, and personal machines
Why? If something gets breached, you don’t want your whole home compromised.
🐳 Step 3: Don’t Trust Your Containers
Yes, containers are isolated — but not bulletproof.
Best Practices:
- Use official or trusted images (check Docker Hub stars and reviews)
- Keep your images up to date:
docker pull image-name && docker restart container-name - Never run containers with
--privilegedunless you know what you’re doing - Use
read-onlyvolumes where possible
🔒 Step 4: Harden the Host OS
Your Pi or server is the base. Secure it like you would any production box.
Key Steps:
- Change default passwords (obviously)
- Enable SSH key auth and disable password login
In/etc/ssh/sshd_config:PasswordAuthentication no - Keep the OS updated
sudo apt update && sudo apt upgrade -y - Install a firewall
sudo apt install ufw sudo ufw allow OpenSSH sudo ufw enable
Want to go further? Set up Fail2Ban to block brute-force attempts.
💾 Step 5: Backups — Because Stuff Breaks
If it’s not backed up, it doesn’t exist.
Use:
- Restic, Duplicati, or BorgBackup
- Mount backup volumes with read-only access
- Sync to cloud with encryption (rclone + Backblaze, Wasabi, or even Google Drive)
We’ll publish a full “back up your containers” walkthrough soon.
📡 Step 6: Monitor Everything
Know when your stuff goes down or starts behaving weirdly.
Tools to Start With:
- Uptime Kuma – Self-hosted uptime monitor
- Netdata – Real-time metrics for CPU, RAM, containers
- Grafana – Beautiful dashboards with alerts
Security starts with visibility.
☠️ Step 7: Plan for Failure
Ask yourself:
- If my NAS died right now, what would I lose?
- Can I rebuild from backup in 15 minutes?
- Would I even know if I got hacked?
Document your setup. Use Git. Snapshot configs. Keep a “disaster recovery” markdown file.
This isn’t paranoia — it’s preparation. And it’ll make you better than 90% of homelabbers out there.
✅ Quick Checklist
| Task | Status |
|---|---|
| [ ] Stop port forwarding | |
| [ ] Set up Zero Trust access (Cloudflare/Twingate/Tailscale) | |
| [ ] Harden SSH and OS | |
| [ ] Use trusted containers | |
| [ ] Install a firewall | |
| [ ] Set up backups | |
| [ ] Start monitoring with Uptime Kuma or Grafana |

🧠 Why This Matters
This isn’t just about protecting your Pi. It’s about building habits and skills that transfer into:
- Cybersecurity roles
- DevOps pipelines
- Cloud architecture
- IT resilience
Your homelab is a sandbox for your future career. Start treating it like one.
From the homelab: How I Approach Security
Security is not something you bolt on after building your homelab. I harden every host I deploy — same principles I apply to enterprise Azure infrastructure by day, scaled for home use. The tools are different, the budgets are different, but the thinking is identical. If you get the fundamentals right at home, you are already ahead of most people doing it professionally.
The Threat Model — What You Are Actually Defending Against
Your homelab is not a nation-state target. Nobody is going to burn a zero-day exploit to get into your Jellyfin server. But your homelab IS on the internet if you expose any services, and that means you face real threats:
- Automated bot scanning. Every public IP gets scanned constantly. Bots check for open ports, default credentials, known CVEs, and exposed admin panels. This is not targeted — it is industrial-scale fishing. If port 22 is open with password auth, you will see brute-force attempts within hours of going live.
- Credential stuffing. If you reuse passwords (and many people do), attackers will try leaked credentials against any login page they can find. Your Nextcloud, your Grafana, your router admin page — all targets.
- Exposed dashboards. Accidentally exposing a management interface to the internet is more common than people admit. Portainer, Proxmox, router admin pages — if it has no authentication or uses default credentials, it will be found.
- Supply chain and image trust. Pulling random Docker images from Docker Hub without checking who published them is the container equivalent of running software from an unknown email attachment.
The good news: defending against all of this is straightforward. You do not need expensive tools or deep security expertise. You need good habits applied consistently.
The Basics That Matter Most
If you do nothing else, do these four things. They eliminate the vast majority of the attack surface that automated tools look for.
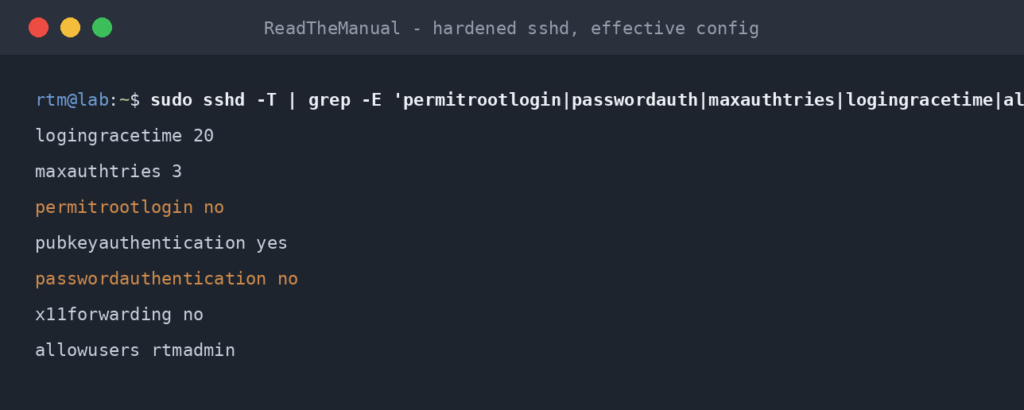
1. SSH key-only authentication. Disable password login for SSH entirely. Generate an SSH key pair, copy the public key to your server, and set PasswordAuthentication no in /etc/ssh/sshd_config. This is the single most impactful security change you can make. It makes brute-force SSH attacks impossible — there is no password to guess.
2. Firewall defaults to deny. Your firewall should block everything inbound by default and only allow traffic you have explicitly permitted. On Ubuntu, ufw does this in two commands. On your router, check that no ports are forwarded unless you have deliberately set them up. The principle is simple: if you did not open it on purpose, it should not be open.
3. Keep things updated. Unpatched software is how most compromises happen. Set up unattended upgrades for security patches (sudo apt install unattended-upgrades) or at minimum run sudo apt update && sudo apt upgrade weekly. For Docker containers, use Watchtower or a manual pull schedule to keep images current.
4. Do not expose admin panels to the internet. Proxmox, Portainer, router management, database admin tools — none of these should be accessible from outside your network. Use a VPN or ZTNA solution (Twingate, WireGuard, Tailscale) to access them remotely. If you need to expose a web service, put it behind a reverse proxy with proper authentication.
Network Segmentation
Network segmentation means separating different types of devices so that a compromise in one area does not give access to everything else. In enterprise environments this is done with VLANs, firewalls, and access control lists. At home, you can achieve meaningful segmentation without enterprise hardware.
If your switch supports VLANs:
- Put your homelab devices on their own VLAN, separate from your household devices.
- Put IoT devices (smart speakers, cameras, smart plugs) on a third VLAN with no access to your homelab or personal devices. IoT firmware is notoriously poorly maintained and full of vulnerabilities.
- Management interfaces (Proxmox web UI, switch management, router admin) should be on a management VLAN that only your admin workstation can reach.
If your switch does not support VLANs:
- Use your router’s guest network for IoT devices. Most consumer routers isolate guest networks from the main network by default.
- Use host-based firewalls (ufw on each server) to restrict which IP addresses can reach management ports.
- At minimum, ensure your homelab servers are not on the same subnet as devices you do not control.
The goal is not perfection — it is reducing blast radius. If a smart bulb gets compromised, it should not be able to reach your Nextcloud instance.
Monitoring for Security
You cannot secure what you cannot see. Monitoring is not optional — it is the feedback loop that tells you whether your security controls are working.
- Uptime Kuma for availability monitoring. If a service goes down unexpectedly, you want to know immediately, not three days later when you try to use it. Uptime Kuma runs in a single Docker container and supports alerts via email, Telegram, Discord, and more.
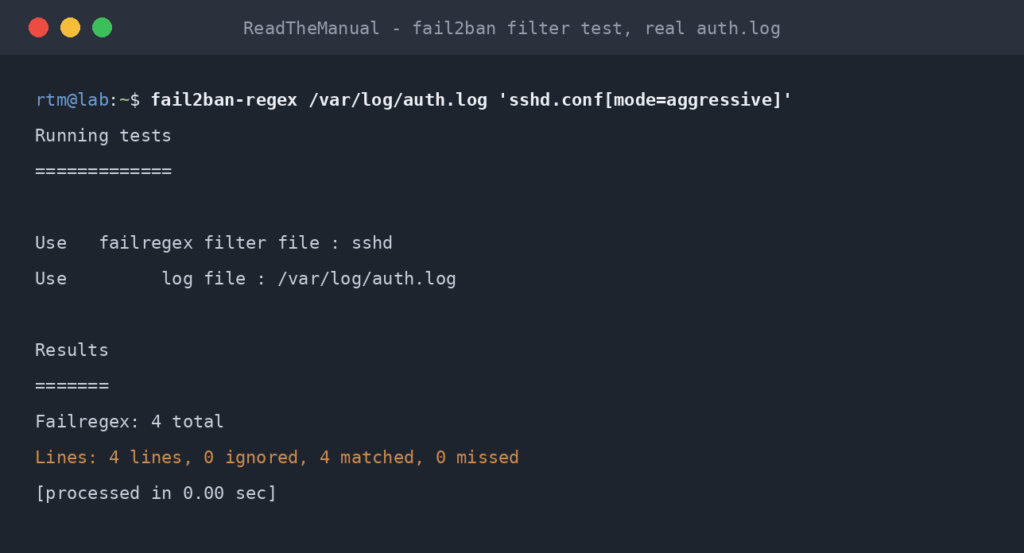
- Fail2ban for brute-force protection. It watches log files for repeated failed login attempts and automatically bans the offending IP address. Install it on every host that accepts SSH or runs a web-facing service. The default SSH jail catches the vast majority of automated attacks.
- Log review. You do not need a full SIEM stack at home (though you can run one). At minimum, periodically check
/var/log/auth.logfor failed SSH attempts, your reverse proxy logs for unusual requests, and your Docker logs for errors. Grafana with Loki makes this much easier if you want a dashboard. - Alerting. Monitoring without alerting is just logging. Set up notifications for critical events: service down, disk nearly full, too many failed logins. Uptime Kuma and Grafana both support this natively.
The pattern is the same as enterprise: detect, alert, respond. The scale is smaller but the discipline is identical — and that discipline is exactly what employers are looking for.
Want the interactive version of this checklist plus the rest of our free tools? They all live in the RTM Toolbox, and the homelab quiz will tell you what to secure next.
The 7-Step Hardening Checklist (Interactive)
Work through the seven steps from this guide. Ticks save in your browser so you can come back mid-hardening. Print it and stick it on the rack.
Want the extended version with the exact commands for each step? It’s in the RTM Toolbox.

ReadTheManual is run, written and curated by Eric Lonsdale.
Eric has over 20 years of professional experience in IT infrastructure, cloud architecture, and cybersecurity, but started with PCs long before that.
He built his first machine from parts bought off tables at the local college campus, hoping they worked. He learned on BBC Micros and Atari units in the early 90s, and has built almost every PC he’s used between 1995 and now.
From helpdesk to infrastructure architect, Eric has worked across enterprise datacentres, Azure environments, and security operations. He’s managed teams, trained engineers, and spent two decades solving the problems this site teaches you to solve.
ReadTheManual exists because Eric believes the best way to learn IT is to build things, break things, and actually read the manual. Every guide on this site runs on infrastructure he owns and maintains.
Enjoyed this guide?
New articles on Linux, homelab, cloud, and automation every 2 days. No spam, unsubscribe anytime.