Home Assistant on Raspberry Pi 5: Event-Driven Architecture That Gets You Hired
I’m going to let you in on a secret: the career reason to run Home Assistant has almost nothing to do with home automation.
Home Assistant is an event-driven platform with a REST API, a WebSocket API, hundreds of integrations, a state management engine, and YAML-based configuration that follows the exact same patterns as Ansible, Kubernetes manifests, and CI/CD pipelines. It’s an enterprise integration platform that happens to also turn your lights on.
I don’t own a single smart bulb. I still run Home Assistant. It monitors my infrastructure, sends me notifications when services misbehave, tracks system metrics over time, and ties into n8n for complex multi-step workflows. The automation mental model it teaches you — “when X happens, if Y is true, do Z” — is identical whether you’re automating a thermostat or deploying infrastructure across three environments.
Career Value: Event-driven architecture is the backbone of modern enterprise systems — from Azure Event Grid and AWS EventBridge to Kafka streams and CI/CD pipelines. Integration Architects and Automation Engineers who can design event-driven workflows command £60-85k. Home Assistant teaches the same patterns: triggers, conditions, actions, state management, and API orchestration. When an interviewer asks about your experience with event-driven systems, “I run a Home Assistant instance that monitors infrastructure and orchestrates automated responses” is a concrete, demonstrable answer.
What You’ll Learn
- Deploying Home Assistant via Docker on a Raspberry Pi 5
- Why
--network hostmatters (and when it doesn’t) - YAML configuration patterns that mirror enterprise config management
- Building useful automations without any smart home devices
- Working with the Home Assistant API for external integrations
- Connecting Home Assistant to n8n for advanced workflows
- Managing database growth and backup strategies
Prerequisites
- Raspberry Pi 5 (8GB recommended) running Ubuntu Server or Raspberry Pi OS
- Docker and Docker Compose installed (see Project 1)
- Basic familiarity with YAML syntax
- A working network connection (obviously)
You do not need any smart home devices. That’s the whole point of this guide.
Why Docker, Not HAOS?
Home Assistant has its own operating system (HAOS) that takes over the entire machine. It’s the “recommended” installation for most home users, and for a dedicated smart home hub, it’s the right choice.
But you’re not building a smart home hub. You’re building a homelab. Your Pi is already running Docker, Portainer, Pi-hole, and whatever else you’ve deployed from this series. HAOS would wipe all of that.
The Docker installation gives you Home Assistant Core — the full automation engine, dashboard, and API — running as one container alongside everything else. You lose the Supervisor (which manages add-ons through the HA UI), but you don’t need it. Anything the Supervisor installs, you can deploy as its own Docker container with more control and better isolation anyway.
This is the same trade-off enterprises make constantly: managed convenience versus operational control. Learning to make that call is itself a career skill.
Installation: Docker Compose Setup
Create the project directory:
mkdir -p ~/homeassistant
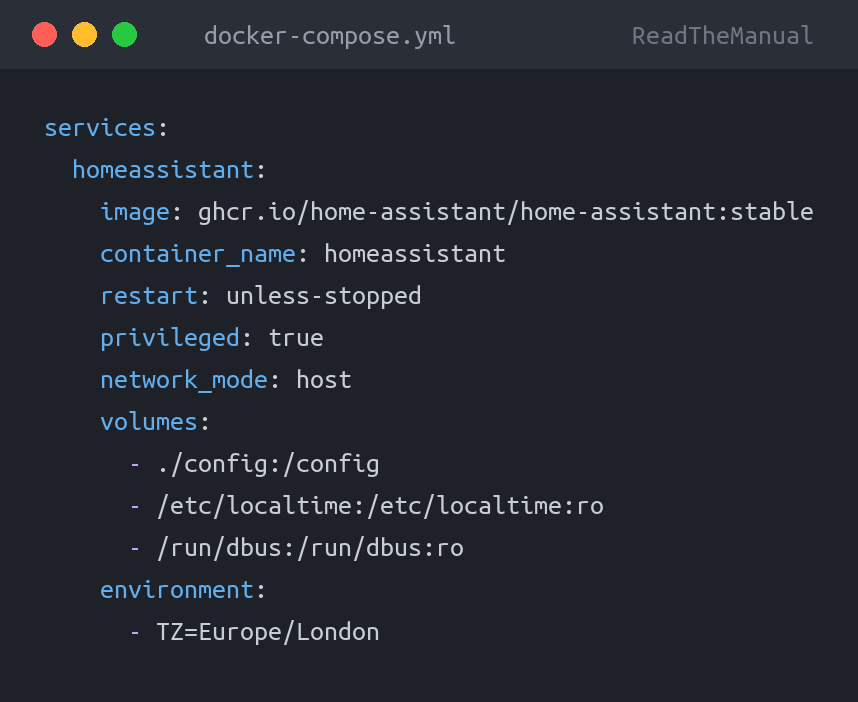
cd ~/homeassistantCreate docker-compose.yml:
services:
  homeassistant:
    image: ghcr.io/home-assistant/home-assistant:stable
    container_name: homeassistant
    restart: unless-stopped
    privileged: true
    network_mode: host
    volumes:
      - ./config:/config
      - /etc/localtime:/etc/localtime:ro
      - /run/dbus:/run/dbus:ro
    environment:
      - TZ=Europe/London
Why network_mode: host?
This is the line that confuses people, and it’s worth understanding properly because it comes up in enterprise networking conversations too.
Normally, Docker containers get their own virtual network. They’re isolated from the host and from each other unless you explicitly publish ports. That’s good practice for most services — it’s the principle of least privilege applied to networking.
Home Assistant is different. It needs to discover devices on your local network using mDNS (multicast DNS), SSDP (Simple Service Discovery Protocol), and other broadcast protocols. These protocols rely on being on the same network segment as the devices they’re discovering. Docker’s bridge network doesn’t forward multicast traffic by default, so HA running behind a bridge network is effectively deaf to the local network.
network_mode: host removes the network isolation entirely. The container shares the host’s network stack — same IP, same ports, same broadcast domain. It’s like the container is running directly on the Pi as far as the network is concerned.
The trade-off: you lose port isolation. Home Assistant will bind directly to port 8123 on your Pi’s IP address. If something else is already using that port, you’ve got a conflict to resolve.
Enterprise Parallel: This is the same decision you face with Kubernetes pod networking. Host networking (hostNetwork: true in a pod spec) gives direct access to the node’s network but sacrifices isolation. Understanding when to use it — and when not to — is a genuine interview topic for infrastructure roles.
Launch it:
docker compose up -dGive it a minute to initialise (first boot takes longer as it sets up the database), then open http://<your-pi-ip>:8123 in your browser. You’ll see the onboarding wizard. Create your account, set your location (this drives sunrise/sunset automations later), and you’re in.
YAML Configuration: Enterprise Config Management Patterns
Here’s where Home Assistant becomes genuinely educational for your career. The configuration system uses YAML — the same language behind Ansible playbooks, Kubernetes manifests, Docker Compose files, GitHub Actions, and Azure DevOps pipelines. If you can write Home Assistant config, you can read any of those. The patterns are identical.
Your configuration lives in ~/homeassistant/config/configuration.yaml. Open it up:
# configuration.yaml - Main Home Assistant config
# This is your "single source of truth" for the platform

homeassistant:
  name: Homelab
  unit_system: metric
  currency: GBP
  country: GB
  time_zone: Europe/London

# Enable the default set of integrations
default_config:

# Split configuration into separate files
# This is the same pattern as Ansible roles or K8s resource directories
automation: !include automations.yaml
script: !include scripts.yaml
scene: !include scenes.yaml
sensor: !include_dir_merge_list sensors/
Notice the !include and !include_dir_merge_list directives. This is YAML anchoring and file splitting — the same organisational pattern you’ll use when your Ansible playbook gets too long or your Kubernetes manifests need splitting across files. Home Assistant teaches you to manage configuration at scale, and that skill transfers directly.
Template Sensors: Monitoring Without Smart Devices
You don’t need a single Zigbee bulb to make Home Assistant useful. Create a sensors/ directory and add system monitoring:
mkdir -p ~/homeassistant/config/sensorsCreate sensors/system_monitoring.yaml:
# System monitoring sensors - no smart devices required
- platform: systemmonitor
  resources:
    - type: processor_use
    - type: memory_use_percent
    - type: disk_use_percent
      arg: /
    - type: last_boot
    - type: processor_temperature
    - type: network_in
      arg: eth0
    - type: network_out
      arg: eth0

# Command-line sensor for Docker container count
- platform: command_line
  name: "Running Containers"
  command: "docker ps -q | wc -l"
  scan_interval: 60
  unit_of_measurement: "containers"

# Command-line sensor for system uptime
- platform: command_line
  name: "System Load Average"
  command: "cat /proc/loadavg | awk '{print $1}'"
  scan_interval: 30
  unit_of_measurement: "load"
Gotcha: The command_line sensor runs commands inside the container. Since we mounted /run/dbus and used host networking, many host commands work. But docker ps requires the Docker socket. If you need Docker-aware sensors, add - /var/run/docker.sock:/var/run/docker.sock:ro to your volumes. Be aware this gives the container root-level access to Docker — the same security consideration you’d evaluate in any enterprise deployment.
After saving, restart Home Assistant:
docker restart homeassistantOr use the UI: Developer Tools → YAML → Check Configuration, then restart. Always check configuration before restarting — a YAML syntax error will prevent HA from starting, and debugging a container that won’t boot is more frustrating than validating first. Same principle as nginx -t before nginx -s reload.
Building Automations: The “When X, If Y, Do Z” Mental Model
This is where Home Assistant’s real educational value lives. Every automation follows a three-part structure:
- Trigger (When X) — What event starts the automation
- Condition (If Y) — Optional checks before proceeding
- Action (Do Z) — What happens when triggered and conditions are met
This is the same pattern behind every enterprise automation system:
- CI/CD: “When code is pushed (trigger), if tests pass (condition), deploy to staging (action)”
- Azure Event Grid: “When a blob is created (trigger), if it’s in the uploads container (filter), run the processing function (action)”
- n8n/Zapier: “When a webhook fires (trigger), if the payload contains X (filter), create a ticket (action)”
Learning to think in triggers, conditions, and actions is a transferable skill. Here’s a practical automation that doesn’t need any smart devices:
# automations.yaml
# Alert when CPU temperature gets too high
- id: 'cpu_temp_alert'
  alias: 'High CPU Temperature Alert'
  description: 'Send notification when Pi CPU exceeds 75°C'
  trigger:
    - platform: numeric_state
      entity_id: sensor.processor_temperature
      above: 75
      for:
        minutes: 5
  condition:
    - condition: time
      after: '07:00:00'
      before: '23:00:00'
  action:
    - service: notify.notify
      data:
        title: "Pi 5 Temperature Warning"
        message: >
          CPU temperature has been above 75°C for 5 minutes.
          Current: {{ states('sensor.processor_temperature') }}°C.
          Check cooling and workload.

# Alert when disk usage gets high
- id: 'disk_usage_alert'
  alias: 'Disk Usage Warning'
  description: 'Warn when root filesystem exceeds 85%'
  trigger:
    - platform: numeric_state
      entity_id: sensor.disk_use_percent
      above: 85
  action:
    - service: notify.notify
      data:
        title: "Disk Space Warning"
        message: >
          Root filesystem is at {{ states('sensor.disk_use_percent') }}%.
          Time to clean up or expand storage.

# Daily system health report
- id: 'daily_health_report'
  alias: 'Daily Infrastructure Report'
  description: 'Send a morning summary of system health'
  trigger:
    - platform: time
      at: '08:00:00'
  action:
    - service: notify.notify
      data:
        title: "Morning Infrastructure Report"
        message: >
          CPU: {{ states('sensor.processor_use') }}%
          Memory: {{ states('sensor.memory_use_percent') }}%
          Disk: {{ states('sensor.disk_use_percent') }}%
          Temp: {{ states('sensor.processor_temperature') }}°C
          Uptime since: {{ states('sensor.last_boot') }}
          Containers: {{ states('sensor.running_containers') }}
Pro Tip: The for: parameter on the temperature trigger prevents flapping alerts — it only fires if the condition has been true for 5 continuous minutes. This is the same concept as alert dampening in Prometheus/Alertmanager or evaluation windows in Azure Monitor. Learning to set appropriate thresholds and dampening periods is an operational skill that takes practice.
Setting Up Notifications
The automations above use notify.notify, which needs configuring. The simplest option for a homelab is the Telegram integration. Add to configuration.yaml:
# Telegram notification bot
telegram_bot:
  - platform: polling
    api_key: !secret telegram_api_key
    allowed_chat_ids:
      - !secret telegram_chat_id

notify:
  - platform: telegram
    name: notify
    chat_id: !secret telegram_chat_id
And create secrets.yaml in the config directory:
# secrets.yaml - NEVER commit this file to Git
telegram_api_key: "your-bot-token-from-botfather"
telegram_chat_id: "your-chat-id"
The !secret reference pattern is worth noting. Home Assistant separates secrets from configuration, just like you’d use environment variables, Azure Key Vault, or HashiCorp Vault in enterprise deployments. Same principle, smaller scale.
The API: Connecting Home Assistant to Everything
Home Assistant exposes a full REST API on the same port (8123). This is where it becomes genuinely powerful as an integration platform.
First, create a Long-Lived Access Token: go to your profile (bottom-left), scroll to Long-Lived Access Tokens, and create one. Store it securely.
Now you can query and control Home Assistant from anywhere on your network:
# Get all sensor states
curl -s -H "Authorization: Bearer YOUR_TOKEN" \
  http://your-pi-ip:8123/api/states | python3 -m json.tool

# Get a specific sensor
curl -s -H "Authorization: Bearer YOUR_TOKEN" \
  http://your-pi-ip:8123/api/states/sensor.processor_temperature

# Fire an event (trigger automations externally)
curl -X POST \
  -H "Authorization: Bearer YOUR_TOKEN" \
  -H "Content-Type: application/json" \
  -d '{"message": "Deployment complete"}' \
  http://your-pi-ip:8123/api/events/custom_deployment_event

# Call a service
curl -X POST \
  -H "Authorization: Bearer YOUR_TOKEN" \
  -H "Content-Type: application/json" \
  -d '{"title": "Test", "message": "API notification works"}' \
  http://your-pi-ip:8123/api/services/notify/notify
That last one is particularly useful. You can fire notifications from any script, cron job, or CI/CD pipeline by hitting the HA API. Backup script finished? POST to the API. Container health check failed? POST to the API. You’ve just turned Home Assistant into a notification hub for your entire homelab.
Connecting to n8n: Advanced Workflow Orchestration
If you’re running n8n from Project 9, the combination with Home Assistant is where things get properly interesting. n8n handles complex multi-step workflows; Home Assistant handles real-time events and state. Together, they cover most automation scenarios you’ll encounter.
n8n Calling Home Assistant
Use n8n’s HTTP Request node to query HA’s API. Set up a workflow that checks system health every hour and posts a summary to a Telegram channel, Slack workspace, or email — whatever your team uses.
Home Assistant Triggering n8n
Configure a webhook in n8n, then create a Home Assistant automation that fires on events and POSTs to the n8n webhook URL. Now your real-time Pi events can trigger complex multi-step workflows: HA detects high memory usage, fires a webhook to n8n, n8n checks which containers are using the most RAM, and sends a detailed diagnostic report.
This is a real integration architecture pattern. Event source (HA) decoupled from processing logic (n8n) via webhook. It’s the same pattern as Azure Event Grid triggering a Logic App, or CloudWatch Events triggering a Step Function.
# Automation that triggers an n8n workflow via webhook
- id: 'n8n_memory_alert'
  alias: 'Trigger n8n Memory Investigation'
  trigger:
    - platform: numeric_state
      entity_id: sensor.memory_use_percent
      above: 90
      for:
        minutes: 2
  action:
    - service: rest_command.trigger_n8n
      data:
        payload: >
          {{ states('sensor.memory_use_percent') }}
With the corresponding REST command in configuration.yaml:
rest_command:
  trigger_n8n:
    url: "http://your-pi-ip:5678/webhook/memory-alert"
    method: POST
    content_type: "application/json"
    payload: '{"memory_percent": "{{ payload }}", "hostname": "pi5"}'
Gotchas and Troubleshooting
Database Growth: The Silent Disk Eater
Home Assistant stores every state change in a SQLite database by default. Every sensor update, every temperature reading, every network throughput sample — it all goes into home-assistant_v2.db. Left unchecked, this database will grow without bound.
I learned this the hard way when my config directory hit 4GB and I couldn’t figure out where the space had gone. The database was 3.8GB of it.
Add this to configuration.yaml:
# Recorder configuration - control what gets stored and for how long
recorder:
  purge_keep_days: 7
  commit_interval: 30
  exclude:
    domains:
      - automation
      - updater
    entity_globs:
      - sensor.network_*
Seven days of history is plenty for a homelab. If you need longer-term metrics, export them to InfluxDB or Prometheus — purpose-built time-series databases that handle this data far more efficiently than SQLite.
YAML Validation Errors
If Home Assistant won’t start after a config change, check the logs:
# Check container logs for config errors
docker logs homeassistant --tail 50

# Validate config without restarting (from inside the container)
docker exec homeassistant python -m homeassistant --script check_config -c /config
The most common YAML errors: incorrect indentation (tabs vs spaces — YAML requires spaces), missing colons, and forgetting quotes around strings that contain special characters. These are the same mistakes you’ll make in Ansible and Kubernetes manifests, so learning to spot them now saves pain later.
Backup Strategy
Your entire Home Assistant configuration is in ~/homeassistant/config/. Back it up:
#!/bin/bash
# Simple HA backup - add to cron
set -euo pipefail

BACKUP_DIR="/mnt/backup/homeassistant"
DATE=$(date +%Y%m%d)

mkdir -p "$BACKUP_DIR"

# Stop HA briefly for consistent backup
docker stop homeassistant

# Tar the config directory (excluding the database - it's regenerated)
tar -czf "$BACKUP_DIR/ha-config-$DATE.tar.gz" \
  --exclude='home-assistant_v2.db' \
  --exclude='home-assistant_v2.db-shm' \
  --exclude='home-assistant_v2.db-wal' \
  -C ~/homeassistant config/

# Restart
docker start homeassistant

# Keep 14 days of backups
find "$BACKUP_DIR" -name "ha-config-*.tar.gz" -mtime +14 -delete

echo "Backup complete: $BACKUP_DIR/ha-config-$DATE.tar.gz"
Important: Exclude the database from backups unless you specifically need historical data. The database is regenerated from scratch on startup, and including it makes backups 10-100x larger for data you probably don’t need. Back up the configuration — that’s the valuable part. The data will rebuild.
Port Conflicts with Host Networking
Because Home Assistant uses network_mode: host, it binds directly to port 8123. If you get a “port already in use” error, check what’s occupying it:
sudo ss -tlnp | grep 8123If something else is there, you’ll need to either move that service or change HA’s port in configuration.yaml under the http: section.
What You’ve Actually Learned
If you’ve followed this guide through, you’ve practiced:
- Event-driven architecture — Triggers, conditions, actions. The foundation of reactive systems from Azure Functions to Kafka consumers.
- YAML configuration management — File splitting, includes, secrets management. Directly transferable to Ansible, Kubernetes, and CI/CD pipelines.
- API integration — REST APIs, authentication tokens, webhook patterns. The glue that connects every enterprise system.
- State management — Understanding that entities have states that change over time, and building logic around state transitions.
- Operational monitoring — Using automation to watch your own infrastructure and alert on problems. The basis of every SRE practice.
- Network architecture decisions — Host networking vs bridge networking, and the security/functionality trade-offs involved.
None of these skills are specific to home automation. All of them appear on job descriptions for DevOps Engineers, Platform Engineers, Integration Architects, and SREs.

Where to Go Next
Home Assistant becomes significantly more powerful when connected to other services in your homelab:
- Project 6: Ollama — Use HA events as triggers for AI-powered analysis. “When a service fails, ask the LLM to summarise recent logs.”
- Project 7: Uptime Kuma — Feed uptime data into HA for unified monitoring dashboards and cross-system alerting.
- Project 9: n8n — The combination of HA’s real-time event engine with n8n’s multi-step workflow orchestration covers almost every automation scenario.
The pattern emerging here — loosely coupled services communicating via APIs and webhooks — is microservices architecture in miniature. You’re building it on a £80 computer, but the architectural patterns are identical to what runs behind every major platform you use.
That’s the real career value. Not the technology. The thinking.

ReadTheManual is run, written and curated by Eric Lonsdale.
Eric has over 20 years of professional experience in IT infrastructure, cloud architecture, and cybersecurity, but started with PCs long before that.
He built his first machine from parts bought off tables at the local college campus, hoping they worked. He learned on BBC Micros and Atari units in the early 90s, and has built almost every PC he’s used between 1995 and now.
From helpdesk to infrastructure architect, Eric has worked across enterprise datacentres, Azure environments, and security operations. He’s managed teams, trained engineers, and spent two decades solving the problems this site teaches you to solve.
ReadTheManual exists because Eric believes the best way to learn IT is to build things, break things, and actually read the manual. Every guide on this site runs on infrastructure he owns and maintains.
Enjoyed this guide?
New articles on Linux, homelab, cloud, and automation every 2 days. No spam, unsubscribe anytime.