Gitea: Own Your Code, Track Your Infrastructure
You have spent the last nine guides building something real. Docker containers, monitoring, automation workflows, reverse proxies, maybe even a Kubernetes cluster. Your Pi is running production services. Configuration files are scattered across directories. Compose files tuned through trial and error. Environment variables that took three attempts to get right.
Now imagine your SD card corrupts. Or you run a command that overwrites a config file. Or you change something, everything breaks, and you cannot remember what it was before.
How much of what you have built could you recreate from memory?
That is not a hypothetical. I have lost Pi configs to SD card failure. I have overwritten working Compose files with broken ones and had no way back except “I think it was something like this.” Every homelab builder learns this lesson eventually. The question is whether you learn it before or after the disaster.
Gitea is self-hosted Git with a clean web interface. It turns “configs I hope I remember” into “infrastructure I can rebuild in minutes.” And the habits it builds are worth serious money in the job market.
Career Impact: Git proficiency is not optional for any infrastructure role above helpdesk. But most people’s Git experience stops at git add, git commit, git push. Understanding branching, reverting changes, tracking infrastructure configs in version control, and running CI/CD pipelines is the difference between “I know Git” and “I practise GitOps.” DevOps Engineer, Platform Engineer, and SRE roles at £55-80k+ expect the latter. Self-hosting Gitea also demonstrates you understand source code management beyond being a consumer of GitHub.
Why Self-Hosted Git?
The obvious question: why not just use GitHub? It is free, it works, and everyone uses it.
For public projects and collaboration, GitHub is excellent. Keep using it. But for your homelab infrastructure configs, there are real reasons to self-host:
- Privacy. Your infrastructure configs reveal your network topology, service architecture, and security decisions. That is not information you necessarily want on a public platform, even in a private repository controlled by a company that can change its terms of service whenever it likes.
- Availability. If your internet goes down, you can still access your configs. If GitHub has an outage (and it does, regularly), your infrastructure documentation is still available on your local network.
- Learning. Running a Git server teaches you things that using GitHub does not. Repository administration, SSH key management, user permissions, webhook configuration, CI/CD runner setup. These are sysadmin skills, not developer skills, and they matter.
- Integration. A Gitea instance on your network can receive webhooks from and send webhooks to every other service on your network without exposing anything to the internet.
This is not either/or. I use both. Public projects and portfolio work go on GitHub. Infrastructure configs, private automation workflows, and homelab documentation live on self-hosted Gitea. Different tools for different purposes.
Installation via Docker
Gitea is lightweight and runs well on the Pi 5. It supports SQLite for small installations, but I recommend PostgreSQL from the start. It handles concurrent access better and is what you will encounter in production environments.
Create the directory structure:
mkdir -p ~/services/gitea
cd ~/services/gitea
Create your docker-compose.yml:
version: '3.8'

services:
  gitea-db:
    image: postgres:15-alpine
    container_name: gitea-db
    restart: unless-stopped
    environment:
      POSTGRES_USER: gitea
      POSTGRES_PASSWORD: ${DB_PASSWORD}
      POSTGRES_DB: gitea
    volumes:
      - gitea-db:/var/lib/postgresql/data
    networks:
      - gitea-internal

  gitea:
    image: gitea/gitea:latest
    container_name: gitea
    restart: unless-stopped
    ports:
      - "3000:3000"
      - "2222:22"
    environment:
      - USER_UID=1000
      - USER_GID=1000
      - GITEA__database__DB_TYPE=postgres
      - GITEA__database__HOST=gitea-db:5432
      - GITEA__database__NAME=gitea
      - GITEA__database__USER=gitea
      - GITEA__database__PASSWD=${DB_PASSWORD}
      - GITEA__server__DOMAIN=${GITEA_DOMAIN}
      - GITEA__server__SSH_DOMAIN=${GITEA_DOMAIN}
      - GITEA__server__ROOT_URL=http://${GITEA_DOMAIN}:3000/
      - GITEA__service__DISABLE_REGISTRATION=true
      - GITEA__service__REQUIRE_SIGNIN_VIEW=true
    volumes:
      - ./data:/data
      - /etc/timezone:/etc/timezone:ro
      - /etc/localtime:/etc/localtime:ro
    depends_on:
      - gitea-db
    networks:
      - gitea-internal

networks:
  gitea-internal:
    driver: bridge

volumes:
  gitea-db:
Create your .env file:
DB_PASSWORD=your-secure-database-password
GITEA_DOMAIN=your-pi-ip-or-hostname
Start it up:
docker compose up -dOpen http://your-pi-ip:3000 in your browser. Gitea will show its initial configuration page. The database settings should be pre-filled from the environment variables. Click through, create your admin account, and you are in.
Port Conflict: Port 3000 is one of the most commonly used ports in development. Grafana defaults to 3000. Node.js applications default to 3000. If you already have something on port 3000, change the Gitea port mapping to 3001:3000 or whatever is free. I learned this the hard way when my Gitea and Grafana installations fought over the same port and both refused to start, with Docker logs that were spectacularly unhelpful about explaining why.
Pro Tip: Set DISABLE_REGISTRATION=true from the start. On a homelab, you are the only user. Leaving registration open is an unnecessary attack surface, especially if your Pi is accessible from other devices on your network. Create your admin account during initial setup, then registration is locked down.
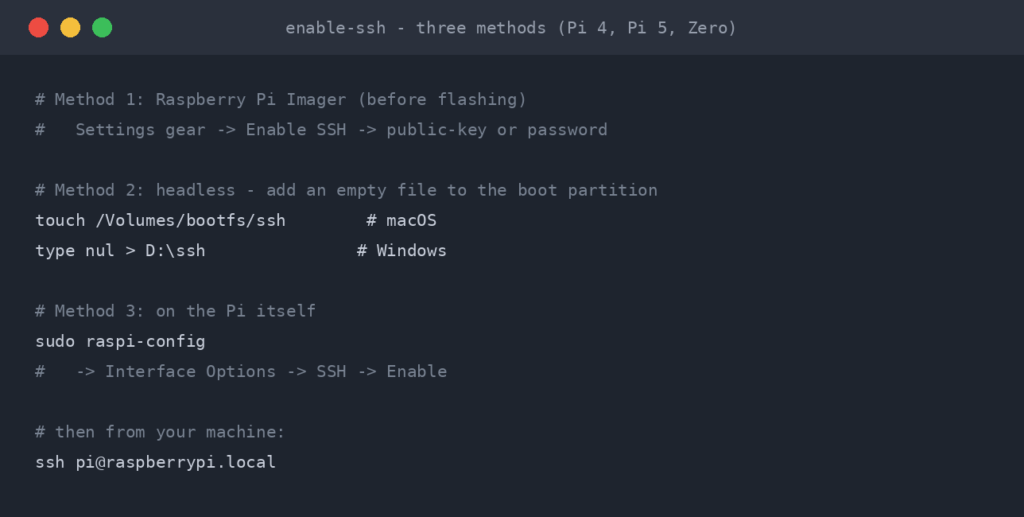
SSH Key Setup
You can interact with Gitea over HTTPS (username and password for every push) or SSH (key-based, no password prompts). SSH is what you want.
If you do not already have an SSH key pair on the machine you will be pushing from:
# Generate a new key pair
ssh-keygen -t ed25519 -C "[email protected]"

# Accept the default location (~/.ssh/id_ed25519)
# Set a passphrase (recommended) or leave blank
Copy your public key:
cat ~/.ssh/id_ed25519.pubIn Gitea’s web interface, go to Settings → SSH / GPG Keys → Add Key. Paste the public key and save.
Now configure SSH to use the right port. Gitea’s SSH runs on port 2222 (mapped from the container’s port 22), not the standard port 22. Add this to your ~/.ssh/config:
Host gitea-pi
    HostName your-pi-ip
    Port 2222
    User git
    IdentityFile ~/.ssh/id_ed25519
Test the connection:
ssh -T git@gitea-pi
# Should respond with: Hi there, username! You've successfully authenticated...
When cloning repositories, use the SSH URL format: git@gitea-pi:username/repo-name.git
SSH Port Gotcha: The most common setup failure is forgetting that Gitea’s SSH is on port 2222, not 22. If git clone hangs or times out, it is almost certainly trying to connect on the wrong port. The SSH config file approach above avoids this entirely — you define the port once and forget about it. Without it, you would need to use the full URL format: ssh://git@your-pi:2222/username/repo.git, which is tedious to type every time.
Creating Your First Repository
Click the + button in Gitea’s top navigation and select New Repository. Name it something like homelab-infrastructure. This will be the single repository that contains all your homelab configs.
Initialise it with a README. Then clone it to your Pi:
cd ~
git clone git@gitea-pi:yourusername/homelab-infrastructure.git
cd homelab-infrastructure
Now let us populate it with everything you have built throughout this series.
What to Commit
This is where most homelab guides stop at “put your configs in Git” without explaining what that actually means in practice. Here is the specific list:
Always Commit
- Docker Compose files — these are the definition of your infrastructure
- Environment variable templates —
.env.examplefiles with placeholder values - Nginx/proxy configs — your reverse proxy routing rules
- Automation workflows — n8n workflow JSON exports
- Custom scripts — backup scripts, maintenance scripts, monitoring scripts
- Documentation — README files explaining what each service does and how to set it up
- Pi-hole config exports — blocklists, DNS records, settings
- Monitoring configs — Uptime Kuma settings, alert rules
- K3s manifests — if you set up Kubernetes, all your YAML manifests
Never Commit
- .env files with real values — these contain passwords, API keys, tokens
- SSL certificates and private keys — treat these like passwords
- Database dumps — contain user data, credentials
- SSH private keys — your
id_ed25519file, never, ever, ever - API tokens — Telegram bot tokens, webhook secrets
- Anything in a directory called secrets/, private/, or certs/
The pattern is simple: commit the structure, not the secrets. Your Compose file says “this service needs a database password from the environment variable DB_PASSWORD.” Your .env.example says “DB_PASSWORD=change-me.” Your actual .env has the real password and is never committed.
This is not optional paranoia. Secrets committed to Git are in the history forever. Even if you delete the file in a later commit, the secret is still there in the repository history. Anyone who clones the repo gets the full history. I have seen real production database credentials leaked in GitHub repositories because someone committed a .env file “just temporarily.” There is no “just temporarily” with Git. If it was committed once, assume it is compromised.
Repository Structure for Homelab Configs
Here is a structure that works well. It mirrors the way your services are organised on the Pi while keeping everything navigable:
homelab-infrastructure/
├── README.md                    # Overview, network diagram, quick start
├── .gitignore                   # Patterns for files to exclude
│
├── docker/                      # Service definitions
│   ├── pihole/
│   │   ├── docker-compose.yml
│   │   ├── .env.example
│   │   └── README.md
│   ├── nginx-proxy-manager/
│   │   ├── docker-compose.yml
│   │   ├── .env.example
│   │   └── README.md
│   ├── uptime-kuma/
│   │   ├── docker-compose.yml
│   │   └── README.md
│   ├── n8n/
│   │   ├── docker-compose.yml
│   │   ├── .env.example
│   │   └── README.md
│   ├── gitea/
│   │   ├── docker-compose.yml
│   │   ├── .env.example
│   │   └── README.md
│   ├── ollama/
│   │   ├── docker-compose.yml
│   │   └── README.md
│   └── home-assistant/
│       ├── docker-compose.yml
│       └── README.md
│
├── automation/                  # n8n workflow exports
│   ├── self-healing-restart.json
│   ├── daily-news-digest.json
│   ├── backup-validation.json
│   └── README.md
│
├── scripts/                     # Maintenance and utility scripts
│   ├── backup.sh
│   ├── update-all.sh
│   ├── health-check.sh
│   └── README.md
│
├── proxy/                       # Nginx/proxy configurations
│   ├── pihole.conf
│   ├── n8n.conf
│   ├── gitea.conf
│   └── README.md
│
├── k3s/                         # Kubernetes manifests (if applicable)
│   ├── deployments/
│   ├── services/
│   └── README.md
│
└── docs/                        # Documentation
    ├── network-diagram.md
    ├── service-dependencies.md
    ├── disaster-recovery.md
    └── changelog.md
The critical file is .gitignore. Create it immediately:
# Environment files with real secrets
.env
*.env.local
*.env.production

# SSL certificates and keys
*.pem
*.key
*.crt
*.p12

# Database files
*.db
*.sqlite
*.sql

# SSH keys
id_*
*.pub

# Backup files (too large for Git)
*.tar.gz
*.zip
backups/

# OS files
.DS_Store
Thumbs.db

# Editor files
*.swp
*.swo
*~
Commit the .gitignore first, before anything else. This ensures that when you start adding files, Git is already configured to ignore the dangerous ones.
Pro Tip: Add a README.md to every service directory. It does not need to be extensive — just a few lines explaining what the service does, any non-obvious configuration, and how to get it running from scratch. Future you, at 2am, trying to rebuild after a failure, will be deeply grateful for past you’s documentation.
The Git Workflow: Beyond Add, Commit, Push
Most people learn three Git commands and stop. That is enough to store files, but it misses the point of version control. The real value is in tracking changes, understanding what broke, and being able to go back.
Meaningful Commits
Every commit should explain why, not just what. Compare these:
# Bad - tells you nothing useful
git commit -m "updated config"

# Good - tells you what changed and why
git commit -m "Increase n8n memory limit to 512MB - OOM kills during RSS workflow"

# Good - tells you what you tried
git commit -m "Switch Pi-hole upstream DNS to Cloudflare - Quad9 latency issues"
When something breaks next month and you run git log, you want to see a story of decisions, not a list of “updated stuff.”
Branching: Test Changes Safely
Branches let you try changes without affecting the working configuration. This is how every professional development team works, and it is just as valuable for infrastructure.
# Create a branch for your experiment
git checkout -b try-new-pihole-config

# Make your changes
nano docker/pihole/docker-compose.yml

# Test them on the Pi
cd ~/services/pihole && docker compose up -d

# If it works, commit and merge
git add .
git commit -m "Add conditional forwarding for local DNS resolution"
git checkout main
git merge try-new-pihole-config

# If it breaks, throw away the branch
git checkout main
git branch -D try-new-pihole-config
The workflow is: branch, change, test, merge if good, discard if bad. Your main branch always has a known-working configuration. You never have to wonder “was this file working before I changed it?” because the answer is always on the main branch.
Reverting: When Things Go Wrong
Something broke. You know it was working yesterday. Git tells you exactly what changed:
# See what changed recently
git log --oneline -10

# See exactly what changed in a specific commit
git show abc1234

# See differences between now and a known-good state
git diff HEAD~3 -- docker/n8n/docker-compose.yml

# Revert a specific commit (creates a new commit that undoes the change)
git revert abc1234

# Or, if you just want to see what the file looked like before
git show HEAD~1:docker/n8n/docker-compose.yml
This is not theory. I have used git log to find exactly which change broke an n8n workflow, then used git show to see what the working version looked like, then used git revert to put it back. Total time: 2 minutes. Without Git, I would have been guessing and testing for an hour.
Gitea Actions: Built-In CI/CD
Gitea includes its own CI/CD system called Gitea Actions. It is compatible with GitHub Actions syntax, which means you can use the same workflow files and most of the same actions. This is a significant advantage — learn it once, use it everywhere.
Enabling Gitea Actions
First, enable Actions in your Gitea configuration. Add to your docker-compose.yml environment:
environment:
# ... existing variables ...
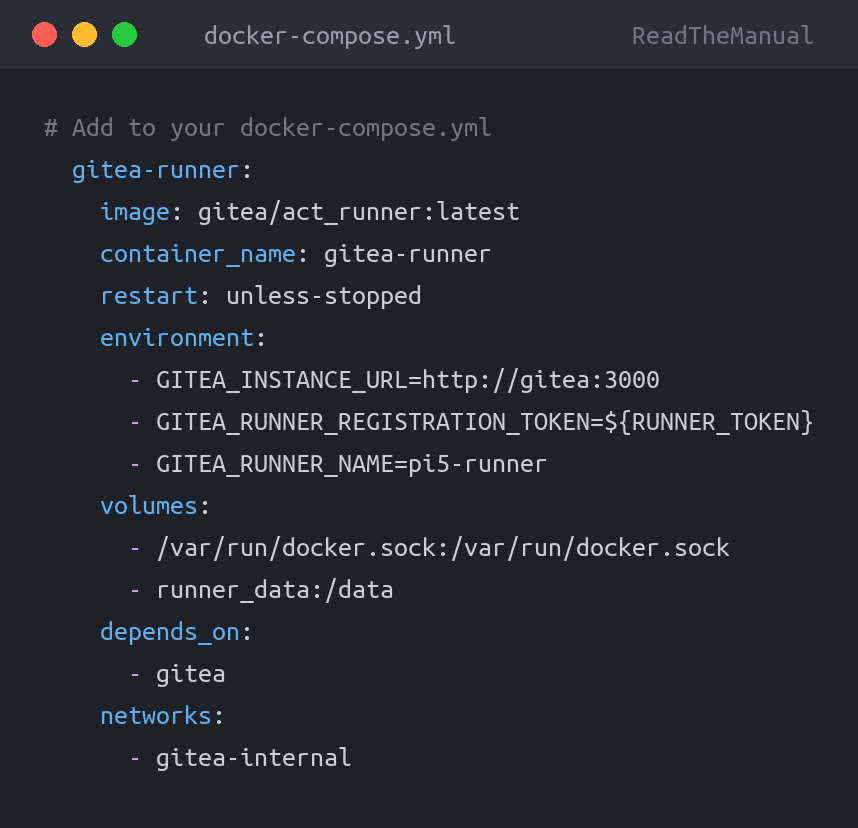
- GITEA__actions__ENABLED=trueRestart Gitea. You will also need a runner — the component that actually executes workflows. Gitea provides a lightweight runner that works on ARM:
# Add to your docker-compose.yml
  gitea-runner:
    image: gitea/act_runner:latest
    container_name: gitea-runner
    restart: unless-stopped
    environment:
      - GITEA_INSTANCE_URL=http://gitea:3000
      - GITEA_RUNNER_REGISTRATION_TOKEN=${RUNNER_TOKEN}
      - GITEA_RUNNER_NAME=pi5-runner
    volumes:
      - /var/run/docker.sock:/var/run/docker.sock
      - runner_data:/data
    depends_on:
      - gitea
    networks:
      - gitea-internal
Get the registration token from Gitea: Site Administration → Runners → Create new Runner. Add it to your .env as RUNNER_TOKEN.
Your First Pipeline
Create the workflow directory in your repository and add a basic validation pipeline:
mkdir -p .gitea/workflowsCreate .gitea/workflows/validate.yml:
name: Validate Configs
on:
  push:
    branches: [main]
  pull_request:
    branches: [main]

jobs:
  validate:
    runs-on: ubuntu-latest
    steps:
      - name: Checkout
        uses: actions/checkout@v4

      - name: Check YAML syntax
        run: |
          find . -name "*.yml" -o -name "*.yaml" | while read f; do
            python3 -c "import yaml; yaml.safe_load(open('$f'))" 2>&1 && \
              echo "OK: $f" || echo "FAIL: $f"
          done

      - name: Check no secrets committed
        run: |
          # Look for common secret patterns
          FOUND=$(grep -rl "password=" --include="*.env" . 2>/dev/null | grep -v ".example" || true)
          if [ -n "$FOUND" ]; then
            echo "WARNING: Possible secrets found in:"
            echo "$FOUND"
            exit 1
          fi
          echo "No secrets detected in committed files"

      - name: Verify .env.example exists for each service
        run: |
          for compose in $(find docker/ -name "docker-compose.yml"); do
            dir=$(dirname "$compose")
            if grep -q '\${' "$compose" && [ ! -f "$dir/.env.example" ]; then
              echo "MISSING: $dir/.env.example (compose file uses variables)"
              exit 1
            fi
          done
          echo "All services with variables have .env.example files"
This pipeline runs every time you push to main. It checks that your YAML files are valid, that no real secrets have been accidentally committed, and that every service with environment variables has a template file. It is basic, but it catches the mistakes that would otherwise bite you at 2am.
Push it:
git add .gitea/
git commit -m "Add config validation pipeline - YAML syntax, secret detection, env template check"
git push
In Gitea’s web interface, go to your repository’s Actions tab. You should see the workflow running. Green tick means everything passed.
Career Translation: That pipeline you just built? It is a simplified version of exactly what runs in enterprise CI/CD. Configuration validation, secret scanning, compliance checks — the patterns are identical. The tools at scale might be GitHub Actions, GitLab CI, Azure DevOps Pipelines, or Jenkins, but the concepts (trigger on push, run validation, fail on problems) are universal. Being able to say “I have built CI/CD pipelines” in an interview carries significant weight.
Infrastructure as Code: The Habit, Not the Buzzword
“Infrastructure as Code” sounds like marketing speak. It is not. It is a specific, practical habit: define your infrastructure in text files, store those files in version control, and treat changes to infrastructure the same way developers treat changes to code.
You have been doing it throughout this series without calling it that. Every Docker Compose file is infrastructure as code. Every n8n workflow export is automation as code. Every Nginx config is routing as code.
The Git repository you have just created is the piece that ties it all together. Now your infrastructure is:
- Versioned — you know what changed, when, and why
- Reproducible — clone the repo, create
.envfiles, rundocker compose up, and everything comes back - Auditable —
git logshows the complete history of every infrastructure decision - Reviewable — before merging a change, you can diff it against the current state
- Recoverable — SD card dies? Clone the repo to a new Pi, restore secrets from your password manager, and you are back in business
This is not enterprise overhead applied to a hobby project. This is professional practice that happens to make your homelab vastly more resilient. The fact that it also makes your CV significantly stronger is a bonus.
Disaster Recovery: The Real Test
Let us make this concrete. Your Pi’s storage fails completely. New SD card, fresh OS install. How quickly can you rebuild?
Without Git: Hours. Possibly days. Trying to remember Compose file settings, environment variables, proxy configs, automation workflows. Some of it you will get wrong. Some of it you will forget entirely. Services you spent evenings configuring are gone.
With Git:
# 1. Fresh OS, install Docker (10 minutes)
curl -fsSL https://get.docker.com | sh

# 2. Clone your infrastructure repo (30 seconds)
git clone git@gitea-backup:yourusername/homelab-infrastructure.git

# 3. For each service, create .env from template, fill in secrets (5 min per service)
cd homelab-infrastructure/docker/pihole
cp .env.example .env
nano .env  # Fill in from your password manager

# 4. Start services (seconds each)
docker compose up -d

# 5. Repeat for each service
Total rebuild time: under an hour. And it is identical to what was running before, because it is defined in code, not memory.
Critical Point: Your Gitea instance is running on the same Pi as everything else. If the Pi dies, your Git repository goes with it. You need an offsite copy. Options: push to a second remote (GitHub private repo, another machine on your network, a VPS), or include the Gitea data directory in your automated backups from the n8n guide. A Git repository that only exists on the hardware it is meant to help you recover from is not a backup plan — it is wishful thinking.
Mirror to GitHub: Gitea supports repository mirroring. Go to Settings → Mirror Settings on any repository and configure it to push to a GitHub private repository automatically. Your configs live on your Gitea, but a copy is always available externally. Best of both worlds.
Gotchas, Pain Points, and Honest Advice
SSH Key Management Confusion
You will have SSH keys for accessing your Pi (the server), and SSH keys for accessing Gitea (the Git service). These can be the same key, but the ports and hosts are different. The ~/.ssh/config file from earlier in this guide is essential for keeping this sane. Without it, you will spend time debugging “permission denied” errors that are actually “wrong port” errors.
Port 3000 Conflicts
As mentioned in the installation section, port 3000 is oversubscribed. If you are running Grafana, development servers, or anything else that defaults to 3000, change Gitea’s external port. Map it to 3001 or 3080 in your Compose file. Update your bookmarks, SSH config, and webhook URLs accordingly.
Large Files Do Not Belong in Git
Git is designed for text files. Committing database dumps, backup archives, or media files will make your repository enormous and slow. Your .gitignore should exclude anything over a few megabytes. If you need to version large files, look into Git LFS, but for a homelab, the simpler answer is: do not put large files in Git.
The “I’ll Commit Later” Trap
You will change a config file, test it, it works, and you will think “I’ll commit that later.” You will not. Commit immediately after every change that works. Make it part of the workflow: change, test, commit. Not change, test, change, test, change, test, maybe commit next week, forget what you changed.
Git Identity Setup
Before your first commit, configure your Git identity:
git config --global user.name "Your Name"
git config --global user.email "[email protected]"
If you skip this, Git will use your system username and hostname, which looks unprofessional in commit logs and can leak information about your setup.
Gitea Updates
Gitea is actively developed and updates frequently. Use gitea/gitea:latest cautiously — major version bumps occasionally include breaking changes. For a homelab, latest is usually fine, but pull updates deliberately rather than letting automated restarts pull a new version at 3am:
# Update deliberately
docker compose pull
docker compose up -d

# Check it is working after update
docker logs gitea --tail 20
What Your Repository Should Look Like After This Series
If you have followed the entire Pi 5 Projects series, your Git repository should now contain:
- Docker Compose files for every service (Docker, Portainer, Pi-hole, NPM, Home Assistant, Ollama, Uptime Kuma, n8n, Gitea itself)
.env.exampletemplates for every service that needs secrets- n8n workflow exports (self-healing, news digest, backup validation)
- Nginx Proxy Manager configuration notes
- K3s manifests if you went that route
- Maintenance scripts (backup, update, health check)
- A CI/CD pipeline that validates your configs on every push
- README files explaining each component
- A comprehensive
.gitignore
That is not just a collection of files. It is a documented, version-controlled, reproducible infrastructure platform. You built it on an £80 computer. And every piece of it translates directly to the work that platform engineers, DevOps engineers, and SREs do every day at companies paying £55-80k for those skills.
Career Translation
| Gitea Skill | Enterprise Equivalent | Roles (£55-80k+) |
|---|---|---|
| Self-hosted Git administration | GitHub Enterprise, GitLab Self-Managed, Bitbucket DC | Platform Engineer, DevOps Engineer |
| Repository structure design | Monorepo vs multi-repo strategy, code organisation | Staff Engineer, Tech Lead |
| Branch and merge workflows | GitFlow, trunk-based development, PR reviews | Any engineering role |
| CI/CD pipeline creation | GitHub Actions, GitLab CI, Azure DevOps, Jenkins | DevOps Engineer, Build Engineer |
| Secret management practices | HashiCorp Vault, Azure Key Vault, AWS Secrets Manager | Security Engineer, Platform Engineer |
| Infrastructure as Code | Terraform, Pulumi, CloudFormation, Ansible | Cloud Engineer, Infrastructure Engineer |
“I version-control all my infrastructure configs with CI/CD validation” is a sentence that puts you ahead of the majority of candidates for infrastructure roles. Most people at the sysadmin level have used Git to clone repositories and maybe push a few changes. Running your own Git server, designing repository structures, building pipelines, and practising GitOps as a daily habit — that is a different conversation entirely.
The tools change at scale. GitHub Enterprise instead of Gitea. Terraform instead of Docker Compose. But the practice — everything in version control, every change reviewed, every deployment automated — is identical. You are not learning a tool. You are building a discipline.

Series Wrap-Up
This is the final guide in the Pi 5 Projects series. Over ten articles, you have built:
- Docker — containerisation foundation
- Portainer — container management and visibility
- Pi-hole — network-wide DNS filtering
- Nginx Proxy Manager — reverse proxy and SSL
- Home Assistant — event-driven automation
- Ollama — local AI model serving
- Uptime Kuma — monitoring and alerting
- K3s — Kubernetes orchestration
- n8n — workflow automation connecting everything
- Gitea — version control and CI/CD for all of it
That is not a hobby project list. That is a platform. Containerisation, orchestration, networking, monitoring, automation, AI, and version control — running on hardware you own, configured by you, maintained by you.
When someone asks about your infrastructure experience, you do not point at a certification. You point at a running system. That is worth more than any exam.
Previous: n8n: Connect Everything With Visual Workflow Automation
Series hub: Raspberry Pi 5 Homelab: 10 Projects That Actually Advance Your Career
Built something from this series? I would genuinely like to hear about it. Drop a comment with your setup — what you are running, what broke, what you learned. The best homelabs are the ones people actually use.

ReadTheManual is run, written and curated by Eric Lonsdale.
Eric has over 20 years of professional experience in IT infrastructure, cloud architecture, and cybersecurity, but started with PCs long before that.
He built his first machine from parts bought off tables at the local college campus, hoping they worked. He learned on BBC Micros and Atari units in the early 90s, and has built almost every PC he’s used between 1995 and now.
From helpdesk to infrastructure architect, Eric has worked across enterprise datacentres, Azure environments, and security operations. He’s managed teams, trained engineers, and spent two decades solving the problems this site teaches you to solve.
ReadTheManual exists because Eric believes the best way to learn IT is to build things, break things, and actually read the manual. Every guide on this site runs on infrastructure he owns and maintains.
Enjoyed this guide?
New articles on Linux, homelab, cloud, and automation every 2 days. No spam, unsubscribe anytime.