Pi-hole on Raspberry Pi 5: Network-Wide Ad Blocking and DNS You Control
Of all the projects in this series, Pi-hole delivers the fastest return on investment. Not in some abstract career-value sense — in the “my partner just thanked me for making the internet less annoying” sense. Within ten minutes of pointing your router at Pi-hole, every device in your house stops seeing most ads. Phones, tablets, smart TVs, the kids’ devices — everything. No software to install on each device. No browser extensions to configure. It just works.
I deployed Pi-hole on my home network over a year ago. The family noticed within hours. YouTube pre-roll ads on the TV disappeared. The kids’ free-to-play games stopped showing interstitial adverts every thirty seconds. My partner’s phone stopped redirecting to dodgy ad pages when reading recipe sites. Nobody asked me to explain what I’d done — they just said “the internet’s better now.”
That’s the immediate benefit. The deeper benefit is what it teaches you about DNS, and what the query logs reveal about your network. The first time you check the dashboard and see that your smart TV made 4,000 tracking requests overnight, you’ll understand why privacy engineers exist.
Career Value: DNS is involved in almost every network troubleshooting scenario you’ll ever encounter. “It’s always DNS” is the most repeated joke in infrastructure for a reason — it’s usually true. Understanding how DNS resolution works, how to read query logs, and how DNS-based filtering operates maps directly to enterprise DNS infrastructure (Windows DNS, BIND, Infoblox), network security appliances, and corporate content filtering. These are core skills for Network Engineer and Systems Administrator roles at £40-60k, and the foundation for Security Engineer positions at £55-75k.
What Pi-hole Actually Does
Pi-hole is a DNS sinkhole. That sounds technical, but the concept is simple: every device on your network needs to look up domain names to connect to anything. When your phone wants to load a webpage, it asks a DNS server “what’s the IP address for example.com?” Pi-hole sits in the middle of that process. When a device asks for the IP address of a known advertising or tracking domain, Pi-hole responds with a dead-end address instead of the real one. The request never leaves your network.
This is fundamentally different from browser-based ad blockers like uBlock Origin. Those work per-device, per-browser, and can’t touch apps, smart TVs, or IoT devices. Pi-hole works at the network level. If it connects to your Wi-Fi, Pi-hole filters it. Your smart TV that’s been phoning home to a dozen analytics services? Blocked. The weather app that loads fifteen ad networks before showing you the forecast? Blocked. The smart speaker that reports your usage patterns to its manufacturer? Blocked — or at least, you’ll know about it.
What Pi-hole blocks:
- Advertising domains (the obvious one)
- Tracking and analytics scripts
- Telemetry endpoints (Windows, smart TVs, IoT devices)
- Known malware command-and-control domains
- Cryptojacking scripts
What Pi-hole doesn’t block:
- YouTube in-stream adverts (these come from the same domain as the video content)
- Ads on Facebook/Instagram in-feed (same domain as the content)
- Anything that doesn’t require a separate DNS lookup
It’s not perfect. But it catches a remarkable amount, and on devices where you can’t install an ad blocker — smart TVs, IoT gadgets, games consoles — it’s your only option.
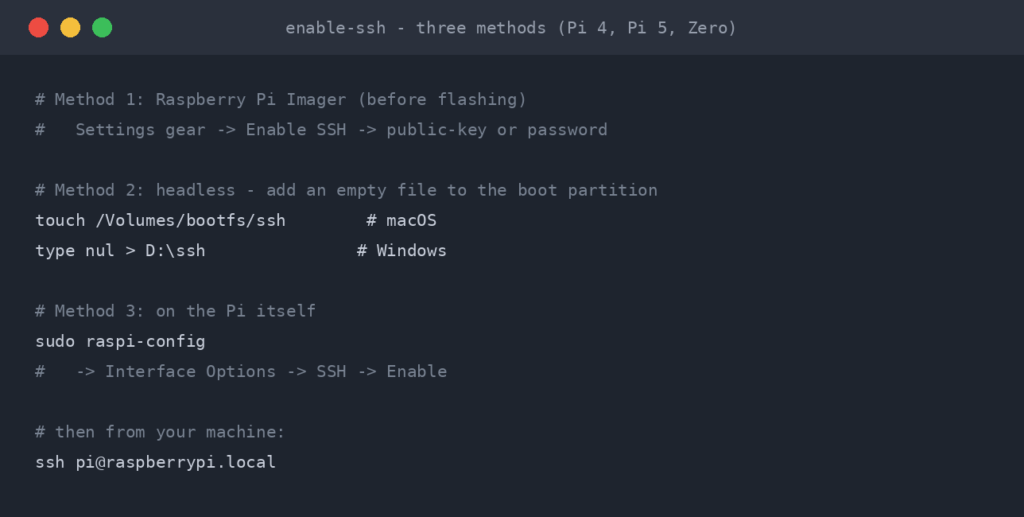
Prerequisites
This guide assumes you’ve completed Project 1: Docker and have Docker and Docker Compose running on your Pi 5. If you haven’t, go and do that first — it takes about fifteen minutes.
You’ll need:
- Raspberry Pi 5 with Docker installed and running
- SSH access to your Pi
- Access to your router’s admin panel (you’ll need to change DNS settings)
- Your Pi’s static IP address (if you haven’t set one, now’s the time)
Static IP required. If your Pi’s IP address changes via DHCP, every device on your network will lose DNS resolution. Set a static IP on the Pi itself or create a DHCP reservation on your router before proceeding. This is non-negotiable.
The Port 53 Problem (Ubuntu Users, Read This First)
If you’re running Ubuntu Server on your Pi 5 — and if you followed the earlier guides in this series, you are — you’re about to hit the single most common Pi-hole installation failure. It’s not a bug. It’s a feature of Ubuntu that happens to conflict with exactly what Pi-hole needs to do.
Ubuntu runs a local DNS stub resolver called systemd-resolved. It listens on port 53, which is the standard DNS port. Pi-hole also needs port 53. Two services can’t bind to the same port. If you try to start Pi-hole without fixing this, it’ll fail with a “port already in use” error and you’ll spend twenty minutes wondering what you did wrong.
Here’s how to fix it properly.
Step 1: Check if systemd-resolved is using port 53
sudo ss -lntp | grep ':53 'If you see systemd-resolve in the output, you need to fix this before proceeding.
Step 2: Edit the resolved configuration
sudo nano /etc/systemd/resolved.confFind or add these lines under [Resolve]:
[Resolve]
DNSStubListener=no
DNS=1.1.1.1
FallbackDNS=8.8.8.8
Step 3: Update the resolv.conf symlink
# Remove the existing symlink
sudo rm /etc/resolv.conf

# Create a new symlink pointing to the resolved config
sudo ln -s /run/systemd/resolve/resolv.conf /etc/resolv.conf
Step 4: Restart systemd-resolved
sudo systemctl restart systemd-resolvedStep 5: Verify port 53 is free
sudo ss -lntp | grep ':53 'This should now return nothing. Port 53 is free for Pi-hole.
Why not just disable systemd-resolved entirely? You can, with sudo systemctl disable systemd-resolved. But that leaves your Pi without any DNS resolution until Pi-hole is running. If Pi-hole is ever down for maintenance, your Pi can’t resolve anything — including pulling Docker images to fix the problem. The approach above is cleaner: it stops the stub listener that conflicts with port 53 but keeps the service available as a fallback.
Don’t skip the resolv.conf step. If you only change the config and restart the service without updating the symlink, Ubuntu will still try to use the old stub resolver address (127.0.0.53) for its own DNS lookups. Your Pi won’t be able to resolve domains, and you’ll be debugging a DNS issue on the very machine that’s supposed to be your DNS server. I’ve made this mistake. It’s maddening.
Installing Pi-hole with Docker
With port 53 freed up, the actual installation is straightforward. We’re using Docker Compose because, as with everything in this series, your infrastructure should be defined in files you can version control and redeploy.
Step 1: Create the project directory
mkdir -p ~/services/pihole
cd ~/services/pihole
Step 2: Create the environment file
Create a .env file with your configuration:
cat > .env << 'EOF'
# Pi-hole Configuration
PIHOLE_PASSWORD=your-secure-admin-password-here
PIHOLE_DNS=1.1.1.1;8.8.8.8
TZ=Europe/London
PI_IP=192.168.1.100
EOF
Replace PI_IP with your Pi's actual static IP address.
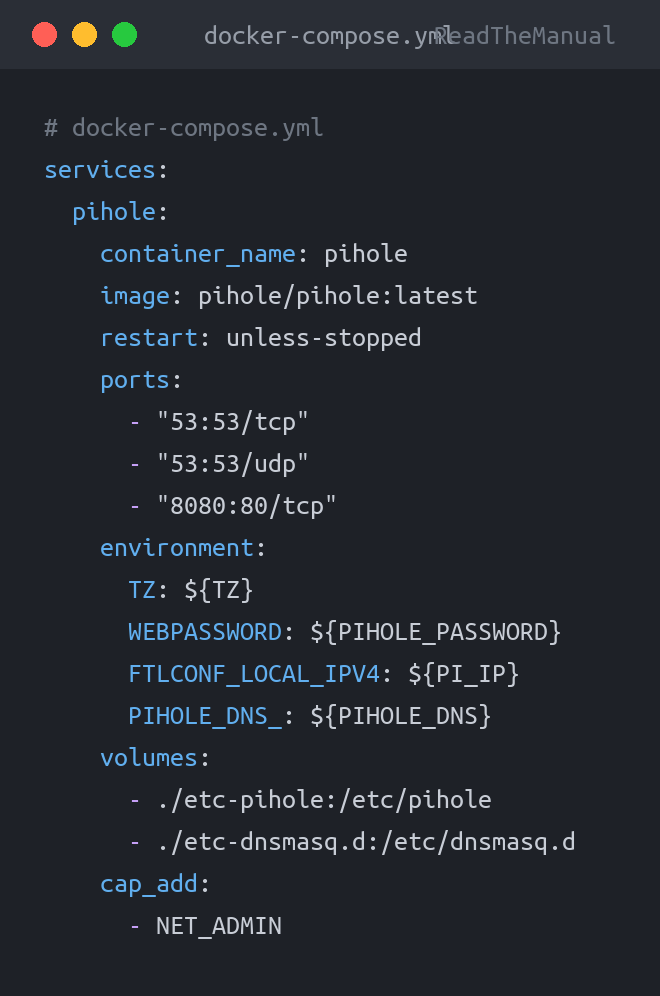
Step 3: Create the Docker Compose file
# docker-compose.yml
services:
  pihole:
    container_name: pihole
    image: pihole/pihole:latest
    restart: unless-stopped
    ports:
      - "53:53/tcp"
      - "53:53/udp"
      - "8080:80/tcp"
    environment:
      TZ: ${TZ}
      WEBPASSWORD: ${PIHOLE_PASSWORD}
      FTLCONF_LOCAL_IPV4: ${PI_IP}
      PIHOLE_DNS_: ${PIHOLE_DNS}
    volumes:
      - ./etc-pihole:/etc/pihole
      - ./etc-dnsmasq.d:/etc/dnsmasq.d
    cap_add:
      - NET_ADMIN
Note the port mapping: We're mapping Pi-hole's web interface to port 8080 on the host (8080:80), not port 80. This avoids a conflict if you later install Nginx Proxy Manager (Project 4), which needs port 80. Plan ahead — port conflicts between services are one of the most common homelab headaches, and they're trivially avoidable if you think about it at deployment time.
Step 4: Start Pi-hole
docker compose up -dStep 5: Verify it's running
# Check the container is up
docker compose ps

# Check DNS is responding
dig @127.0.0.1 google.com

# If dig isn't installed:
# sudo apt install dnsutils
You should see a DNS response with google.com's IP address. If you get a timeout, check the container logs:
docker compose logs piholeStep 6: Access the web interface
Open a browser and go to http://YOUR-PI-IP:8080/admin. Log in with the password you set in the .env file.
You should see the Pi-hole dashboard. At this point, it's working but only your Pi is using it. The next step is making your whole network use it.
Configuring Your Router
For Pi-hole to filter your entire network, every device needs to use it as their DNS server. The cleanest way to do this is at the router level.
Option 1: Change your router's DNS settings (recommended)
Log into your router's admin panel and find the DNS settings. This is usually under DHCP settings, LAN settings, or Internet settings — every router manufacturer puts it somewhere different.
- Set the primary DNS server to your Pi's IP address
- Set the secondary DNS server to either your Pi's IP again, or a fallback like 1.1.1.1
The secondary DNS debate. If you set a public DNS (like 1.1.1.1) as your secondary, devices may use it instead of Pi-hole when they feel like it, bypassing your filtering entirely. Some routers and operating systems will alternate between primary and secondary. If you want consistent filtering, set both primary and secondary to your Pi's IP. The trade-off is that if the Pi goes down, your entire network loses DNS. In practice, Pi-hole on a Pi 5 is remarkably stable — mine has been running for months without a restart. But it's a decision you should make consciously.
Option 2: DHCP-level DNS assignment
Some routers let you set the DNS server that gets pushed to devices via DHCP. This is better than changing the router's own DNS, because you can see individual device queries in Pi-hole's logs (rather than all queries appearing to come from the router).
Look for DHCP settings in your router and set the DNS server to your Pi's IP.
Option 3: Per-device configuration
If you can't change router settings (rented ISP routers are notorious for locking this down), you can manually set DNS on individual devices. This is tedious but works. On each device, set the DNS server to your Pi's IP address.
After changing DNS settings, you'll need to renew DHCP leases on your devices. The quickest way is to reconnect to Wi-Fi or restart the device. Within a few minutes, you should start seeing queries appear in the Pi-hole dashboard.
The Privacy Revelation
The first hour with Pi-hole running is genuinely eye-opening. Not because of the ad blocking — because of what the query logs reveal.
Within the first day of running Pi-hole on my network, I discovered:
- My smart TV was making thousands of requests to Samsung analytics endpoints. Not when I was watching anything. Just sitting there on standby.
- A children's tablet was contacting over a dozen ad networks before the child had even opened an app.
- Windows 10 machines were making hundreds of requests to Microsoft telemetry endpoints every day, even with telemetry "minimised" in settings.
- Smart home devices were phoning home to their manufacturers' analytics platforms constantly, reporting usage patterns.
- My phone, even when idle, was making requests to tracking domains every few minutes.
The Pi-hole dashboard tells you exactly how much of your network traffic is advertising and tracking. For most home networks, it's between 15% and 35% of all DNS queries. Let that sink in. Up to a third of what your devices are doing on the internet is reporting on you or trying to sell you things.
If you're interested in the broader privacy implications, the Digital Sovereignty series on readthemanual covers why this matters and what you can do about it beyond DNS filtering.
Reading the Dashboard
The Pi-hole dashboard is more than a pretty graph. Here's what the key metrics tell you:
Total Queries: The number of DNS lookups your network has made. A typical household generates 30,000-100,000 per day. If this seems high, remember that a single web page can trigger dozens of DNS lookups for scripts, images, fonts, analytics, and ads.
Queries Blocked: How many of those lookups Pi-hole intercepted. The percentage gives you a rough idea of how much of your network traffic was advertising or tracking.
Percentage Blocked: Healthy ranges are typically 15-35% for a normal household. If you're seeing over 50%, you might have overly aggressive blocklists. If you're under 10%, your blocklists may need updating.
Top Permitted Domains: What your network uses most. Expect to see things like connectivity-check.ubuntu.com, NTP servers, and whatever streaming services your household uses.
Top Blocked Domains: The domains Pi-hole is catching most frequently. This is where the interesting revelations live. Sort by client to see which devices are the worst offenders.
Query Log: The real-time stream of every DNS lookup on your network. Each entry shows the domain requested, which device made the request, whether it was blocked or permitted, and which upstream DNS server answered it. This is the single most educational view — spend ten minutes watching it and you'll learn more about how the internet works than any textbook can teach.
Blocklists and Whitelists
Adding Blocklists
Pi-hole comes with a default blocklist that catches the most common offenders. You can add more via the web interface under Adlists.
Recommended additional lists:
- Steven Black's Unified Hosts:
https://raw.githubusercontent.com/StevenBlack/hosts/master/hosts— comprehensive, well-maintained, the standard recommendation - OISD (full):
https://big.oisd.nl/— aggressive but well-curated, blocks a lot of telemetry - Developer Dan's Ads & Tracking:
https://www.github.developerdan.com/hosts/lists/ads-and-tracking-extended.txt— good supplement
After adding lists, go to Tools > Update Gravity to pull the latest entries. Pi-hole updates gravity automatically on a weekly schedule, but you should run it manually after adding new lists.
More lists is not always better. Aggressive blocklists will break things. Banking websites, captive portals, some app login flows, and CAPTCHA services can all stop working if you block too aggressively. Start with the defaults and one additional list, live with it for a week, then add more if you're comfortable with the trade-off. You can always add lists later. Debugging why your online banking suddenly won't load is a much worse experience than seeing a few ads.
Whitelisting: When Things Break
And things will break. It's not a question of if, it's when. Someone in your house will try to do something and it won't work, and the answer will be Pi-hole. Here's how to handle it.
Finding what to whitelist:
- Go to the Pi-hole query log
- Filter by the device that's having problems
- Look for blocked domains (shown in red) that correspond to the service that's broken
- Add the domain to the whitelist
Common whitelisting needs:
s.youtube.com— YouTube history and recommendationscdn.optimizely.com— some sites won't load without thisclients4.google.com— Android connectivity checkscaptive.apple.com— Apple device Wi-Fi portal detection- Various Microsoft domains if you use Microsoft 365
- Your bank's CDN and authentication domains
There's a community-maintained whitelist at https://github.com/anudeepND/whitelist that covers common false positives. It's worth reviewing but don't blindly add everything — some entries will re-enable tracking you specifically want blocked.
The family diplomacy tip: When someone in your house says "this thing doesn't work," don't launch into an explanation of DNS sinkholes. Just say "let me check," pull up the query log on your phone, find the blocked domain, whitelist it, and say "try again." You'll look like a wizard and avoid a conversation about privacy that nobody asked for at that moment. Save the philosophical discussion for when they ask why the internet's been so much faster lately.
Troubleshooting: When Things Stop Resolving
DNS is critical infrastructure. When it breaks, nothing works — no web browsing, no email, no streaming, nothing. Here are the common failure modes and how to fix them.
Problem: No DNS resolution at all
Symptoms: Nothing loads on any device. Browsers show "DNS_PROBE_FINISHED_NXDOMAIN" or similar.
# First, check if Pi-hole container is running
docker ps | grep pihole

# If it's not running, check why
docker compose -f ~/services/pihole/docker-compose.yml logs --tail 50

# Restart it
docker compose -f ~/services/pihole/docker-compose.yml restart

# Verify DNS is responding
dig @YOUR-PI-IP google.com
Problem: Pi-hole is running but not blocking anything
Symptoms: The dashboard shows zero queries, or all queries come from the router's IP instead of individual devices.
This usually means devices aren't using Pi-hole as their DNS server. Check your router settings. If all queries appear from one IP (your router), your router is proxying DNS requests rather than pointing devices at Pi-hole directly. Check for a "DNS proxy" or "DNS relay" option in your router and disable it, or set the DHCP DNS option instead of the router's own DNS.
Problem: Specific websites not loading
Symptoms: Most things work, but one site or app doesn't.
Check the query log for blocked domains from the affected device. Nine times out of ten, a required CDN or authentication domain is on a blocklist. Whitelist it and try again.
Problem: Slow DNS resolution
Symptoms: Pages take noticeably longer to start loading (but are fine once they start).
This is usually the upstream DNS being slow. Go to Settings > DNS in the Pi-hole admin and check your upstream servers. Try switching to a faster provider (1.1.1.1 tends to be fastest in the UK). You can also enable Pi-hole's built-in conditional forwarding for local domain resolution.
Emergency: Regain access if Pi-hole is unreachable
# On any device, manually set DNS to bypass Pi-hole temporarily
# Linux:
echo "nameserver 1.1.1.1" | sudo tee /etc/resolv.conf

# Then SSH to the Pi and fix the issue
ssh user@YOUR-PI-IP

# Once fixed, revert the DNS change
Keep a note of these emergency steps somewhere offline. If your DNS is down, you can't Google "how to fix DNS." Write your Pi's IP address and the basic recovery commands on a sticky note near your desk. It sounds old-fashioned, but when the internet's down at 10pm and your partner is giving you That Look, you'll be glad you did.
Pi-hole and the Bigger Privacy Picture
Pi-hole is a starting point, not a complete solution. It blocks DNS-based tracking, but modern tracking has evolved well beyond simple domain lookups.
What Pi-hole handles well:
- Third-party ad networks
- Analytics scripts loaded from separate domains
- IoT device telemetry to known endpoints
- Malware domains from curated blocklists
What Pi-hole can't stop:
- First-party tracking (same domain as the content)
- Browser fingerprinting
- Tracking via IP addresses rather than domains
- Encrypted DNS bypasses (DNS-over-HTTPS from apps that use their own resolvers)
For a deeper look at building layered privacy defences, see the Digital Sovereignty series on readthemanual. Pi-hole is one layer in a defence-in-depth approach. It's an important layer — possibly the easiest and most impactful single thing you can do — but it's not the whole picture.
Keeping Pi-hole Updated
Pi-hole running in Docker makes updates straightforward:
cd ~/services/pihole

# Pull the latest image
docker compose pull

# Recreate the container with the new image
docker compose up -d

# Verify it's running
docker compose ps
Your configuration, blocklists, and whitelists are stored in the mounted volumes (./etc-pihole and ./etc-dnsmasq.d), so they survive container updates. This is why we use volumes — the container is disposable, the data isn't.
If you've set up Gitea (Project 10 in this series), commit your docker-compose.yml and .env.example (never the .env itself — it contains your password) to version control. If you ever need to rebuild, you want to recreate from config, not from memory.
The Enterprise Connection
Every skill you've just practiced has a direct enterprise equivalent:
| Pi-hole Skill | Enterprise Equivalent |
|---|---|
| DNS sinkhole configuration | DNS-based security (Cisco Umbrella, Infoblox, Zscaler) |
| Blocklist management | Corporate content filtering policies |
| Query log analysis | DNS analytics, threat hunting, SIEM correlation |
| Upstream DNS configuration | DNS forwarding, split-horizon DNS, conditional forwarding |
| systemd-resolved troubleshooting | Linux service conflict resolution, port management |
| Network-wide deployment | DHCP scope configuration, Group Policy DNS settings |
In interviews, "I run DNS infrastructure for my home network with custom filtering and query analytics" demonstrates practical understanding that no certification exam covers. DNS is one of those topics where practical experience immediately distinguishes you from candidates who only know the theory. When someone says "it's a DNS issue," you'll actually know how to prove it.
If you want to build on this foundation, Network Troubleshooting Commands covers the broader diagnostic toolkit that pairs with DNS knowledge.
What's Next
Pi-hole gives you DNS filtering. The next project gives your services proper addresses.
Right now, you're accessing Pi-hole at http://192.168.1.100:8080/admin. Portainer is on port 9443. Any future services will be on their own ports. This doesn't scale — and more importantly, it doesn't teach you how production infrastructure actually works.
Project 4: Nginx Proxy Manager puts a reverse proxy in front of everything, giving each service a proper URL with SSL certificates. It's the same pattern that every enterprise uses for web application delivery, and it's the skill that maps to Kubernetes ingress controllers, AWS Application Load Balancers, and Azure Application Gateway.