
I posted on LinkedIn this week about building a homelab from e-waste. One laptop, zero pounds, a public webapp at the end. This is the technical write-up that the 3,000-character limit on LinkedIn couldn’t fit.
If you want the short version of why, read the LinkedIn post. If you want the step-by-step of how a 2010 Advent Verona with 3GB of RAM ends up serving a hardened Flask app to the public internet behind Cloudflare, you’re in the right place.
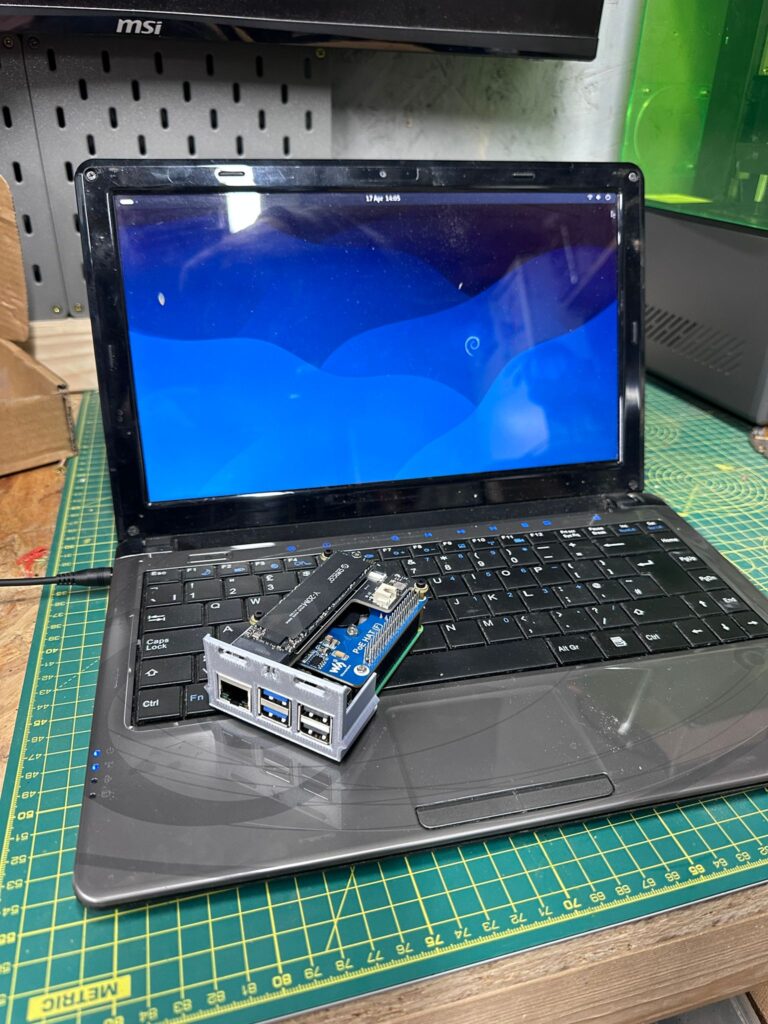
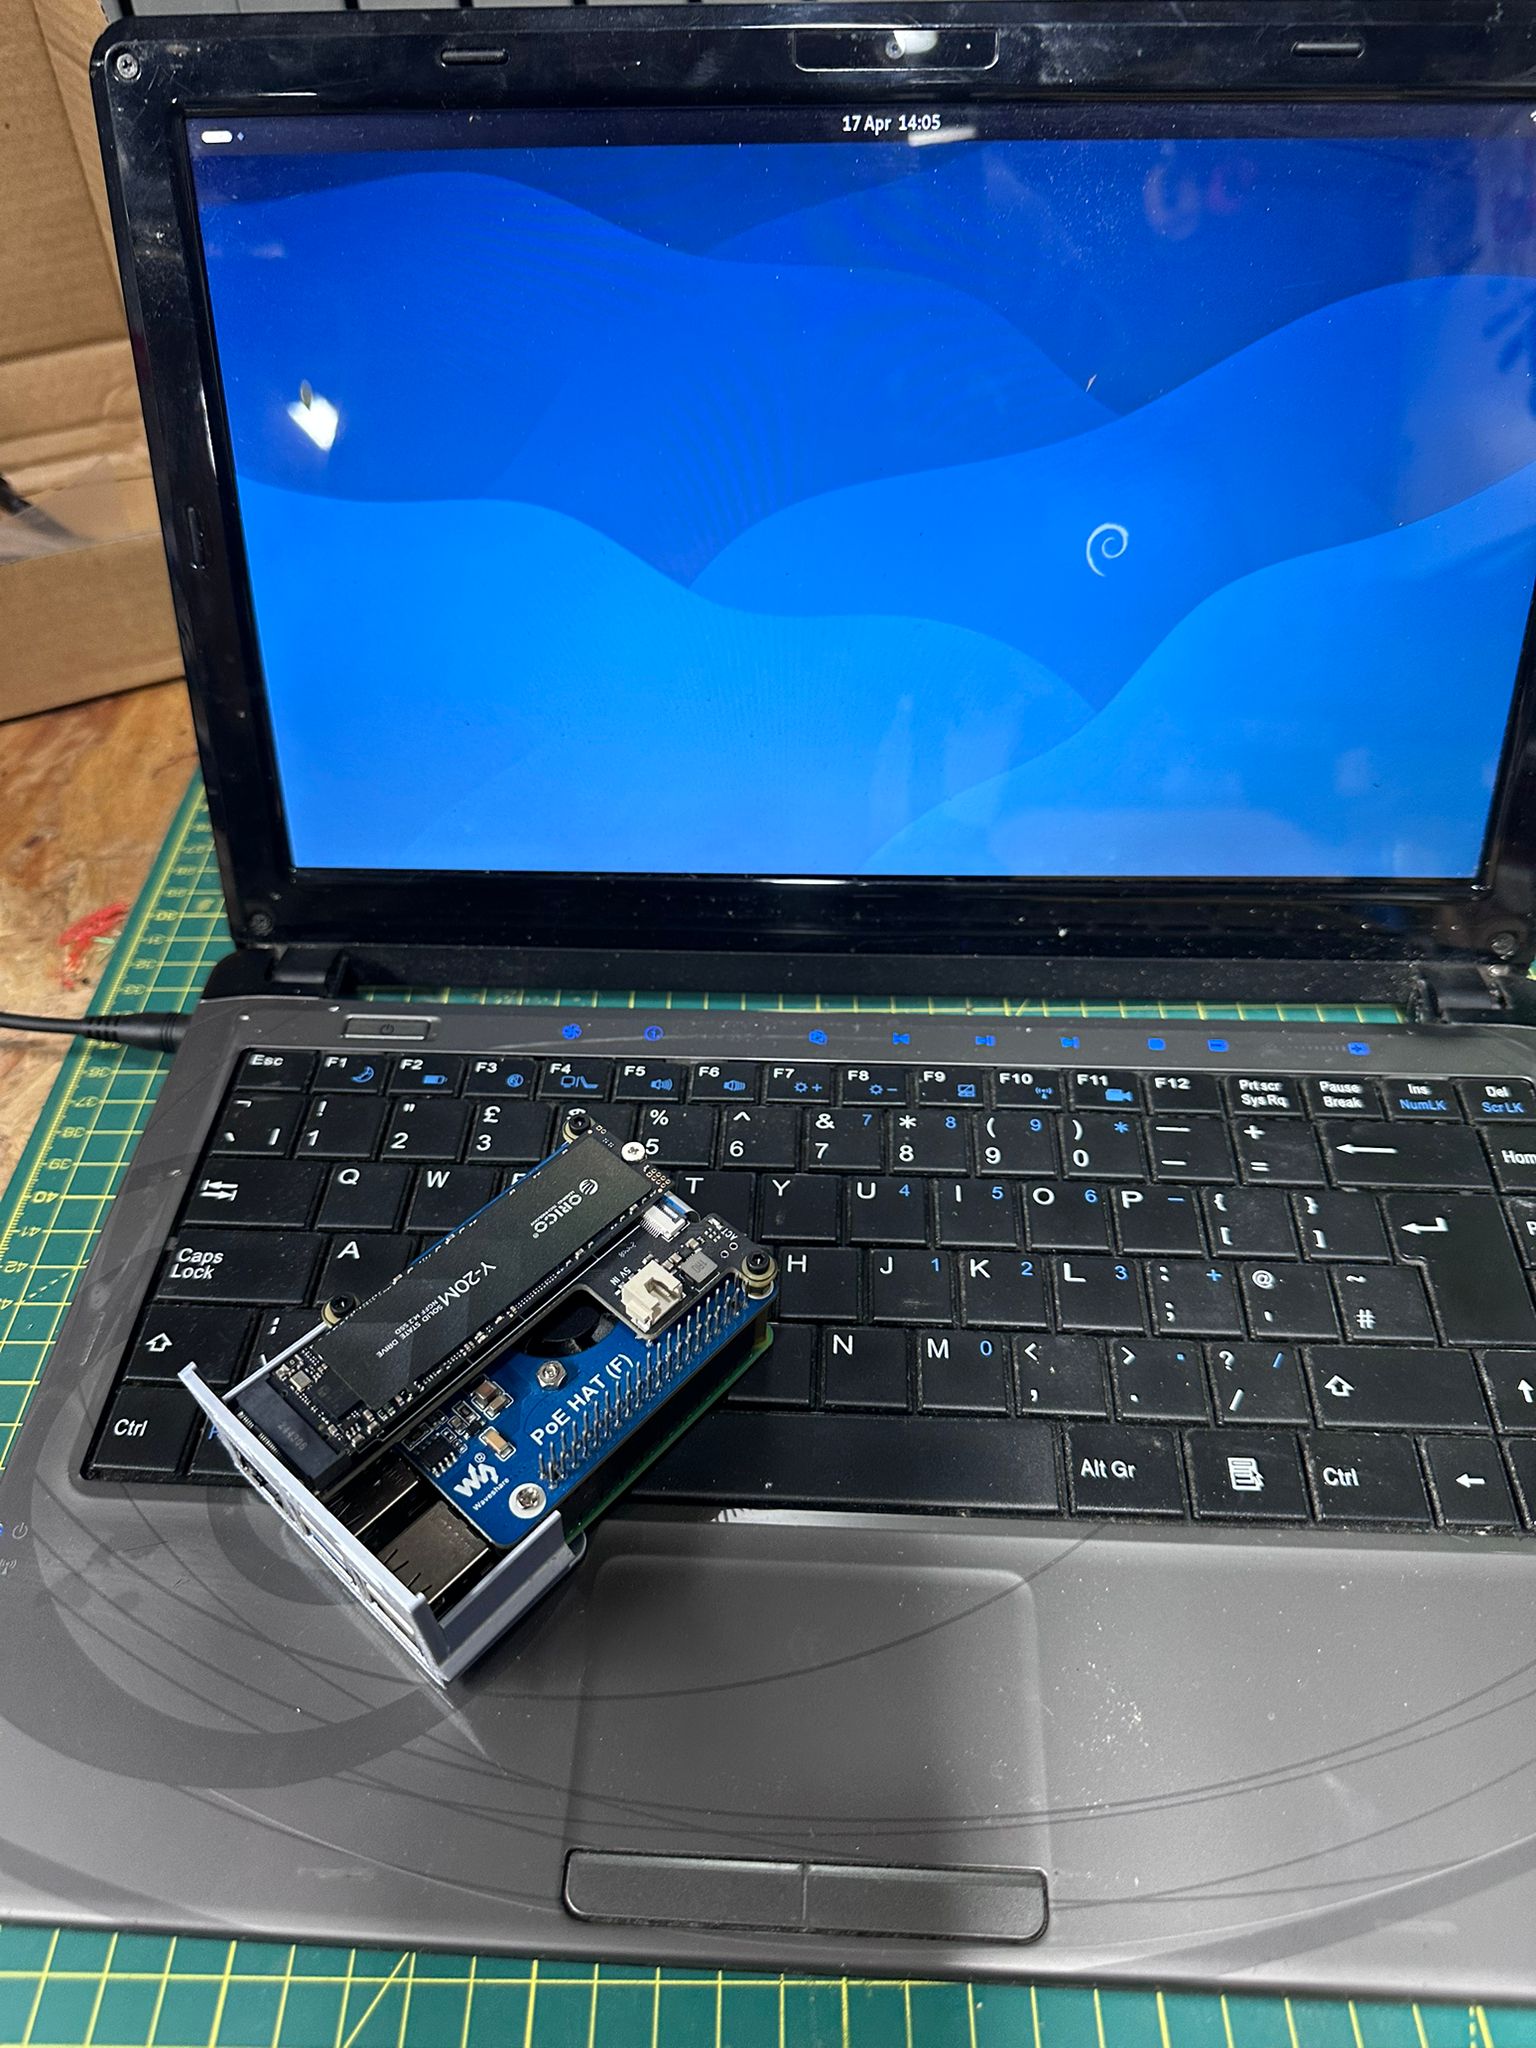
Everything in this post runs on actual hardware I’m looking at right now. No theory. No lab diagram with cartoon clouds. Real build, warts and all.

The machine
Advent Verona, circa 2010. Intel Celeron 1.3GHz, 3GB of RAM, dying spinning-rust hard drive, wobbly hinge, leaking battery, missing a screw on the palm rest. By any reasonable measure, the worst computer in the house. Every Raspberry Pi I own has more headroom.
Cost to acquire: £0. It was already mine. It was already useless. A drawer was storing it for me until I needed it.
The point of the project is not that this hardware is good. It isn’t. The point is that “I can’t afford a homelab” is almost never the real reason people aren’t building one. The real reason is usually that nobody told them what the cheapest viable starting point looks like. So here it is.

The install
Ubuntu Server gave up roughly a third of the way through the install. The installer hung on a package step and never recovered. I tried twice. Two different USB sticks, two different ISOs, same result. Not a surprise on 3GB of RAM with a failing drive.
Debian 13 installed cleanly in 20 minutes. Debian is what I’d reach for anyway on constrained hardware. Smaller footprint, fewer background services, much kinder to a Celeron.

The original drive was dying audibly. A spare Kingston 60GB SATA SSD from a previous machine was sitting in my parts tray, so in it went. If you don’t have a drawer full of rescued components, the closest current-generation equivalent is something like the Patriot Burst Elite 120GB 2.5″ SATA SSD at around £29. Same form factor, same SATA 3 interface, twice the capacity, widely available. Unscrew, unplug, swap, reinstall.
The one thing I genuinely had to buy was a charger. The Verona’s original power brick had packed in along with the battery, and the proprietary barrel connector meant nothing else in the house fit. A 100W multi-tip laptop charger for £25.89 solved it. Ships with interchangeable tips for most major laptop brands including older Advent-era barrel plugs, so it works on this machine and on basically anything else you might rescue from a cupboard. Worth having as a spare even if you don’t need it today.
Total out of pocket on parts: £25.89. The laptop was free, the SSD came from my scrap pile, the Debian ISO was free, the USB stick was already in a drawer. One genuine purchase, and this Linux server was running.
Why you harden a £0 box
The obvious counter-argument to everything that follows is: “this is a transient host, skip the security.” Wrong answer.
The second you put a machine on the public internet, attack surface stops being theoretical. The whole point of this build is to treat a £0 laptop exactly like I’d treat a production VM. Every shortcut you take on the toy project is a habit you carry into the paid one.
If you’re using a homelab to practice the job, you practice the whole job. That includes the unglamorous parts.
The baseline: one playbook, seven defences
Rather than click through hardening steps one at a time, I run a single Ansible playbook that I reuse across every Linux host I stand up. One command, consistent result.
The baseline stack:
- ClamAV for anti-virus scanning, with a nightly cron that scans /home, /var/www, /opt and /tmp. Not glamorous. Catches things.
- fail2ban tuned with a 1-hour ban, 10-minute findtime and 5 max attempts on SSH.
- UFW with default-deny inbound, default-allow outbound, and explicit allow rules for the ports I actually need.
- SSH hardening: PermitRootLogin prohibit-password, X11Forwarding off, MaxAuthTries 5, ClientAlive timers set.
- unattended-upgrades so security patches apply without me remembering. Daily.
- auditd for kernel-level audit logging of process execution, file changes and privilege escalation.
- node_exporter on port 9100 so Prometheus can scrape this host’s metrics, and the Wazuh agent reporting back to my SIEM manager. GLPI agent too, for asset inventory.
None of that is hard. All of it is boring. Most of it is standard on any production server in the real world. The playbook runs against a new host in about four minutes.
Skipping this step because the host is “only a demo” is how hobby projects end up as the pivot point in somebody else’s incident report.
The DMZ: network isolation for anything that faces the internet
This is a DMZ. Demilitarized Zone, a slightly dated military metaphor that has stuck around anyway, and the pattern it names has been a standard in corporate networks for decades. A DMZ is a separate network segment for any machine that faces the public internet, fenced off from the rest of your estate so that if one of them is compromised, the attacker lands somewhere empty instead of next to your databases.
Worth acknowledging that Cloudflare Tunnel does erode some of the traditional reasoning for building a DMZ. A classical DMZ exists because the public-facing server is, in fact, public-facing: ports open through the firewall, a listening socket reachable from the internet. With a Cloudflare Tunnel there is no open port on the router, no listening socket exposed anywhere, no inbound surface for an attacker to aim at. The tunnel daemon runs outbound-only and Cloudflare’s edge forwards traffic down to the service on loopback. What you’re exposing to the internet is a single container’s HTTP handler, not a server.
The DMZ still earns its keep. The container can be compromised through the application itself: a framework vulnerability, a bad dependency, a supply-chain issue in the base image. When that happens you want the attacker’s next hop from inside the compromised process to end at a firewall rule, not at your home router or file server.
So this laptop does not sit on my main LAN. It lives on its own VLAN on the UniFi, firewalled off from the rest of the estate.
Firewall rules at the gateway:
- Inbound to the Verona: only from my management subnet, only on SSH, node_exporter (9100) and Wazuh agent ports (1514/1515) from the Wazuh manager host. Nothing else.
- Verona outbound: allowed to the internet (for apt updates and the Cloudflare tunnel). Denied east-west to the rest of my LAN. It can’t reach the hypervisor cluster, it can’t see internal services, it can’t ping the router. If it gets compromised, the blast radius is the VLAN itself.
This is defence in depth. The container is read-only and dropped to zero capabilities. The host is hardened. The network is isolated. Each layer costs nothing and assumes the layer above it has failed.
Most homelabs skip network segmentation because it feels advanced. It isn’t. It’s ten minutes in a UniFi controller.
The app: Flask with hardened Docker
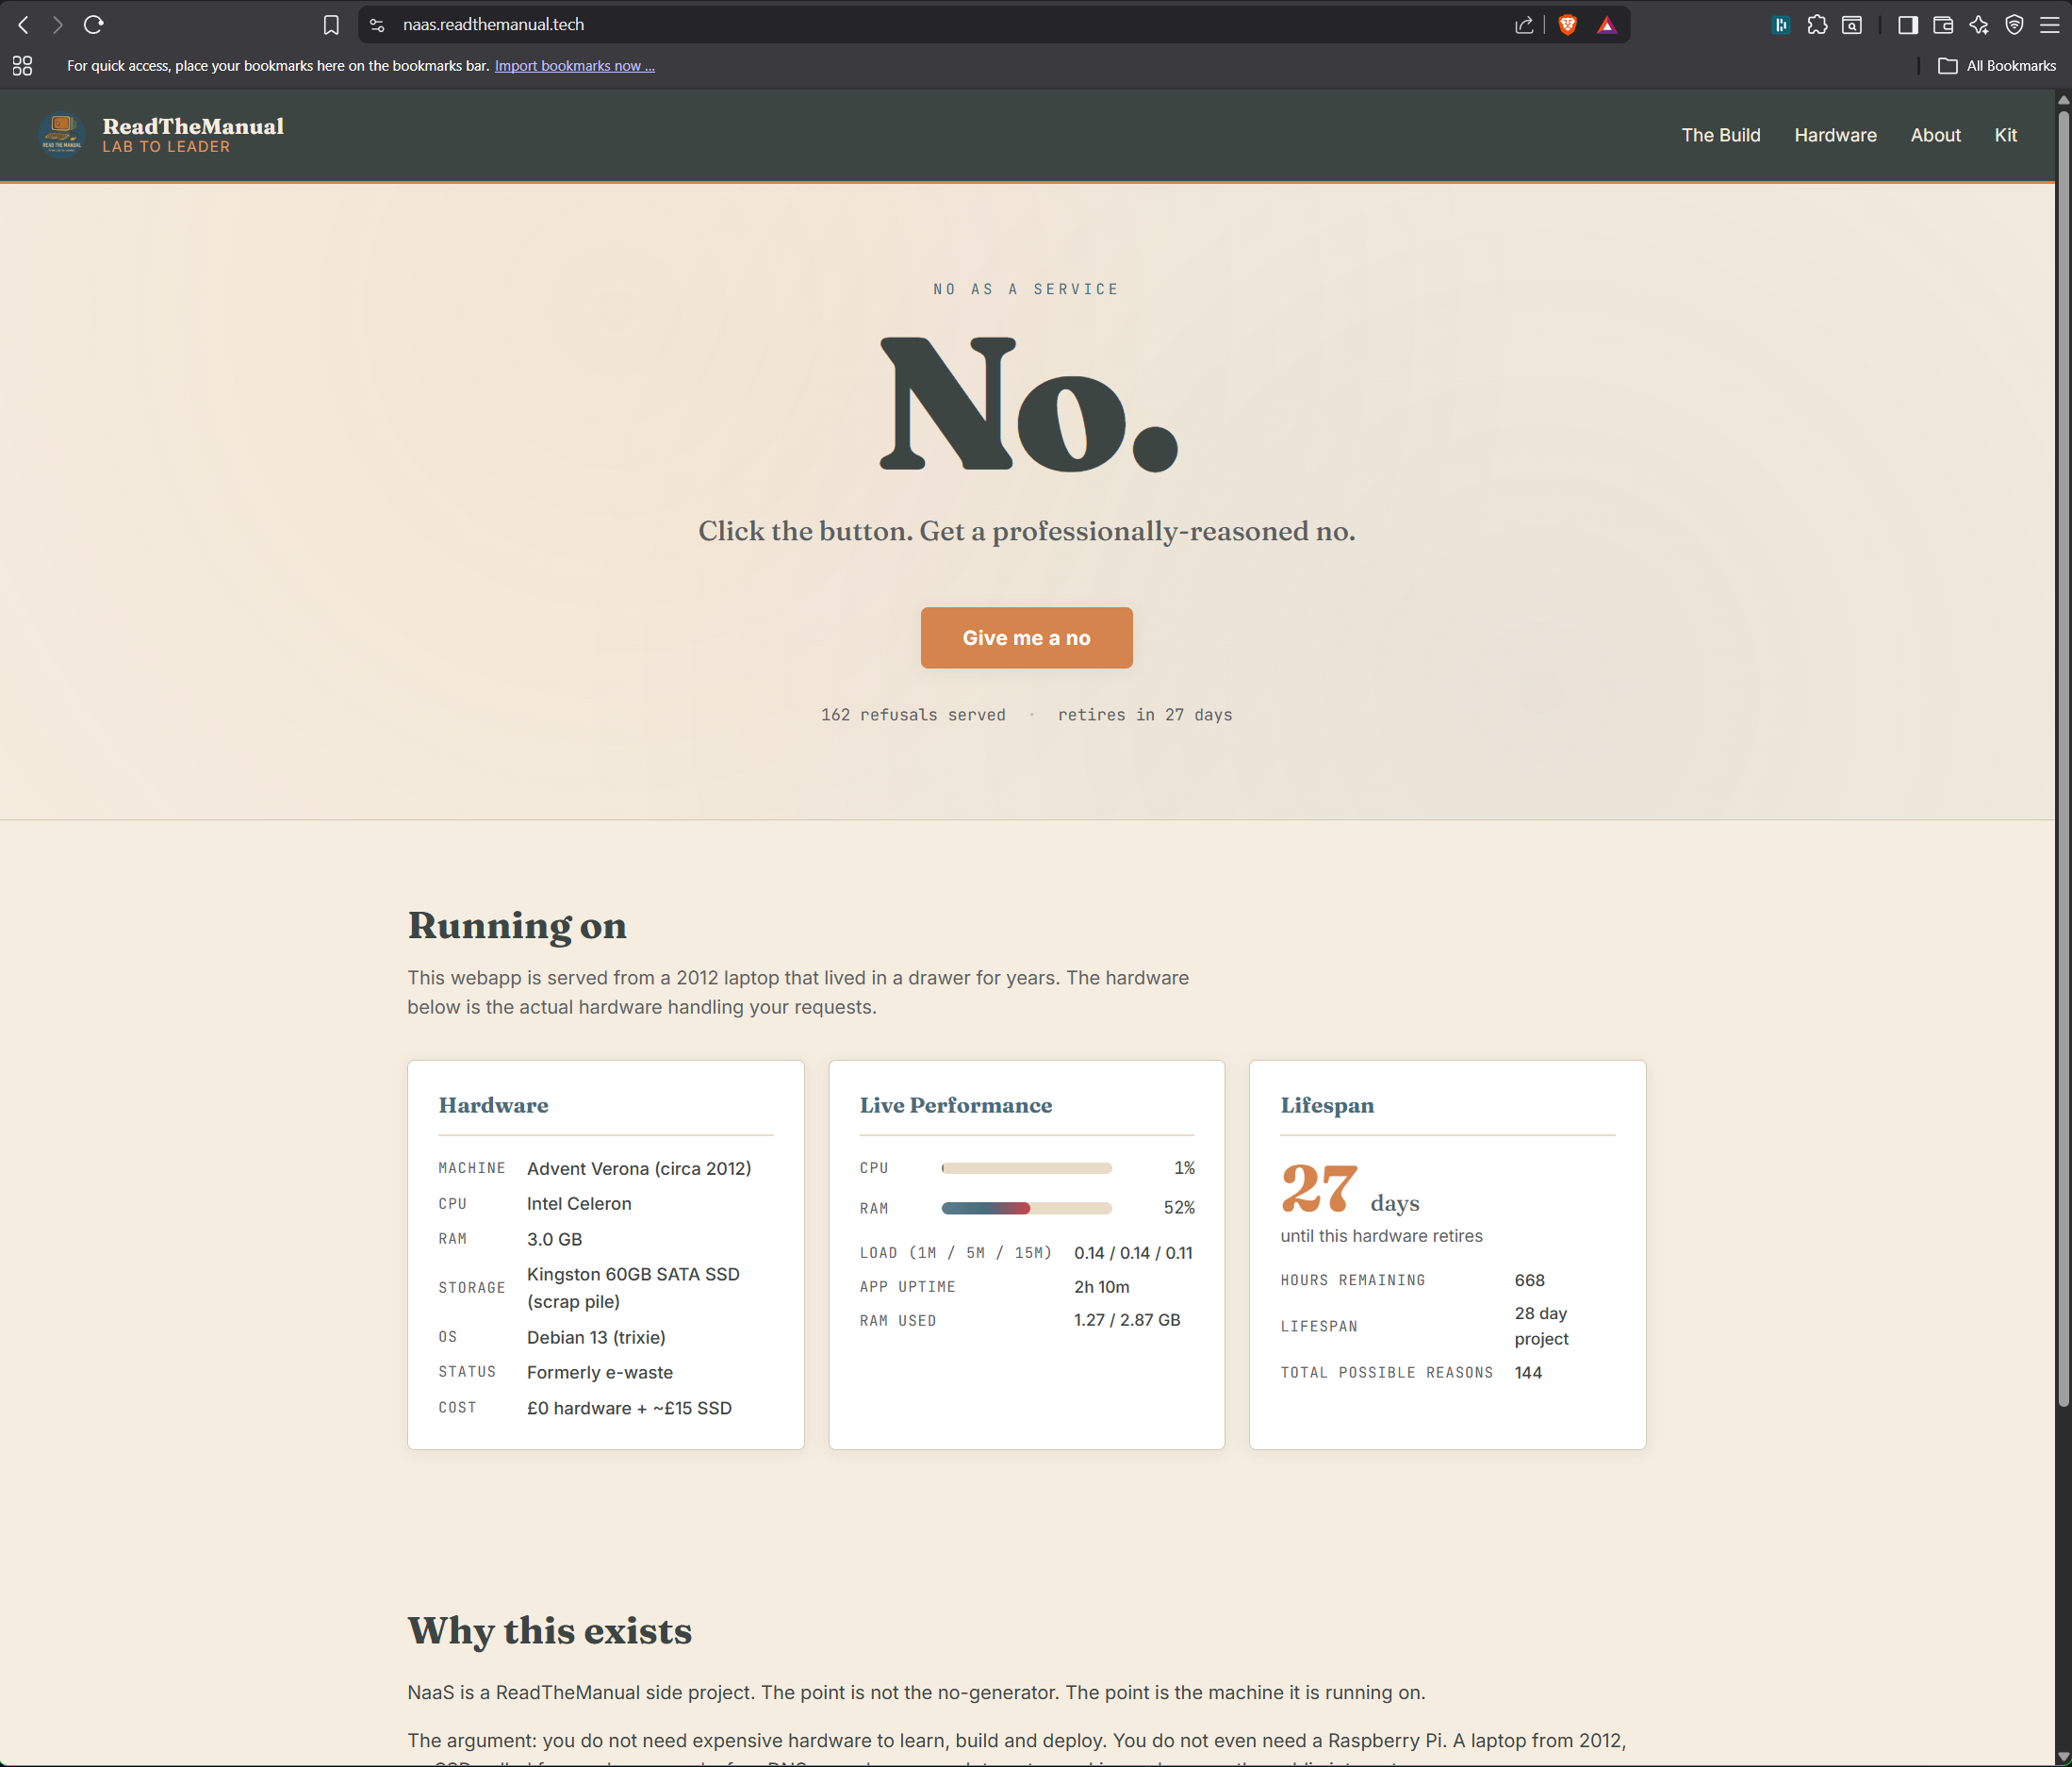
The webapp itself is a Flask service. About 300 lines of Python. It serves sysadmin-grade refusals, shows live hardware stats, and runs a retirement countdown. The code is almost irrelevant to the point of this post, but the way it’s packaged isn’t.
Key lines from the compose file:
services:
  naas:
    image: registry.example.internal/naas:latest
    restart: unless-stopped
    ports:
      - "127.0.0.1:5000:5000"
    read_only: true
    tmpfs:
      - /tmp
    security_opt:
      - no-new-privileges:true
    cap_drop:
      - ALL
    deploy:
      resources:
        limits:
          memory: 256M
          cpus: "0.75"
What that does, in English:
127.0.0.1:5000:5000— the container only listens on loopback. There is no way to reach it from anywhere on the network directly. Public access comes later, through a tunnel.read_only: true— the container’s filesystem is immutable at runtime. Any write attempt fails. Exploits that rely on writing to /etc or /usr stop dead.cap_drop: ALL— strip every Linux capability. The process can’t bind low ports, can’t change file ownership, can’t raise privilege.no-new-privileges— setuid binaries are neutered. A compromised process cannot escalate.- Memory and CPU caps — a bug can’t crash the whole box. The container gets 256MB of RAM and three quarters of one CPU. Misbehave and you get OOM-killed.
The app runs with about 60MB of resident memory and idles under 1% CPU. The 2010 hardware isn’t struggling.
The pipeline: Gitea, a private registry, multi-arch builds
The image does not live on Docker Hub. It lives in a self-hosted container registry running as part of my Gitea install. Source lives in a Gitea repository on the same box. Building happens with an Ansible playbook that archives the code, ships it to the build host, runs docker buildx against both amd64 and arm64, and pushes to the registry.
Multi-arch matters because this image might run on the Advent next week and a Raspberry Pi the week after. Single build, two architectures, same tag.
Self-hosting the registry and the git server is not harder than using GitHub and Docker Hub. It’s about two hours of first-time setup. What it teaches you is worth fifty times that in an interview: you have, with proof, run the same stack that enterprise platform teams are paid to run. Gitea, Harbor, GitLab self-hosted, registry v2, the concepts are identical.
Cloudflare Tunnel: zero-trust ingress
The last piece. The Verona is on a VLAN with no inbound ports open at the router. So how does the public reach naas.readthemanual.tech?
Cloudflare Tunnel runs as a daemon on the Verona, establishes an outbound TLS connection to Cloudflare’s edge, and holds it open. Requests for the hostname hit Cloudflare’s network first, get terminated at their edge, and are forwarded down the tunnel to the Verona. The Verona never accepts an inbound connection from the internet.
A three-line ingress config maps the hostname to the loopback port the container is listening on:
ingress:
  - hostname: naas.readthemanual.tech
    service: http://127.0.0.1:5000
  - service: http_status:404
The benefits, in priority order:
- No port forwarding required on the router. This works behind carrier-grade NAT, behind a VPN, behind a mobile 4G connection. The Verona would work over a mobile dongle if it had to.
- No public IP exposed. The origin IP is invisible. There is no IP to DDoS, no port to scan.
- TLS is terminated at Cloudflare, with their certificate. Free, auto-renewed, no Let’s Encrypt to manage on the origin.
- Built-in WAF, rate limiting, bot detection, and caching at the edge, free of charge at Cloudflare’s hobbyist tier.
If you’re publishing anything from your house, do it this way. Port forwarding is how 2015 did it.
What all of this looks like on a CV
Here’s the part the LinkedIn post hammered and I want to deepen. Every step of this project maps to a paid job bullet point. In order:
- Hardware fault diagnosis on end-of-life equipment. Identifying a failing drive by ear and interpretation of SMART output. Desktop support. First-line infrastructure. Every single helpdesk role.
- Bootable image creation and OS install on resource-constrained hardware. Choosing the right distro for the target. Writing the ISO. Recovering from a failed install. Junior sysadmin, cloud engineer, internal IT.
- Linux post-install security hardening. Baseline controls: AV, firewall, IDS, audit logging, SSH hardening. Everything a Cyber Essentials audit asks for. Every SOC analyst role wants you to know what a hardened host looks like, because their job is detecting when one isn’t.
- Ansible-based configuration management. Idempotent infrastructure. Declarative state. Repeatable across hosts. DevOps, SRE, platform engineering, the entire IaC space.
- Network segmentation with VLANs and firewall rules. Zero-trust networking. Defence in depth. Junior network engineer, cloud architect, security engineer.
- Containerisation with Docker and compose. Read-only, capability-dropped, resource-limited containers. Not “I ran a container.” “I ran a container securely.” DevOps, backend engineering, platform.
- Git and self-hosted CI/CD with a private container registry. Source control, pipelines, image distribution. Every software shop. Every platform team. Every DevOps interview.
- Zero-trust ingress with Cloudflare Tunnel. Egress-only origins. No public IP exposure. Cloud security, modern networking, architect-level thinking.
- Full lifecycle ownership. Idea to running public URL without handing work off. Senior engineer. Staff engineer. The hire-yourself-a-cofounder level.
The project took me a handful of hours across a week. It demonstrates nine hiring signals. That ratio is why homelab practitioners move faster than their lab-free peers, and it’s why “I just tinker at home” is a catastrophic thing to say in an interview.
The part about AI
A quick note, because it matters to anyone reading this with career anxiety.
Most of the skills above are not in the first wave of what AI is automating. Diagnosing a dying drive by listening to it, deciding whether to put a machine on its own VLAN, choosing between Wazuh and Falco, reading auth.log at 2am during a suspected intrusion, debugging a container’s capability set, negotiating firewall rules with a grumpy network team, these are stubbornly human activities. They involve judgement calls, physical context, incomplete information, and a lot of “it depends.”
AI is very good at writing boilerplate Python. AI is not good at running infrastructure. The gap between “can write code” and “can operate the systems the code runs on” is where the work is, and where it’s staying for a while.
Homelab practitioners are leaning into the part of the job the AI curve hasn’t reached. That’s not an accident. That’s the whole edge.
Starting from zero
If you don’t have a scrap pile to pull parts from, here’s the kit I’d point you at. The SSD link is the closest current equivalent to what I fitted. The charger link is the exact one I bought for this machine. Both are my Amazon affiliate links. Buy through them and RTM earns a small commission at no cost to you. Don’t, that’s fine too. I’d still recommend the same parts.
- SSD: Patriot Burst Elite 120GB SATA SSD — around £29. Same form factor as the Kingston I had in the pile, cheapest reliable current-gen option.
- Charger: 100W multi-tip laptop charger — £25.89. Covers Advent, Lenovo, Dell, HP, Acer and most other legacy barrel connectors. The only thing I actually bought for this build.
- Laptop: used Celeron-era machine with 2 to 4GB of RAM. eBay, Gumtree, local auction, or a family member’s drawer. Typically £0 to £40.
- USB stick: anything 4GB or larger for the Debian installer. Almost certainly already in a drawer. £0 to £5.
Worst-case total, buying absolutely everything fresh with nothing in the cupboard: around £100. Still less than a Raspberry Pi 5 8GB starter kit once you add the SD card, PSU, case and active cooler.
For the broader RTM stack (hosting I pay for, software I run, filming kit, domain registrars, the exact tools behind every piece on the blog), the RTM Essential Stack page has the full list. Affiliate links, no paid placements. If the item isn’t something I’ve actually bought or run, it isn’t on the list.
What’s next
The build continues:
- 3D-printed wall-mount case on the Bambu Lab X1C, because the current chassis is held together by optimism.
- An allotment edge-compute node running on solar and 4G, same stack, different hardware.
- The public URL goes live on Friday. If you’re reading this before that, you’ll know it’s working because this link will stop 404ing: naas.readthemanual.tech.
This is Part 1 of a 3-part series. The companion posts expand the technical pieces of this build:
- How to Set Up a Cloudflare Tunnel (2026). Ten-minute walkthrough of the token-based dashboard flow, every step screenshotted, with the Docker Compose config I actually use.
- How to Host Your Own Website in 2026. Shared hosting, VPS, homelab plus tunnel, and serverless compared with real costs and clear recommendations.
The point, one more time
The scrap hardware was free. The skills are not.
Neither is the translation from tinker-speak to CV-speak. That’s the work most practitioners forget to do. You can spend a year building the most impressive personal infrastructure in your postcode and still walk into an interview and say “I just mess about with a Pi at home,” and throw the whole thing away in one sentence.
Learn to name what you just did. Write it up. Put it on your CV in the language the hiring manager is trained to recognise. The drawer laptop doesn’t pay for itself. The translation does.
→ See the full RTM Essential Stack: gear, hosting, software I actually use

ReadTheManual is run, written and curated by Eric Lonsdale.
Eric has over 20 years of professional experience in IT infrastructure, cloud architecture, and cybersecurity, but started with PCs long before that.
He built his first machine from parts bought off tables at the local college campus, hoping they worked. He learned on BBC Micros and Atari units in the early 90s, and has built almost every PC he’s used between 1995 and now.
From helpdesk to infrastructure architect, Eric has worked across enterprise datacentres, Azure environments, and security operations. He’s managed teams, trained engineers, and spent two decades solving the problems this site teaches you to solve.
ReadTheManual exists because Eric believes the best way to learn IT is to build things, break things, and actually read the manual. Every guide on this site runs on infrastructure he owns and maintains.
Enjoyed this guide?
New articles on Linux, homelab, cloud, and automation every 2 days. No spam, unsubscribe anytime.