
Port forwarding is how we exposed home services to the internet ten years ago. Nobody should be doing it in 2026. The single best free upgrade you can make to a self-hosted setup right now is replacing every forwarded port with a Cloudflare Tunnel.
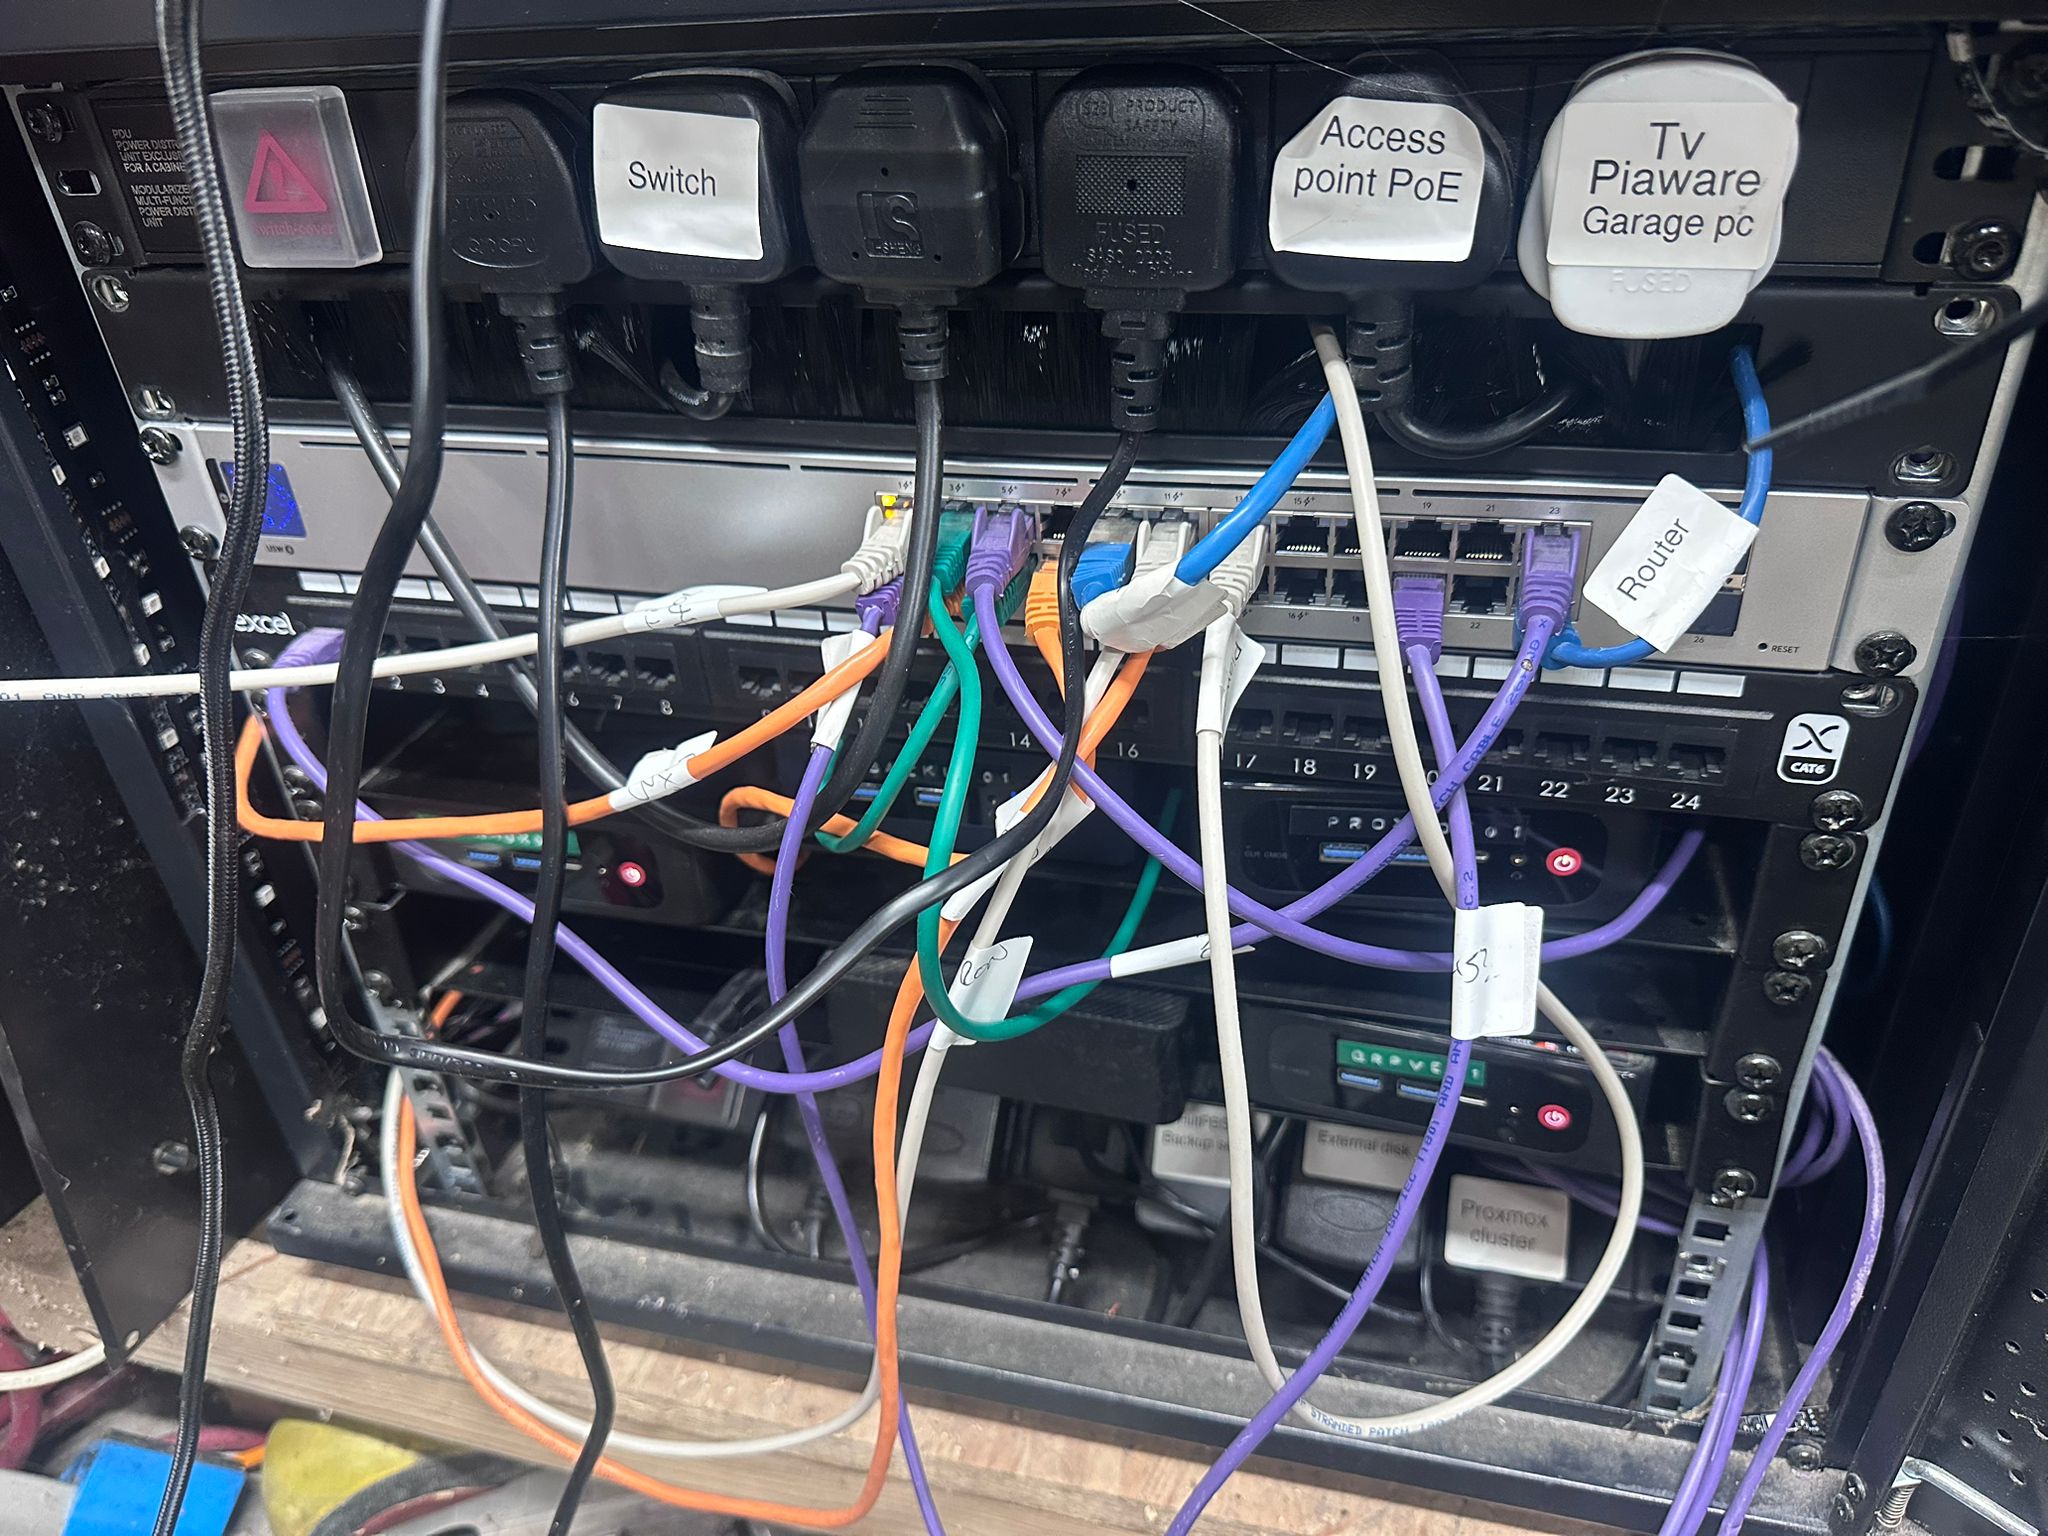
This post is the complete step-by-step for getting a tunnel live on any Linux host, from zero to a public URL with HTTPS, in about ten minutes. It’s the same setup I used for my homelab-from-e-waste build, running a public Flask app on a 2010 laptop that has no inbound ports open anywhere on the network.
What a Cloudflare Tunnel actually is
A tunnel is a daemon that runs on your origin host. On startup it opens an outbound TLS connection to Cloudflare’s edge network and holds it open. Requests to your hostname arrive at Cloudflare’s nearest data centre, get terminated there, and are forwarded back down the tunnel to your host. Your host never accepts an inbound connection from the internet.
The practical implications are the entire reason this is worth doing:
- No port forwarding required. Works behind a consumer router, behind carrier-grade NAT, behind a VPN, on a mobile 4G connection, anywhere that has outbound HTTPS.
- No public IP exposed. Your origin IP is invisible. Attackers cannot scan ports that aren’t open.
- TLS is free and automatic. Cloudflare terminate with their certificate. No Let’s Encrypt on the origin to manage, renew or worry about.
- Rate limiting, WAF, bot detection and caching all run at the edge for free at the hobbyist tier.
- Single binary (or single container). Installs as a systemd service, or runs in Docker with one command.
Two ways to set it up
Cloudflare offers two patterns for creating a tunnel:
- Remotely-managed (token-based): you create and configure the tunnel in the Cloudflare dashboard. Cloudflare gives you a token. You run a single command on your host with that token. Configuration (which hostnames map to which services) lives in the dashboard. Quickest path, easiest for beginners, and what this post walks through in detail.
- Locally-managed (CLI + config.yml): you install
cloudflaredon the host, authenticate it with the CLI, create the tunnel from the command line, and write a localconfig.ymlmapping hostnames to services. More control, version-controllable, preferred for infrastructure-as-code setups. Covered as an appendix at the end.
Pick whichever suits your temperament. Both produce the same tunnel, the same public URL, the same result. For most homelabbers, the token flow is the right default.
Before you start
You need:
- A Cloudflare account, free tier is fine
- A domain or subdomain that Cloudflare is managing DNS for (move your nameservers to Cloudflare if the domain is elsewhere, it’s free and takes five minutes)
- A Linux host running the service you want to expose (anything with Docker, or any Debian or Ubuntu flavour if you prefer the native binary)
- The service itself listening on a local port (typically 127.0.0.1 on a chosen port)
That’s it. No open ports on your router, no dynamic DNS, no static IP.
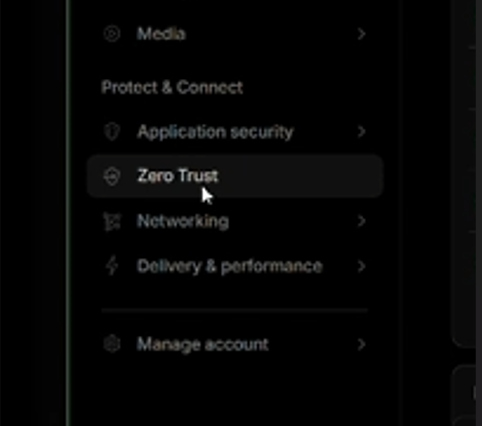
Step 1: Find Zero Trust in the Cloudflare dashboard
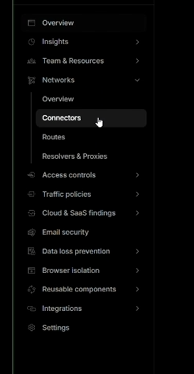
Log in to Cloudflare at dash.cloudflare.com, then open the sidebar and find Zero Trust under the Protect & Connect section.
Once you’re inside Zero Trust, expand Networks in the left sidebar and click Connectors.
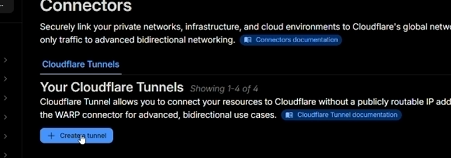
Step 2: Create the tunnel
On the Connectors page you’ll see your existing tunnels (if any) and a blue + Create a tunnel button. Click it.
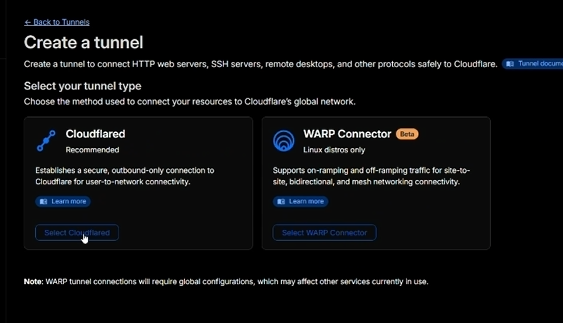
Step 3: Pick the tunnel type
Cloudflare asks whether you want a Cloudflared tunnel or a WARP Connector. For a public-facing web service you want Cloudflared. WARP is a different tool for user-to-network VPN-like connectivity and isn’t what we’re doing here.
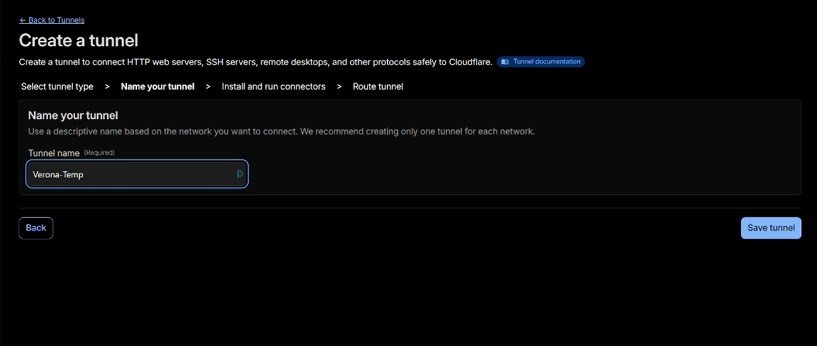
Step 4: Name the tunnel
Give the tunnel a name that identifies which host or service it belongs to. My convention is service-host, but anything descriptive works. I called this one Verona-Temp because it’s the temporary tunnel for the Verona laptop build.
Step 5: Install and run the connector
Before you run the command on the next screen, make sure you actually have Docker installed on the host. If docker --version returns a version string, you’re fine. If it says “command not found”, install it first: my install Docker on Debian and Ubuntu guide has a five-minute walkthrough covering both the distro repo and Docker’s official repo paths. Come back here when docker --version works.
Cloudflare now generates a token unique to this tunnel and gives you a one-line command to run on your host. Pick your OS (Docker is the easiest option and works everywhere), copy the command, and run it on the host.
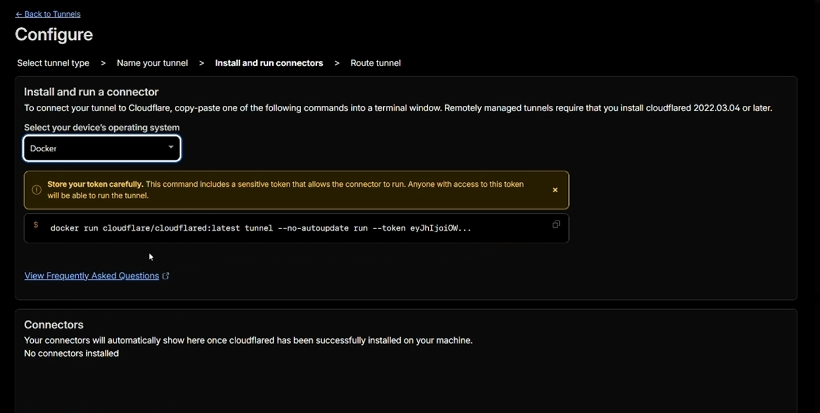
docker run cloudflare/cloudflared:latest tunnel --no-autoupdate run --token eyJ.... The token at the end is sensitive. Treat it like a password.A few seconds after you run the command, Cloudflare’s dashboard flips the tunnel status to Healthy and the Connectors list shows your new connector. You now have an active tunnel with nothing attached to it.
For production use I prefer running cloudflared under Docker Compose rather than a raw docker run. That lets you store the token in a .env file (600 perms, not readable by anyone but root) and auto-restart on host reboot. Minimal compose file:
services:
  cloudflared:
    image: cloudflare/cloudflared:latest
    container_name: cloudflared
    restart: unless-stopped
    command: tunnel --no-autoupdate run
    network_mode: host
    environment:
      - TUNNEL_TOKEN=${TUNNEL_TOKEN}
network_mode: host is important: it lets cloudflared reach 127.0.0.1:5000 (or wherever your service listens) on the host itself. Without it, the container would see loopback as its own tiny loopback and find nothing.
Step 6: Route a public hostname to a local service
The tunnel is live but doesn’t know what to route yet. This is where you tell Cloudflare which hostname maps to which local service.
On the Route Traffic step, choose your domain from the dropdown, type a subdomain (I used naas), and fill in the local service URL (http://localhost:5000 for my Flask app).
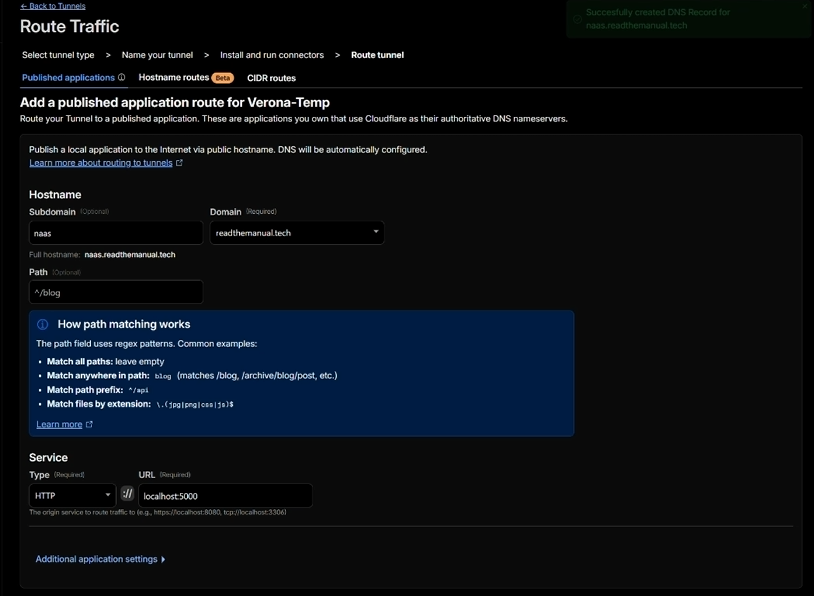
naas.readthemanual.tech, pointing at http://localhost:5000 on the host. The Path field is optional unless you want to route different paths to different services.Hit Save tunnel. Cloudflare creates the CNAME record in your DNS zone automatically (you’ll see a green confirmation: Successfully created DNS Record for naas.readthemanual.tech).
Step 7: Verify the route is live
Back on the tunnel detail page, open Published application routes. You should see your hostname mapped to the local service, plus the built-in catch-all rule (http_status:404) for anything that doesn’t match.

Open the public URL in a browser. You should see your service, served over HTTPS, with a valid certificate signed by Cloudflare. Or from the command line:
curl -I https://naas.readthemanual.tech/You should see a 200 OK, a server: cloudflare header and a cf-ray header. The presence of those two headers confirms the request went through Cloudflare rather than hitting your origin directly.
Troubleshooting the common issues
The tunnel shows as “Inactive” or “Down” in the dashboard. The cloudflared daemon can’t reach Cloudflare. Check outbound 443 isn’t being blocked at your firewall or router. Run curl -v https://api.cloudflare.com from the host to confirm outbound HTTPS is working.
502 Bad Gateway or 1033 Argo Tunnel error from the browser. The tunnel is up but the service it’s pointing at isn’t responding. Check your service is actually listening on the address you wrote in the route config, with ss -tlnp. The most common mistake is binding to 0.0.0.0:port in the service but network_mode: host not being set on the cloudflared container, or vice versa.
DNS record exists but the hostname won’t resolve publicly. Cloudflare DNS propagates fast, but not instantly. Wait a minute. If it’s still not resolving after five minutes, use dig naas.readthemanual.tech to confirm the CNAME is visible from an external resolver.
Everything works locally but the tunnel can’t reach the service. This usually means you bound the service to loopback but didn’t enable network_mode: host on the cloudflared container. Because the tunnel runs as a container, loopback inside the container is not the host’s loopback unless you share the host network namespace.
What you’ve built
You now have a public HTTPS endpoint that:
- Can be reached from anywhere in the world
- Does not require a static IP or a public IP at all
- Does not need port forwarding on your router
- Does not expose your origin IP
- Does not need TLS certificates to be managed on the origin
- Restarts automatically (Docker) or under systemd
- Sits behind Cloudflare’s global network, including free WAF, rate limiting and caching
The entire setup, once you’ve done it a couple of times, takes about ten minutes. The cloudflared container uses under 50MB of RAM at idle. No running costs beyond your existing Cloudflare free account.
Appendix: the locally-managed CLI method
If you prefer infrastructure-as-code, or you want tunnel config committed to a git repo rather than living in Cloudflare’s UI, use the CLI method instead. The steps are:
- Install
cloudflaredfrom Cloudflare’s apt repo. - Run
cloudflared tunnel loginand authorise against the zone in a browser. - Create the tunnel:
cloudflared tunnel create my-tunnel. Note the UUID and credentials file path. - Write
/etc/cloudflared/config.ymlwith aningress:block mapping hostnames to services. Always include a catch-allservice: http_status:404rule at the end. - Route DNS:
cloudflared tunnel route dns my-tunnel my.domain.com. - Install as a systemd service:
cloudflared service installthensystemctl enable --now cloudflared.
The tradeoff is simple: CLI gives you a version-controllable config.yml at the cost of a few extra setup steps and a local credentials file to manage. The token method gives you UI-managed routing at the cost of tunnel config living in Cloudflare’s dashboard. Pick the one that fits your review-and-rollback habits.
Where to go from here
If Docker’s the bit you’re missing, my Debian/Ubuntu install guide gets you from nothing to docker run in five minutes, and then every other tutorial on this blog (including this one) just works.
If you don’t yet have a server to put behind a tunnel, my homelab-from-e-waste build walks through turning a 2010 laptop into a public webapp for about £26 out of pocket, using exactly this tunnel setup.
If you’re still weighing up hosting options in general and not sure whether shared hosting, a VPS, a homelab with a tunnel or serverless is the right choice, my how to host your own website in 2026 compares the four main routes with real costs and trade-offs.
For the broader stack I use day-to-day, including the domain registrars, the hosting I actually pay for, and the software behind every RTM project, the RTM Essential Stack page has the full list. Affiliate links, no paid placements, no nonsense.
One thing to remember
Cloudflare Tunnel is free because Cloudflare want the traffic data and the business use-case upsell path. That’s a fair trade for personal and hobby use. For regulated workloads, production enterprise, or anywhere you genuinely do not want a third party seeing your traffic metadata, self-hosted alternatives exist. Tailscale Funnel, Pangolin, rathole, frp, Ngrok, all do similar things with different trade-offs.
For everyone else, for the price of a DNS record and ten minutes, Cloudflare Tunnel is the single most useful free infrastructure tool on the internet right now.

ReadTheManual is run, written and curated by Eric Lonsdale.
Eric has over 20 years of professional experience in IT infrastructure, cloud architecture, and cybersecurity, but started with PCs long before that.
He built his first machine from parts bought off tables at the local college campus, hoping they worked. He learned on BBC Micros and Atari units in the early 90s, and has built almost every PC he’s used between 1995 and now.
From helpdesk to infrastructure architect, Eric has worked across enterprise datacentres, Azure environments, and security operations. He’s managed teams, trained engineers, and spent two decades solving the problems this site teaches you to solve.
ReadTheManual exists because Eric believes the best way to learn IT is to build things, break things, and actually read the manual. Every guide on this site runs on infrastructure he owns and maintains.
Enjoyed this guide?
New articles on Linux, homelab, cloud, and automation every 2 days. No spam, unsubscribe anytime.