Published on 25 February 2026 | Homelab / Self-Hosting | 12 min read
Right, so you’ve got Docker running on a spare PC or a Raspberry Pi. Maybe you followed a YouTube tutorial, maybe you just winged it. Either way – now what?
I’ve been running a homelab for a few years now, and honestly, the first year was a mess. Containers everywhere, no organisation, no way to tell what was running or why half of it had stopped. Something I probably should have planned better from the start.
Here’s the thing – the containers that actually matter aren’t the flashy ones that get upvoted on Reddit. They’re the boring ones. The infrastructure. The stuff that makes everything else work without you losing your mind at 11pm on a Tuesday.
At last count I’ve got 30-odd services spread across five Beelink mini PCs and a handful of Raspberry Pis. Nextcloud, Gitea, Jellyfin, a full SIEM stack, AI inference on a GPU box – the lot. And every single one of those services relies on the five containers I’m about to walk you through. They’re not exciting. They don’t get the Reddit upvotes. But without them, the rest of it falls apart.
These are my five essentials.
1. Reverse Proxy – Nginx Proxy Manager
I’m going to be upfront about something: I don’t actually use Nginx Proxy Manager myself. I run raw Nginx with hand-written conf.d files, because I came from an infrastructure background and I’m comfortable with that. But I wouldn’t recommend that to someone starting out. It’s fiddly, the config syntax will bite you, and honestly NPM does the job brilliantly with a fraction of the hassle.
Here’s the story that made me realise a reverse proxy is non-negotiable. About six months into my homelab, I had maybe eight services running. Every one of them on a different port. Nextcloud on 8080, Gitea on 3000, Grafana on 3001. I had a sticky note on my monitor with all the port numbers. An actual sticky note. Like an animal.
Then I set up a wildcard DNS record – *.homelab.example pointing to my proxy server – and within an hour everything had a proper subdomain. cloud.homelab.example, git.homelab.example, grafana.homelab.example. No ports to remember. Free SSL certificates that renew themselves. That sticky note went in the bin and never came back.
Nginx Proxy Manager (GitHub) wraps all of that in a clean web UI. You point your domain at it, click a few buttons, and suddenly everything has HTTPS and a proper URL.
services:
  nginx-proxy-manager:
    image: jc21/nginx-proxy-manager:latest
    ports:
      - 80:80
      - 443:443
      - 81:81  # Admin UI
    volumes:
      - ./data:/data
      - ./letsencrypt:/etc/letsencrypt
Getting it running
After docker compose up -d, hit http://your-server-ip:81 in your browser. The default login is admin[at]example.com with password changeme. You’ll be asked to change both immediately – do that first.
Then go to “Proxy Hosts” and add your first service. You’ll need three things: the subdomain you want (like portainer.yourdomain.com), the internal IP of the Docker host, and the port the service runs on. Tick “Request a new SSL certificate” and “Force SSL”, and you’re done. Thirty seconds per service, once you get the hang of it.
How it connects to everything else
This is the container that ties it all together. Every other container on this list – Portainer, Uptime Kuma, Homepage, WireGuard’s admin panel – gets a proxy host entry in NPM. Once you’ve set it up, adding a new service to your lab means: deploy the container, add a DNS record, add a proxy host in NPM. That’s it. It becomes muscle memory.
The gotcha
Set up your wildcard DNS record first. Seriously. If you’re using an internal domain, point *.home.yourdomain.com at your proxy server’s IP. If you’re using a proper domain with Cloudflare or similar, set up the wildcard there. Without this, you’ll be adding individual DNS records for every single service, and you will get bored of that very quickly. I speak from experience.
2. Portainer
I manage Docker hosts across five different machines. One host runs the core infrastructure – Nginx, Gitea, Nextcloud, Grafana. A second handles the dashboard and automation. A third is dedicated to security tooling. A fourth runs AI inference with a GPU. There’s a dev workstation too. That’s a lot of terminals to keep track of.
The moment that sold me on Portainer was debugging a failed Nextcloud update at about 10pm. I needed to check logs on one host, restart a container on another, and compare environment variables on a third. Without Portainer, that’s three SSH sessions, three terminals, trying to remember which host each container lives on. With Portainer, it’s one browser tab. Click the host, click the container, read the logs. Done.
Portainer (docs) gives you a single pane of glass across all your Docker hosts. Container status, logs, shell access, stack deployment, volume management – all from a browser.
services:
  portainer:
    image: portainer/portainer-ce:latest
    ports:
      - 9000:9000
    volumes:
      - /var/run/docker.sock:/var/run/docker.sock
      - portainer_data:/data
Getting it running
After docker compose up -d, go to http://your-server-ip:9000. You’ll be prompted to create an admin account – pick a strong password, you won’t be asked again. Portainer will then ask about your environment. Choose “Docker – Manage the local Docker environment” to start with. That connects it to the Docker socket you mounted in the compose file.
Once you’re in, you’ll see your local environment listed. Click into it and you’ll get an overview of all running containers, images, volumes, and networks. Have a click around. It’s intuitive enough that you won’t need a tutorial.
How it connects to everything else
Portainer is where you’ll go when something breaks. Uptime Kuma tells you something’s down – you open Portainer to check the logs and restart it. You deploy a new service via compose file – you check Portainer to make sure it’s actually running. And once you add your other Docker hosts as “Environments” (Portainer’s term for remote Docker endpoints), you get all of them in one dashboard.
The real power comes when you add remote hosts. Install the Portainer Agent on each machine (portainer/agent:latest on port 9001), then add them as environments in your main Portainer instance. Suddenly you can manage five hosts from one place.
The gotcha
The Community Edition is free and covers everything you’ll need for a homelab. Don’t let the Business Edition upsell put you off – CE is not a crippled trial version. It’s genuinely complete. Also, that Docker socket mount (/var/run/docker.sock) gives Portainer full control over your Docker daemon. That’s kind of the point, but be aware of it. Don’t expose port 9000 to the internet without putting it behind your reverse proxy with authentication.
3. Uptime Kuma
Services fail silently. That’s the single most annoying truth about self-hosting. Your Nextcloud sync stopped working three days ago and you only notice when you’re sitting in a coffee shop trying to grab a file. Your Gitea instance ran out of disk space last Tuesday and you find out when you try to push code on Friday. Not that either of these have happened to me. (Both of these have happened to me.)
The breaking point was when my Grafana instance had been down for nearly a week before I noticed. A week. I’d set the whole thing up, configured dashboards, felt very pleased with myself – and then it just quietly died after an update and I had no idea. That’s when I set up Uptime Kuma and added every single service I run.
Uptime Kuma is a self-hosted monitoring tool with a genuinely beautiful interface. HTTP checks, TCP pings, DNS monitoring, Docker container status – it handles the lot. And it’ll shout at you through just about any notification channel you can think of when something goes wrong.
services:
  uptime-kuma:
    image: louislam/uptime-kuma:latest
    ports:
      - 3001:3001
    volumes:
      - ./data:/app/data
Getting it running
After docker compose up -d, visit http://your-server-ip:3001. You’ll create an admin account on first visit. Once you’re in, click “Add New Monitor” and start adding your services. For most things, “HTTP(s)” monitor type is what you want – just paste in the URL. Set the check interval to something sensible (60 seconds is fine for most things) and pick a name you’ll recognise.
The first thing I’d configure after adding monitors is notifications. Go to Settings, then “Notifications”, and set up at least one channel. I use Telegram – create a bot via BotFather, grab the token and chat ID, paste them in. Takes about five minutes and means you’ll get a ping on your phone when something dies. Discord and Slack work just as well if that’s more your thing.
How it connects to everything else
Uptime Kuma monitors everything else on this list – and everything else in your lab. I’ve got checks on my reverse proxy, Portainer, Homepage, WireGuard, Nextcloud, Gitea, Grafana, the SIEM – all of it. If NPM goes down, I know within a minute. If a container on the automation host stops responding, my phone buzzes.
You can also set up a public status page if you want – handy if other people in your household use your services and you’re tired of being asked “is the internet broken?” when actually it’s just Jellyfin being dramatic.
The gotcha
Don’t go overboard with check frequency. I initially set everything to check every 10 seconds, because why not? Turns out that’s a lot of HTTP requests when you’ve got 30+ monitors, and Uptime Kuma’s SQLite database started getting chunky. Sixty seconds is plenty for a homelab. Also, make sure the box running Uptime Kuma isn’t the same box running everything it’s monitoring – if that host goes down, you lose your monitoring at the exact moment you need it most. I run mine on a separate host for exactly this reason.
4. Homepage (or Homarr)
This one is partly practical and partly vanity. I’ll be honest about that. But there’s a genuinely useful side to it too.
When you’ve got 30+ services, you forget things exist. I set up ArchiveBox months ago for web archiving, configured it, used it a few times, and then completely forgot about it until I was scrolling through my dashboard one day and thought “oh right, I have that.” A dashboard keeps everything visible. It’s the front door to your homelab.
The vanity bit is that when someone asks what I’ve been building, I can pull up the dashboard and it looks properly impressive. Security section with Wazuh and Grafana, development section with Gitea and n8n, AI section with Ollama and ComfyUI. All categorised, all with status indicators. It’s a good feeling. I’m not going to pretend otherwise.
I use Homepage (GitHub) and I rate it highly. Configuration is done through YAML files, which suits me because I can version control it in Git. It’s got widget support for pulling live data from services – Pi-hole stats, RSS feed counts, that sort of thing. And it auto-discovers Docker containers if you mount the socket.
services:
  homepage:
    image: ghcr.io/gethomepage/homepage:latest
    ports:
      - 3000:3000
    volumes:
      - ./config:/app/config
      - /var/run/docker.sock:/var/run/docker.sock:ro
Getting it running
After docker compose up -d, visit http://your-server-ip:3000. You’ll see… a mostly empty page. That’s normal. Homepage needs configuring.
The config lives in the ./config directory you mounted. You’ll want to edit services.yaml to add your services. Here’s a quick example to get you started:
- Infrastructure:
    - Portainer:
        icon: portainer.png
        href: https://portainer.yourdomain.com
        description: Container Management
    - Uptime Kuma:
        icon: uptime-kuma.png
        href: https://status.yourdomain.com
        description: Service Monitoring
The Homepage docs are excellent and cover every widget and integration option. Give them a read – it’s worth the 20 minutes.
How it connects to everything else
Homepage becomes your starting point. Open a browser tab, there’s your lab. Every service you add to your proxy gets an entry on the dashboard. I’ve got mine organised into sections – Security, Infrastructure, Development, AI, Data. At a glance I can see what’s running, click through to anything, and spot if something looks off.
The Docker integration is particularly nice. Mount the socket read-only (note the :ro in the compose file) and Homepage can show container status automatically. Green means running, red means something needs attention.
The alternative
Homarr is the other popular option and it’s worth a look. It’s got a drag-and-drop interface and more built-in integrations out of the box. If YAML config files make you twitch, Homarr might be more your speed. I went with Homepage because I wanted the YAML approach for version control, but there’s genuinely no wrong answer here.
The gotcha
The Docker socket mount. Again. Even read-only, it gives Homepage visibility into your Docker environment. That’s fine on your internal network, but don’t expose the Homepage port directly to the internet. Put it behind your reverse proxy. And if you’re running Homepage on a different host from some of your services, the Docker auto-discovery only works for the local host. You’ll need to add remote services manually in the YAML.
5. WireGuard (via wg-easy)
All those services you just set up? They’re on your home network. Which is fine when you’re at home. But the moment you’re anywhere else – at work, on your phone, travelling – none of it is accessible. And you do not want to port-forward 30 individual services to the internet. That’s a terrible idea. Don’t do that.
WireGuard solves this properly. It creates an encrypted tunnel from wherever you are back to your home network. Once connected, it’s as if you’re sitting at home. Every service, every subdomain, everything – just works.
The story that convinced me was pretty mundane. I was out and needed to grab a document from Nextcloud. This was before I had VPN access set up, so my options were “drive home” or “don’t have the document.” I drove home. Set up WireGuard that same evening and never had that problem again.
wg-easy wraps WireGuard in a simple web UI that handles client management, config generation, and even QR codes for phone setup. The QR code thing sounds minor but it’s brilliant – scan it with the WireGuard app on your phone and you’re connected in seconds.
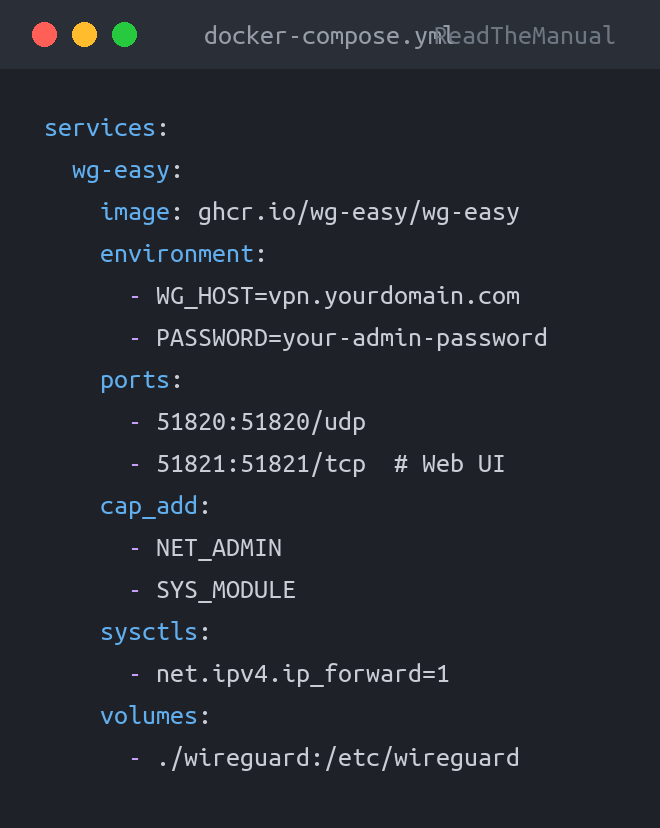
services:
  wg-easy:
    image: ghcr.io/wg-easy/wg-easy
    environment:
      - WG_HOST=vpn.yourdomain.com
      - PASSWORD=your-admin-password
    ports:
      - 51820:51820/udp
      - 51821:51821/tcp  # Web UI
    cap_add:
      - NET_ADMIN
      - SYS_MODULE
    sysctls:
      - net.ipv4.ip_forward=1
    volumes:
      - ./wireguard:/etc/wireguard
Getting it running
This one needs a bit more setup than the others. First, you need to forward port 51820/UDP on your router to the machine running wg-easy. This is the only port you’re forwarding – everything else goes through the tunnel.
Set WG_HOST to either your public IP or a dynamic DNS hostname (if your ISP gives you a dynamic IP, set up a DDNS service first). Set PASSWORD to something strong – this protects the admin UI.
After docker compose up -d, visit http://your-server-ip:51821. Log in with the password you set, then click “New Client.” Give it a name (like “Phone” or “Laptop”), and you’ll get a config file and a QR code. On your phone, install the WireGuard app, scan the QR code, and toggle the connection on. On a laptop, download the config file and import it into the WireGuard client.
Test it by disconnecting from your home Wi-Fi (use mobile data), enabling the VPN, and trying to access one of your services by its internal address. If it works, you’re sorted.
How it connects to everything else
WireGuard is what makes your entire homelab portable. Once you’re connected via VPN, you can access NPM’s admin panel, Portainer, Uptime Kuma, Homepage – everything. It’s the container that turns “my home network” into “my network, accessible anywhere.”
This also means you don’t need to expose any of your other services to the internet. No port forwarding for Nextcloud, no public-facing Gitea. VPN in, access everything. Much smaller attack surface.
The gotcha
Two things. First, the NET_ADMIN and SYS_MODULE capabilities – these give the container elevated privileges because it needs to create network interfaces. That’s expected, but it means you should keep the wg-easy image up to date. Second, and this tripped me up: if your home network uses the 10.0.0.0/24 subnet and WireGuard’s default client range also uses 10.x.x.x, you’ll get routing conflicts. Check the wg-easy docs for how to change the client address range if you hit this. The default is usually 10.8.0.x which is fine for most setups, but it’s worth being aware of.
Honourable Mentions
These didn’t make the top five, but they’ve earned their place in my stack:
- Pi-hole – Network-wide ad blocking at the DNS level. I run this on a Raspberry Pi and point all my devices at it. The before-and-after difference in web browsing is staggering – pages load faster, tracking is blocked, and the query log is genuinely fascinating (and slightly terrifying) when you see how often your devices phone home.
- Watchtower – Automatic container updates. This one divides opinion. Some people prefer manual control over updates, and I respect that – an auto-update breaking a production service at 3am is a valid concern. I use Watchtower with notifications enabled so I know when it updates something, and I’ve excluded a few containers that I’d rather update manually. It’s a “trust but verify” approach.
- Vaultwarden – Self-hosted Bitwarden-compatible password manager. If you’re self-hosting everything else, your passwords probably shouldn’t be the exception. Vaultwarden is lightweight, compatible with all the official Bitwarden clients, and means your password vault lives on your hardware. This is on my list to deploy and it’s near the top.
The Stack in One Compose File
Here’s a combined compose file to get all five running together. If you want to start from scratch, this is a good way to do it.
Setup steps
1. Create a directory for the stack:
mkdir -p ~/homelab-core && cd ~/homelab-core2. Save the compose file below as docker-compose.yml in that directory.
3. Edit before deploying – you need to change two things at minimum:
WG_HOST– set this to your public IP address or DDNS hostnamePASSWORDunder wg-easy – set a strong admin password
4. Deploy:
docker compose up -d5. Check everything came up:
docker compose psYou should see all five containers with status “Up”. If anything says “Restarting” or “Exit”, check the logs with docker compose logs <service-name>.
The compose file
services:
  nginx-proxy-manager:
    image: jc21/nginx-proxy-manager:latest
    container_name: npm
    restart: unless-stopped
    ports:
      - 80:80
      - 443:443
      - 81:81
    volumes:
      - ./npm/data:/data
      - ./npm/letsencrypt:/etc/letsencrypt

  portainer:
    image: portainer/portainer-ce:latest
    container_name: portainer
    restart: unless-stopped
    ports:
      - 9000:9000
    volumes:
      - /var/run/docker.sock:/var/run/docker.sock
      - portainer_data:/data

  uptime-kuma:
    image: louislam/uptime-kuma:latest
    container_name: uptime-kuma
    restart: unless-stopped
    ports:
      - 3001:3001
    volumes:
      - ./uptime-kuma:/app/data

  homepage:
    image: ghcr.io/gethomepage/homepage:latest
    container_name: homepage
    restart: unless-stopped
    ports:
      - 3000:3000
    volumes:
      - ./homepage:/app/config
      - /var/run/docker.sock:/var/run/docker.sock:ro

  wg-easy:
    image: ghcr.io/wg-easy/wg-easy
    container_name: wg-easy
    restart: unless-stopped
    environment:
      - WG_HOST=your-public-ip-or-domain
      - PASSWORD=changeme
    ports:
      - 51820:51820/udp
      - 51821:51821/tcp
    cap_add:
      - NET_ADMIN
      - SYS_MODULE
    sysctls:
      - net.ipv4.ip_forward=1
    volumes:
      - ./wireguard:/etc/wireguard

volumes:
  portainer_data:
What to do after it’s up
The services don’t depend on each other at the Docker level, so they’ll all start in parallel. But there’s a logical order to configuring them:
- Nginx Proxy Manager first (port 81) – Log in, change the default credentials, and set up your first proxy host. This is the foundation for everything else.
- Portainer second (port 9000) – Create your admin account and get familiar with the interface. Then add it as a proxy host in NPM.
- Uptime Kuma third (port 3001) – Create your account, add NPM and Portainer as your first monitors, set up notifications. Then add it as a proxy host too.
- Homepage fourth (port 3000) – Edit the config YAML and add all your services with their new proxy URLs. Add it as a proxy host.
- WireGuard last (port 51821) – This needs router configuration (port forwarding 51820/UDP), so save it for when the rest is working. Create your first client, test from outside your network.
Once all five have proxy host entries in NPM, go back to Uptime Kuma and update all your monitors to use the HTTPS subdomain URLs instead of IP:port. Then add all five to your Homepage dashboard. Everything references everything else – that’s the point.

What’s Next?
Once you’ve got these five running, you’ve got a proper foundation. The boring bit is done. From here, the fun starts:
- Media: Jellyfin, Plex, the *arr stack
- Productivity: Nextcloud, Paperless-ngx, Bookstack
- Development: Gitea, code-server, n8n
- AI: Ollama, Open WebUI, LocalAI
Each of those could be its own post. And they probably will be.
This is part of an ongoing series about self-hosting and digital sovereignty – the kind of stuff I post about on LinkedIn as well. If you’ve been following that thread, this is the practical “how” to go with the philosophical “why.”
Got a different essential five? The homelab community loves debating these lists, and honestly there’s no single right answer. What would you swap out? Come find me on LinkedIn – I’m always up for a good infrastructure argument.
This post is part of the self-hosting and digital sovereignty series on readthemanual.tech.
About the author – Eric Lonsdale is an Azure and Infrastructure Architect who designs cloud platforms for businesses and self-hosts everything personal. He writes about both because they are not mutually exclusive. Connect on LinkedIn.
If you are the kind of person who reads man pages before Stack Overflow, you might appreciate the RTFM store. Just saying.