Your app is containerized. Now where do you put the image?
Docker Hub is the default answer. It’s also someone else’s infrastructure, with their terms, their rate limits, and their visibility into your projects.
This post sets up your own container registry. Your images, your storage, your control. This is the sovereignty angle applied to deployment infrastructure.
DevOps Skills Demonstrated
- Container registry setup and management
- Image tagging and versioning strategies
- Infrastructure ownership and sovereignty
- Security and access control
Market Value: Understanding artifact management is crucial for DevOps and Platform Engineering roles at £55-75k+
What You’ll Learn
- Why self-host a registry
- Options: Gitea, Harbor, basic registry
- Pushing images to your registry
- Pulling images for deployment
- Registry maintenance basics
Why Not Docker Hub?
Docker Hub Is Fine For
- Public open-source projects
- Learning and experimentation
- When you don’t care about privacy
Self-Hosted Registry Is Better For
- Private projects
- No rate limits on pulls
- Full control over retention
- No third-party dependency
- Sovereignty over your artifacts
The Practical Reality
| Docker Hub Free Tier | Your Registry |
|---|---|
| 1 private repository | Unlimited private repos |
| Rate limits on pulls | No rate limits |
| 6-month inactivity deletion | You control retention |
| They see your images | Complete privacy |
Registry Options
Option 1: Gitea Packages (Recommended)
If you already run Gitea for Git hosting, you have a registry built in.
Pros:
- Already integrated with your Git
- Web UI included
- Authentication handled
- Zero additional setup
Enable in Gitea:
# app.ini
[packages]
ENABLED = true
Option 2: Harbor
Enterprise-grade registry with vulnerability scanning.
Pros: Security scanning built in, replication between registries, full RBAC.
Cons: More complex setup, heavier resource usage, overkill for personal use.
Option 3: Docker Registry (Basic)
The official minimal registry.
Pros: Minimal, simple, low resource usage.
Cons: No web UI, basic authentication only, manual cleanup.
My Recommendation: Use Gitea Packages if you self-host Gitea. Everything in one place. Use basic registry if you want minimal and don’t need UI.
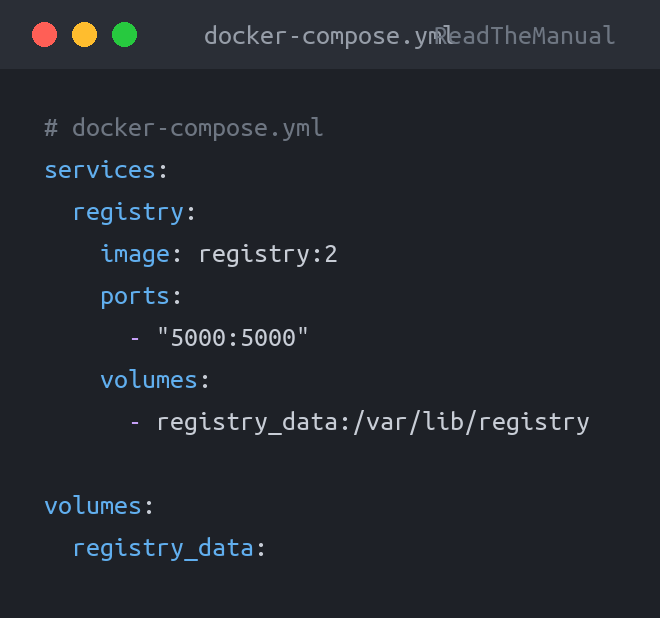
Basic Docker Registry Setup
# docker-compose.yml
services:
  registry:
    image: registry:2
    ports:
      - "5000:5000"
    volumes:
      - registry_data:/var/lib/registry

volumes:
  registry_data:
Setting Up Gitea Packages
Hour 0-1: Prerequisites
- Gitea instance running
- HTTPS configured (required for Docker auth)
Enable Packages
In app.ini:
[packages]
ENABLED = true
CHUNKED_UPLOAD_PATH = /data/tmp/package-upload
Restart Gitea. Packages are now enabled.
Registry URL
Your registry URL is:
registry.yourdomain.comOr if sharing domain with Gitea:
git.yourdomain.comPushing Images to Your Registry
Hour 1-2: Login to Registry
docker login registry.yourdomain.com
# Enter Gitea username and password (or access token)
For tokens, create one in Gitea: Settings > Applications > Access Tokens
Tag Your Image
Images must be tagged with the registry path:
# Tag for your registry
docker tag my-app:latest registry.yourdomain.com/username/my-app:latest
Format: registry/owner/image:tag
Push
docker push registry.yourdomain.com/username/my-app:latestVerify
In Gitea: Your Profile > Packages
You’ll see your image listed with tags and size.
Pulling Images
Hour 2-3: On Any Machine
# Login (once)
docker login registry.yourdomain.com

# Pull image
docker pull registry.yourdomain.com/username/my-app:latest

# Run it
docker run -d -p 8080:80 registry.yourdomain.com/username/my-app:latest
In Docker Compose
services:
  app:
    image: registry.yourdomain.com/username/my-app:latest
    ports:
      - "8080:80"
Image Tagging Strategy
Version Tags
# Specific version
docker tag my-app:latest registry.yourdomain.com/username/my-app:1.0.0
docker push registry.yourdomain.com/username/my-app:1.0.0

# Also tag as latest
docker tag my-app:latest registry.yourdomain.com/username/my-app:latest
docker push registry.yourdomain.com/username/my-app:latest
Tag Naming
| Tag | Purpose |
|---|---|
latest | Most recent build |
1.0.0 | Specific version (semver) |
main | Built from main branch |
sha-abc123 | Specific commit |
Best Practice
Always push both versioned AND latest:
docker push registry.yourdomain.com/username/my-app:1.2.3
docker push registry.yourdomain.com/username/my-app:latest
Production uses versioned tags. Development uses latest.
Real Example: Complete Workflow Script
Create build-and-push.sh:
#!/bin/bash
set -euo pipefail

REGISTRY="registry.yourdomain.com"
IMAGE="username/my-app"
VERSION=${1:-latest}

echo "Building $IMAGE:$VERSION..."
docker build -t $IMAGE:$VERSION .

echo "Tagging for registry..."
docker tag $IMAGE:$VERSION $REGISTRY/$IMAGE:$VERSION
docker tag $IMAGE:$VERSION $REGISTRY/$IMAGE:latest

echo "Pushing to registry..."
docker push $REGISTRY/$IMAGE:$VERSION
docker push $REGISTRY/$IMAGE:latest

echo "Done! Image available at $REGISTRY/$IMAGE:$VERSION"
Usage: ./build-and-push.sh 1.0.0
Registry Maintenance
Storage Growth
Images accumulate. Monitor storage:
# Check registry volume size
du -sh /var/lib/docker/volumes/gitea_data/_data/packages
Cleanup Old Images
In Gitea, delete old package versions through the UI.
For basic Docker registry, run garbage collection:
docker exec registry bin/registry garbage-collect /etc/docker/registry/config.ymlBackup Strategy
Your registry contains your deployment artifacts. Back it up:
# Backup Gitea packages directory
rsync -av /path/to/gitea/data/packages/ /backup/packages/
Troubleshooting
“unauthorized: authentication required”
# Re-login
docker logout registry.yourdomain.com
docker login registry.yourdomain.com
“server gave HTTP response to HTTPS client”
Your registry needs HTTPS. If testing locally:
# Add insecure registry (not for production!)
# Edit /etc/docker/daemon.json:
{
  "insecure-registries": ["localhost:5000"]
}
# Restart Docker
For production, always use HTTPS.
“denied: requested access to the resource is denied”
Check:
- Correct username in image path
- You have push permission
- Token has write scope
Push is Slow
First push uploads all layers. Subsequent pushes only upload changed layers. This is normal.
Security Considerations
Access Control
- Use access tokens instead of passwords
- Create tokens with minimal scope
- Rotate tokens periodically
- Don’t commit tokens to Git
HTTPS Required
Docker requires HTTPS for registry authentication. No exceptions for production.
Private by Default
Gitea packages respect repository visibility:
- Public repo = public packages
- Private repo = private packages
Keep your app repos private if you want private images.
What You’ve Accomplished
You now have:
- Your own container registry
- Images stored on your infrastructure
- No Docker Hub dependency
- Full control over access and retention
Your deployment workflow is now:
Code > Build > Push to YOUR registry > Deploy from YOUR registryNo third-party in the critical path.
How to Talk About This in Interviews
On your resume:
- “Self-hosted container registry management”
- “Image tagging and versioning strategies”
- “Artifact management and retention policies”
In interviews:
“I run my own container registry to maintain control over deployment artifacts. I use semantic versioning for images, always tag with both version and latest, and have backup strategies for registry data. This eliminates third-party dependencies and rate limits in my deployment pipeline.”
The Journey So Far
- Step 1: Built app with AI tools
- Step 2: Set up local development environment
- Step 3: Containerize with Docker
- Step 4: Push to private registry (You are here)
- Step 5: Automate with CI/CD
- Step 6: Deploy to your infrastructure
Practical Exercise
Today:
- Enable Gitea Packages (or set up basic registry)
- Login:
docker login registry.yourdomain.com - Tag your image for the registry
- Push:
docker push registry.yourdomain.com/... - Verify in Gitea UI (or
docker pullfrom another machine)
Verification:
- Image visible in Gitea Packages
- Can pull from a different machine
- No Docker Hub involved
Your code is in your Git. Your images should be in your registry. Own the whole pipeline.

ReadTheManual is run, written and curated by Eric Lonsdale.
Eric has over 20 years of professional experience in IT infrastructure, cloud architecture, and cybersecurity, but started with PCs long before that.
He built his first machine from parts bought off tables at the local college campus, hoping they worked. He learned on BBC Micros and Atari units in the early 90s, and has built almost every PC he’s used between 1995 and now.
From helpdesk to infrastructure architect, Eric has worked across enterprise datacentres, Azure environments, and security operations. He’s managed teams, trained engineers, and spent two decades solving the problems this site teaches you to solve.
ReadTheManual exists because Eric believes the best way to learn IT is to build things, break things, and actually read the manual. Every guide on this site runs on infrastructure he owns and maintains.
Enjoyed this guide?
New articles on Linux, homelab, cloud, and automation every 2 days. No spam, unsubscribe anytime.