Why Docker on a Raspberry Pi Makes Sense
I have three Raspberry Pis running Docker in my homelab. One handles DNS and ad blocking, another runs monitoring and a dashboard, and the third runs Listmonk for newsletter management. They draw about 5 watts each, run silently, and cost less than a month of any cloud VM to buy outright.
From the homelab: I run Docker on several Raspberry Pis across my homelab. Pi-hole, monitoring agents, lightweight services — the Pi handles all of it without breaking a sweat. The setup is straightforward once you know the ARM-specific quirks.
The Raspberry Pi has become a genuinely capable Docker host, particularly since the Pi 5 arrived with a proper PCIe bus and significantly better I/O. But even the Pi 4 handles lightweight containers without breaking a sweat. The ARM64 architecture that once caused compatibility headaches is now well supported by the vast majority of popular Docker images.
This guide covers installing Docker on both the Pi 4 and Pi 5, the ARM64 image compatibility situation, why you absolutely need an SSD instead of an SD card, and the first containers worth running once you’re set up. If you’ve already followed our Ubuntu 24.04 Docker guide, this follows the same principles but with Pi-specific considerations.
Pi 4 vs Pi 5 for Docker: Which Should You Use?
Both work. But they’re not equal.
The Pi 5 has a quad-core Cortex-A76 at 2.4 GHz, genuine PCIe 2.0 for NVMe SSDs, and available in 4 GB or 8 GB RAM configurations. For Docker workloads, the CPU improvement matters less than the I/O improvement. Containers read and write constantly, and the PCIe bus on the Pi 5 means NVMe SSD performance is dramatically better than anything the Pi 4 could manage through USB 3.0.
The Pi 4 has a quad-core Cortex-A72 at 1.8 GHz and tops out at 8 GB RAM. It connects to external SSDs via USB 3.0, which is perfectly adequate for most homelab workloads. I still run a Pi 4 with eight containers and it handles them fine. You’ll notice the difference when pulling large images or rebuilding containers, not during normal operation.
If you’re buying new, get the Pi 5 with 8 GB. The price difference is small and you’ll appreciate the headroom. If you already have a Pi 4 sitting in a drawer, it’s more than capable of running Docker. Don’t let anyone tell you it’s too slow. Mine has been running containers continuously for over a year.
The ARM64 situation
The Pi 4 and Pi 5 both use ARM64 (also called aarch64) processors. A few years ago, this was a genuine problem. Many Docker images were built only for x86_64 (AMD64) and simply would not run on a Pi.
In 2026, this is mostly resolved. The major images (Nginx, PostgreSQL, MariaDB, Redis, Node.js, Python, Grafana, Prometheus, Home Assistant, Pi-hole, Portainer, Uptime Kuma) all publish multi-architecture images that include ARM64 builds. Docker automatically pulls the correct architecture when you run docker pull.
Where you’ll still hit issues is with niche or unmaintained images, particularly older projects that haven’t updated their CI pipelines to build for multiple architectures. Before committing to running something on a Pi, check the image’s supported architectures on Docker Hub. Look for linux/arm64 or linux/aarch64 in the tag details.
If an image doesn’t support ARM64, Docker will tell you with a fairly clear error: no matching manifest for linux/arm64/v8. Don’t try to force it with platform flags unless you know what you’re doing. QEMU emulation technically works but the performance penalty makes it impractical for anything beyond a quick test.
Prerequisites
Before you start:
- A Raspberry Pi 4 (4 GB+) or Pi 5
- Raspberry Pi OS (64-bit) or Ubuntu Server 24.04 (arm64) installed and booted
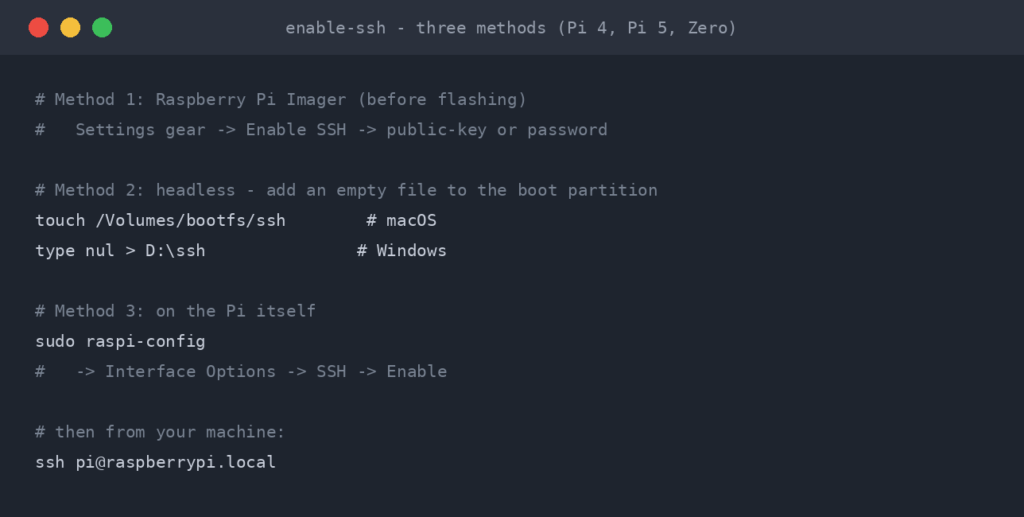
- SSH access to the Pi (or a keyboard and monitor connected)
- An SSD for Docker storage (strongly recommended over SD card)
- A working internet connection
If you’re still running Raspberry Pi OS 32-bit, stop and reinstall with the 64-bit version. Docker’s official packages require a 64-bit OS, and running 32-bit on hardware that supports 64-bit is leaving performance on the table. Use the Raspberry Pi Imager to flash the 64-bit version of Raspberry Pi OS Lite (no desktop needed for a Docker host).
Storage: Use an SSD, Not an SD Card
I need to say this before we get to installation because it affects where Docker stores its data.
SD cards are not designed for the sustained random read/write patterns that Docker generates. Container layers, volume data, log files, and image pulls all hammer the storage. I’ve killed two SD cards running Docker, one lasted three months, the other about five. The write endurance simply isn’t there.
For the Pi 5: Use an NVMe SSD with a Pi 5 HAT or the official M.2 HAT+. Boot directly from the NVMe. This is the best-performing option by a wide margin.
For the Pi 4: Use a USB 3.0 SSD enclosure with a SATA SSD. Boot from USB (configure this in raspi-config under Advanced Options > Boot Order). A 256 GB SATA SSD in a USB enclosure costs about fifteen quid and will outlast a dozen SD cards.
If you absolutely must use an SD card (temporary setup, testing), at least move Docker’s data directory to an external SSD. I’ll cover that after installation.
Method 1: The Convenience Script (Recommended)
Docker provides an official convenience script that detects your OS and architecture, then installs everything correctly. On a Pi, this is the simplest path.
curl -fsSL https://get.docker.com -o get-docker.sh
sudo sh get-docker.sh
This will:
- Detect your Raspberry Pi OS or Ubuntu version
- Add Docker’s official GPG key and repository
- Install Docker Engine, CLI, containerd, and the Compose plugin
The script takes a couple of minutes on a Pi 5 and a bit longer on a Pi 4. When it finishes, add your user to the docker group:
sudo usermod -aG docker $USERLog out and back in for the group change to take effect, then verify:
docker run hello-worldYou should see “Hello from Docker!” confirming everything works.
The convenience script is fine for personal use and homelabs. For production or automated deployments where you need reproducible installs, use the manual method below instead. The manual method gives you explicit control over every step and is easier to script in Ansible playbooks or similar automation.
Method 2: Manual Installation
If you prefer to understand each step (or you’re automating the install), here’s the manual process. This mirrors the approach from the Ubuntu 24.04 guide with the appropriate changes for Raspberry Pi OS.
Remove old packages
sudo apt remove docker docker-engine docker.io containerd runc 2>/dev/null
sudo apt autoremove -y
Install prerequisites
sudo apt update
sudo apt install -y ca-certificates curl gnupg
Add Docker’s GPG key and repository
For Raspberry Pi OS (which is Debian-based):
sudo install -m 0755 -d /etc/apt/keyrings
sudo curl -fsSL https://download.docker.com/linux/debian/gpg -o /etc/apt/keyrings/docker.asc
sudo chmod a+r /etc/apt/keyrings/docker.asc

echo \
  "deb [arch=$(dpkg --print-architecture) signed-by=/etc/apt/keyrings/docker.asc] https://download.docker.com/linux/debian \
  $(. /etc/os-release && echo "${VERSION_CODENAME}") stable" | \
  sudo tee /etc/apt/sources.list.d/docker.list > /dev/null
For Ubuntu Server on Pi, replace debian with ubuntu in both the GPG URL and the repository line.
Install Docker Engine
sudo apt update
sudo apt install -y docker-ce docker-ce-cli containerd.io docker-buildx-plugin docker-compose-plugin
Post-install configuration
sudo usermod -aG docker $USER
sudo systemctl enable docker.service
sudo systemctl enable containerd.service
Docker Compose on the Pi
Docker Compose is included as a plugin when you install Docker using either method above. No separate installation needed. The command is docker compose (with a space), and it works identically to any other platform.
Verify it’s installed:
docker compose versionIf you see a version number, you’re good. If you find old tutorials telling you to install docker-compose via pip or download a binary, ignore them. That’s the legacy standalone version and it’s deprecated.
Moving Docker’s Data Directory to an SSD
If you’re booting from an SD card but have an SSD attached, you should move Docker’s data directory to the SSD. Docker stores everything (images, containers, volumes, build cache) under /var/lib/docker by default.
# Stop Docker
sudo systemctl stop docker
sudo systemctl stop containerd

# Mount your SSD (adjust device name - check with lsblk)
sudo mkdir -p /mnt/ssd
sudo mount /dev/sda1 /mnt/ssd

# Add to /etc/fstab for persistence (get UUID with blkid)
# UUID=your-uuid-here /mnt/ssd ext4 defaults,noatime 0 2

# Move Docker data
sudo mkdir -p /mnt/ssd/docker
sudo rsync -aP /var/lib/docker/ /mnt/ssd/docker/

# Configure Docker to use the new location
sudo tee /etc/docker/daemon.json > /dev/null <<'EOF'
{
  "data-root": "/mnt/ssd/docker",
  "log-driver": "json-file",
  "log-opts": {
    "max-size": "10m",
    "max-file": "3"
  },
  "storage-driver": "overlay2"
}
EOF

# Start Docker
sudo systemctl start docker

# Verify
docker info | grep "Docker Root Dir"
Once confirmed working, you can remove the old data: sudo rm -rf /var/lib/docker.
Performance Expectations
Let’s be honest about what a Pi can and cannot handle.
Runs well: DNS servers (Pi-hole, AdGuard Home), monitoring (Uptime Kuma, Grafana with modest dashboards), reverse proxies (Nginx, Caddy, Traefik), dashboards (Homepage, Homarr), lightweight databases (SQLite-backed apps), Home Assistant, MQTT brokers, RSS readers, small wikis.
Runs but struggles under load: Full-stack apps with heavy databases (Nextcloud with MariaDB can feel sluggish with multiple users), media servers (Jellyfin works for direct play but transcoding will bring a Pi to its knees), build tools, anything that needs sustained CPU.
Don’t bother: AI/ML workloads, video transcoding, CI/CD runners for large projects, anything that needs more than 8 GB RAM.
The Pi is brilliant as a secondary Docker host for lightweight, always-on services. I run my monitoring and DNS on Pis specifically because they’re cheap to run 24/7 and if the main server goes down for maintenance, monitoring and DNS stay up. That separation of concerns is worth the price of a Pi on its own.
First Containers to Run on a Pi
These are the containers I’d put on a Pi first, chosen specifically because they’re lightweight, ARM64-compatible, and genuinely useful from day one.
Pi-hole: Network-wide ad blocking
docker run -d \
  --name pihole \
  --restart=always \
  -p 53:53/tcp \
  -p 53:53/udp \
  -p 80:80 \
  -e TZ="Europe/London" \
  -e WEBPASSWORD="changethis" \
  -v pihole_etc:/etc/pihole \
  -v pihole_dnsmasq:/etc/dnsmasq.d \
  pihole/pihole:latest
Point your router’s DHCP DNS setting at the Pi’s IP address and every device on your network gets ad blocking without installing anything on the device itself.
Portainer: Container management UI
docker run -d \
  --name portainer \
  --restart=always \
  -p 9443:9443 \
  -v /var/run/docker.sock:/var/run/docker.sock \
  -v portainer_data:/data \
  portainer/portainer-ce:latest
Home Assistant: Home automation
docker run -d \
  --name homeassistant \
  --restart=always \
  --privileged \
  --network=host \
  -v homeassistant_config:/config \
  -e TZ="Europe/London" \
  ghcr.io/home-assistant/home-assistant:stable
Home Assistant runs surprisingly well on a Pi and it’s one of the most popular use cases for the hardware. The --privileged flag and host networking are needed for device discovery (Zigbee, Z-Wave, Bluetooth).
Troubleshooting Pi-Specific Issues
Container fails to start with “exec format error”
This means the image doesn’t have an ARM64 build. Check the image’s Docker Hub page for supported architectures. You’ll need to find an alternative image or build from source.
Docker is slow after running for a few days
Check your storage. Run docker system df to see how much space Docker is using. On a Pi with limited storage, unused images and build cache fill up fast. Run docker system prune -f regularly.
Temperature throttling
The Pi 5 in particular will throttle under sustained load if it overheats. Check with vcgencmd measure_temp. If you’re consistently above 80C, fit an active cooler. The official Pi 5 Active Cooler or any heatsink with a fan will sort it. A throttled Pi running Docker containers is noticeably sluggish.
SD card corruption
If Docker starts behaving erratically after weeks of running on an SD card (containers won’t start, images appear corrupted), the card is likely failing. This is exactly why I recommended an SSD earlier. Move to SSD storage and flash a fresh SD card if needed.
Running Docker on a Raspberry Pi is a cheap way to build real container experience. The skills transfer directly: the commands are identical to what you’d use on a production server, and managing resource constraints on a Pi teaches you to think about efficiency in a way that having unlimited cloud resources never will. I’d rather interview someone who runs six containers on a Pi and understands the trade-offs than someone who’s only ever clicked buttons in a cloud console.
Key Takeaways
- Both Pi 4 and Pi 5 are capable Docker hosts, but the Pi 5’s PCIe SSD support makes it significantly better for I/O-heavy workloads
- Use a 64-bit OS. Docker’s official packages don’t support 32-bit ARM
- Use an SSD, not an SD card. SD cards will fail under Docker’s sustained write patterns
- Most popular Docker images now support ARM64 natively, but check before committing to a niche image
- The convenience script (
get.docker.com) is the quickest way to install, but manual installation gives you more control - Docker Compose is included as a plugin, so no separate installation is needed
- Pis are ideal for lightweight, always-on services: DNS, monitoring, dashboards, Home Assistant
- Don’t expect a Pi to handle transcoding, AI workloads, or heavy databases. Use the right tool for the job
Related Guides
If you found this useful, these guides continue the journey:
- Essential Docker Commands You Need to Know — The core Docker commands every homelab operator should know by heart
- Docker Compose Beginner’s Guide — Learn to manage multi-container applications with Docker Compose
- Raspberry Pi 5 Homelab Guide — Put your Raspberry Pi 5 to work as a homelab node
- Pi-hole Docker Setup Guide — Block ads network-wide with Pi-hole running in Docker
- How to Install Docker on Ubuntu 24.04 — Step-by-step Docker installation on Ubuntu 24.04 LTS


ReadTheManual is run, written and curated by Eric Lonsdale.
Eric has over 20 years of professional experience in IT infrastructure, cloud architecture, and cybersecurity, but started with PCs long before that.
He built his first machine from parts bought off tables at the local college campus, hoping they worked. He learned on BBC Micros and Atari units in the early 90s, and has built almost every PC he’s used between 1995 and now.
From helpdesk to infrastructure architect, Eric has worked across enterprise datacentres, Azure environments, and security operations. He’s managed teams, trained engineers, and spent two decades solving the problems this site teaches you to solve.
ReadTheManual exists because Eric believes the best way to learn IT is to build things, break things, and actually read the manual. Every guide on this site runs on infrastructure he owns and maintains.
Enjoyed this guide?
New articles on Linux, homelab, cloud, and automation every 2 days. No spam, unsubscribe anytime.