How to Run Pi-hole in Docker (DNS Ad Blocking with Docker Compose)
If you are already running Docker on your server, putting Pi-hole in a container is the obvious choice. Your DNS service gets the same isolation, portability, and reproducibility as every other service in your stack. You can version control the compose file, blow away the container without affecting your host, and redeploy the whole thing in sixty seconds if something goes wrong.
I run Pi-hole in Docker on my homelab alongside a dozen other services. It has been rock solid for over a year. But there is one specific gotcha with the Docker deployment that trips up nearly everyone, and it is not the one you are expecting. It is not Docker itself. It is the port 53 conflict with systemd-resolved on Ubuntu, combined with the networking mode question that Docker introduces. Get those two things right and the rest is straightforward.
This guide assumes you have Docker and Docker Compose already installed. If not, follow the Docker installation guide for Ubuntu 24.04 first. If you would rather install Pi-hole natively without Docker, see the Pi-hole on Ubuntu 24.04 guide instead.
Career Value: Running DNS infrastructure in containers is exactly how it works in production environments. Kubernetes clusters use CoreDNS in pods. Cloud-native stacks run DNS services as containerised workloads with persistent storage. Understanding how to expose UDP ports through Docker, manage persistent volumes for stateful services, and handle port conflicts on the host maps directly to container orchestration roles. This is not a homelab exercise — it is the same pattern at smaller scale.
Prerequisites
- Docker and Docker Compose installed (installation guide)
- Ubuntu 24.04 or similar Linux host with a static IP address
- SSH access to your server
- Router access for DNS configuration later
The Port 53 Problem (Read This Before Anything Else)
If you are running Ubuntu, you will hit this. It is the single most common reason Pi-hole fails to start in Docker, and I have seen experienced engineers waste an hour on it because they assumed it was a Docker networking issue when it was actually an Ubuntu default.
Ubuntu runs systemd-resolved, a local DNS stub resolver that listens on port 53. Pi-hole also needs port 53. Docker will try to bind the container’s port 53 to the host’s port 53 and fail because systemd-resolved is already there.
The error looks like this:
Error response from daemon: driver failed programming external connectivity
on endpoint pihole: Bind for 0.0.0.0:53 failed: port is already allocated
Here is the fix:
# Check if port 53 is in use
sudo ss -lntp | grep ':53 '

# Edit resolved config
sudo nano /etc/systemd/resolved.conf
Set these values under [Resolve]:
[Resolve]
DNSStubListener=no
DNS=1.1.1.1
FallbackDNS=8.8.8.8
Then fix the resolv.conf symlink and restart:
sudo rm /etc/resolv.conf
sudo ln -s /run/systemd/resolve/resolv.conf /etc/resolv.conf
sudo systemctl restart systemd-resolved

# Verify port 53 is free
sudo ss -lntp | grep ':53 '
Should return nothing. Now Docker can bind to port 53.
Do not skip the resolv.conf symlink step. If you only change the config and restart systemd-resolved, your server will still point at 127.0.0.53 for its own DNS lookups. That address no longer works because you disabled the stub listener. Your server will not be able to resolve any domains, including pulling Docker images. I have made this mistake more than once. It is infuriating.
Host Network vs Bridge Network: The Docker Networking Decision
This is the gotcha specific to running Pi-hole in Docker, and it is worth understanding properly because it affects how your query logs work.
Bridge network (default)
Docker’s default bridge network means Pi-hole sees all DNS queries as coming from the Docker gateway IP (typically 172.17.0.1), not from the actual client devices. Your Pi-hole dashboard shows one client making thousands of queries instead of individual devices. You lose per-device visibility.
Host network
With network_mode: host, the container shares the host’s network stack directly. Pi-hole sees the real source IP of every query. Your dashboard shows individual devices, and group management works properly because you can assign rules per client.
Bridge network with macvlan
A macvlan network gives the container its own IP address on your LAN, separate from the host. Pi-hole sees real client IPs, and you get network isolation. This is the most complex to set up but the cleanest from a networking perspective.
My recommendation: Use bridge networking with explicit port mappings. Yes, you lose per-device client identification in some configurations, but it is the most portable, easiest to debug, and works reliably across different Docker versions. If per-client visibility matters to you (and it should, once you start using group management), switch to host networking. Avoid macvlan unless you already understand Docker networking well.
Docker Compose Setup
Create a directory for your Pi-hole deployment:
mkdir -p ~/services/pihole && cd ~/services/piholeCreate the environment file first. Never hardcode passwords in your compose file:
cat > .env << 'EOF'
PIHOLE_PASSWORD=your-secure-admin-password
PIHOLE_DNS=1.1.1.1;9.9.9.9
TZ=Europe/London
SERVER_IP=192.168.1.50
EOF
Replace SERVER_IP with your server's actual static IP.
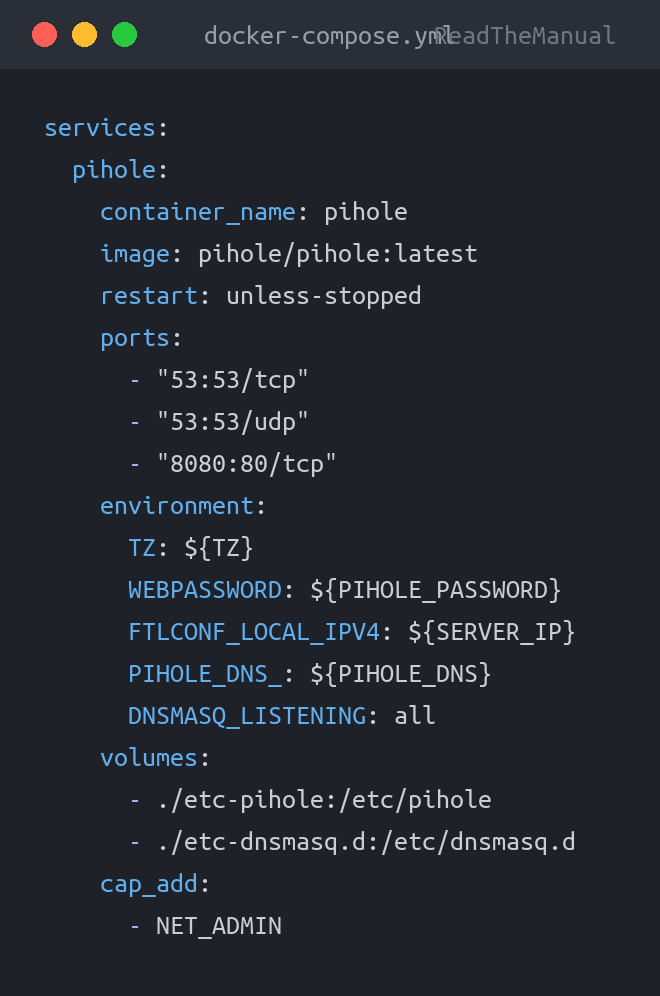
Now create docker-compose.yml:
services:
  pihole:
    container_name: pihole
    image: pihole/pihole:latest
    restart: unless-stopped
    ports:
      - "53:53/tcp"
      - "53:53/udp"
      - "8080:80/tcp"
    environment:
      TZ: ${TZ}
      WEBPASSWORD: ${PIHOLE_PASSWORD}
      FTLCONF_LOCAL_IPV4: ${SERVER_IP}
      PIHOLE_DNS_: ${PIHOLE_DNS}
      DNSMASQ_LISTENING: all
    volumes:
      - ./etc-pihole:/etc/pihole
      - ./etc-dnsmasq.d:/etc/dnsmasq.d
    cap_add:
      - NET_ADMIN
Why port 8080 and not port 80? If you are running other web services behind a reverse proxy (Nginx Proxy Manager, Caddy, Traefik), they need port 80. Mapping Pi-hole's web interface to 8080 avoids the conflict. You can always put Pi-hole's admin behind your reverse proxy later if you want a proper domain name for it. Plan your port allocations before you have six services fighting over port 80.
Host network alternative
If you want per-device visibility in the query logs, use host networking instead:
services:
  pihole:
    container_name: pihole
    image: pihole/pihole:latest
    restart: unless-stopped
    network_mode: host
    environment:
      TZ: ${TZ}
      WEBPASSWORD: ${PIHOLE_PASSWORD}
      FTLCONF_LOCAL_IPV4: ${SERVER_IP}
      PIHOLE_DNS_: ${PIHOLE_DNS}
      WEB_PORT: 8080
      DNSMASQ_LISTENING: local
    volumes:
      - ./etc-pihole:/etc/pihole
      - ./etc-dnsmasq.d:/etc/dnsmasq.d
    cap_add:
      - NET_ADMIN
Note the differences: no ports section (host networking exposes everything directly), WEB_PORT set to 8080 to avoid port 80 conflicts, and DNSMASQ_LISTENING set to local rather than all for security.
Start Pi-hole and Verify
# Start the container
docker compose up -d

# Check it is running
docker compose ps

# Test DNS resolution
dig @127.0.0.1 google.com

# Test blocking is working
dig @127.0.0.1 ads.google.com
# Should return 0.0.0.0

# Check container logs if something is wrong
docker compose logs pihole
Access the web interface at http://YOUR-SERVER-IP:8080/admin and log in with the password from your .env file.
Persistent Volumes: What Gets Saved and Why
The two volume mounts in the compose file are critical:
./etc-pihole-- Contains the Gravity database (your blocklists), whitelist, blacklist, DNS records, group management configuration, and web interface settings. This is all your customisation../etc-dnsmasq.d-- Contains dnsmasq configuration files, including custom DNS records and DHCP settings if you use Pi-hole as a DHCP server.
These volumes mean you can destroy and recreate the container without losing anything. Your blocklists, whitelists, custom DNS records, and settings all survive. The container is disposable. The data is not.
# Pulling a new image and recreating preserves all data
docker compose pull
docker compose up -d
This is the correct update procedure. Do not docker compose down and delete the volumes unless you genuinely want to start fresh.
Custom DNS Records
One of Pi-hole's most useful features for a homelab is custom local DNS records. Instead of remembering IP addresses for all your services, you can create DNS entries that resolve on your local network.
In the web interface, go to Local DNS > DNS Records and add entries like:
pihole.home.lan    192.168.1.50
nextcloud.home.lan 192.168.1.50
grafana.home.lan   192.168.1.50
These records only resolve on your local network through Pi-hole. They do not need to be registered with any domain registrar. Any device using Pi-hole for DNS will resolve them.
You can also add CNAME records under Local DNS > CNAME Records if you want aliases pointing to an existing DNS name rather than an IP.
Pick a local domain and stick with it. I use .home.lan for local services. Some people use .local, but that can conflict with mDNS/Bonjour on Apple devices. Others use a subdomain of a domain they own (e.g., lab.yourdomain.com). Whatever you pick, be consistent. Changing your local DNS naming scheme once you have twenty services configured is the kind of task you put off indefinitely.
Running Pi-hole Alongside Other Containers
If you are running Pi-hole on the same Docker host as other services, there are two things to be aware of.
Other containers resolving DNS: By default, Docker containers use Docker's embedded DNS server, not the host's DNS. Your other containers will not automatically use Pi-hole for their DNS queries. If you want them to, add DNS settings to their compose files:
services:
  some-other-service:
    image: whatever:latest
    dns:
      - 192.168.1.50  # Your Pi-hole IP
Port conflicts: If another container is already using port 53 (unlikely but possible with some DNS or VPN containers), Pi-hole will fail to start. Check for conflicts with docker ps and look at the ports column.
Resource usage: Pi-hole is lightweight. It typically uses 50-100 MB of RAM and negligible CPU. It will happily coexist with a dozen other services on modest hardware. DNS queries are tiny and fast. You do not need to worry about Pi-hole competing with your other containers for resources.
Configuring Your Router
Same as any Pi-hole deployment: you need to point your network's DNS at the Pi-hole server. The best approach is changing the DNS server in your router's DHCP settings so every device automatically uses Pi-hole. If your router does not support that, change the router's own DNS settings. As a last resort, configure devices individually.
See the Ubuntu Pi-hole guide for detailed router configuration options. The process is identical regardless of whether Pi-hole is running natively or in Docker.
Test before you commit. Before changing your router's DNS settings, verify Pi-hole is responding correctly from another device on your network: dig @192.168.1.50 google.com (replace with your server's IP). If that works, you are safe to point your router at it. If it does not, debug the Docker container first. Changing router DNS to a non-functional server takes down your entire network's internet access.
Web Admin Password Management
If you need to change the web interface password after deployment:
# Change password via docker exec
docker exec -it pihole pihole -a -p

# Or set it via environment variable and recreate
# Update PIHOLE_PASSWORD in .env, then:
docker compose up -d --force-recreate
If you have forgotten the password entirely and cannot log in, the environment variable approach is the clean reset. Update the .env file and force-recreate the container.
Updating Pi-hole in Docker
This is one of Docker's genuine advantages over a native install. Updates are clean and reversible:
cd ~/services/pihole

# Pull the latest image
docker compose pull

# Recreate with new image (data volumes preserved)
docker compose up -d

# Verify
docker compose ps
docker compose logs --tail 20 pihole
If the update causes problems, you can roll back by specifying the previous image tag in your compose file instead of latest. This is why pinning specific versions (e.g., pihole/pihole:2024.07.0) in production is better than using latest, even though latest is more convenient. At minimum, note which version you were running before updating so you can roll back.
Troubleshooting
Container starts but DNS does not resolve:
# Check container logs for errors
docker compose logs pihole | tail -50

# Verify port 53 is actually bound
sudo ss -lntp | grep ':53 '
# Should show the Docker proxy, not systemd-resolved
Web interface loads but shows no queries:
Your devices are not using Pi-hole for DNS. Check your router's DHCP/DNS settings and renew leases on your devices.
"Permission denied" on volume mounts:
# Pi-hole containers run as root by default, but if you hit
# permission issues, ensure the directories exist and are writable
sudo chown -R 999:999 ./etc-pihole ./etc-dnsmasq.d
Key Takeaways
- Fix systemd-resolved before starting. The port 53 conflict is an Ubuntu default, not a Docker issue. Disable the stub listener and fix the resolv.conf symlink first.
- Bridge networking is simpler, host networking gives better visibility. Bridge mode loses per-device query attribution. Host mode preserves it. Choose based on whether you need group management.
- Volumes are your data. The container is disposable. The
etc-piholeandetc-dnsmasq.dvolumes contain everything that matters. Never delete them unless you mean it. - Test DNS from another device before changing your router. Pointing your network at a non-functional DNS server takes down everyone's internet.
- Pin your image version in production. Using
latestis convenient until an update breaks something and you do not know what version you were on before.
Related Guides
- How to Install Pi-hole on Ubuntu 24.04 -- native installation without Docker
- Pi-hole vs AdGuard Home -- which DNS filter should you choose?
- Pi-hole on Raspberry Pi 5 -- dedicated hardware deployment
- How to Install Docker on Ubuntu 24.04
- How to Install Nextcloud with Docker
Related Guides
If you found this useful, these guides continue the journey:
- Pi-hole on Ubuntu 24.04 -- Install Pi-hole directly on Ubuntu 24.04 for a dedicated DNS server.
- Pi-hole vs AdGuard Home -- A hands-on comparison of the two most popular DNS ad blockers.
- Pi-hole on Windows via WSL2 -- Test Pi-hole on your Windows machine using WSL2.
- Docker Compose Beginner's Guide -- Learn how to define and manage multi-container applications.
- How to Build Your First Homelab in 2026 -- Start your self-hosting journey with a practical homelab build.
- DuckDNS Dynamic DNS Setup -- Set up free dynamic DNS so you can reach your homelab remotely.


ReadTheManual is run, written and curated by Eric Lonsdale.
Eric has over 20 years of professional experience in IT infrastructure, cloud architecture, and cybersecurity, but started with PCs long before that.
He built his first machine from parts bought off tables at the local college campus, hoping they worked. He learned on BBC Micros and Atari units in the early 90s, and has built almost every PC he’s used between 1995 and now.
From helpdesk to infrastructure architect, Eric has worked across enterprise datacentres, Azure environments, and security operations. He’s managed teams, trained engineers, and spent two decades solving the problems this site teaches you to solve.
ReadTheManual exists because Eric believes the best way to learn IT is to build things, break things, and actually read the manual. Every guide on this site runs on infrastructure he owns and maintains.
Enjoyed this guide?
New articles on Linux, homelab, cloud, and automation every 2 days. No spam, unsubscribe anytime.