Every Homelab Needs a Front Door
If you are running more than one web-facing service in your homelab, you have probably hit the same wall everyone does. Nextcloud is on port 8080, Vaultwarden is on port 8081, Uptime Kuma is on port 3001, and you are typing IP addresses and port numbers into your browser like it is 1998. It works, but it is ugly, hard to remember, and impossible to add SSL certificates to properly.
From the homelab: NPM is the front door to my entire homelab. Every service I self-host sits behind it — TLS termination, subdomain routing, the lot. It is the first thing I deploy on any new setup because everything else depends on it.
A reverse proxy solves all of this. Instead of http://192.168.1.100:8080, you access https://cloud.yourdomain.com. Instead of managing SSL certificates manually for each service, the reverse proxy handles them all. And instead of opening dozens of ports on your firewall, you open two: 80 and 443.
Nginx Proxy Manager (NPM) is the reverse proxy I recommend for anyone starting out. It wraps Nginx — the same web server that powers a significant portion of the internet — in a web-based GUI that makes configuration visual and immediate. You do not need to edit Nginx config files by hand (though you can if you want to). Adding a new proxy host takes about 30 seconds. Getting a free SSL certificate from Let’s Encrypt is a single checkbox.
I have been running NPM on my primary Docker host for over two years. It handles all inbound traffic for about 15 services. This guide covers the setup, the first proxy host, SSL, and the patterns that make it work well at scale. It also covers what NPM cannot do, because understanding its limitations is as important as understanding its features.
What Is a Reverse Proxy?
Before we install anything, let me explain what a reverse proxy actually does, because this is a concept that trips up a lot of beginners.
Without a reverse proxy, each service listens on its own port. Your browser connects directly to that service. To access three services, you need three open ports, three separate SSL certificates, and three URLs that include port numbers.
A reverse proxy sits in front of all your services. It listens on ports 80 (HTTP) and 443 (HTTPS). When a request comes in for cloud.yourdomain.com, the proxy looks up its configuration, sees that cloud should go to the Nextcloud container on port 8080, and forwards the request there. The user never sees the port number. The user never connects to the backend service directly.
The benefits:
- Clean URLs:
https://cloud.yourdomain.cominstead ofhttp://192.168.1.100:8080 - Central SSL: One place manages all your certificates
- Security: Only ports 80 and 443 need to be exposed. Backend services are not directly reachable from the internet.
- Flexibility: Move a service to a different port or host, update the proxy config, and nothing changes for users
Prerequisites
You will need:
- Docker and Docker Compose installed. Follow the Docker installation guide if you have not done this yet.
- A domain name with DNS control. You need to be able to create A records or CNAME records pointing subdomains to your server’s IP. A free DuckDNS subdomain works too.
- Ports 80 and 443 available on the host. No other service can be using these ports. If you have Apache or another web server running, stop it first.
NPM needs exclusive access to ports 80 and 443 on the host machine. If you have another service bound to these ports (Apache, a different Nginx instance, Caddy), you must stop it or move it to different ports first. Running sudo ss -tlnp | grep -E ':80|:443' will show you what is currently using those ports.
Step 1: Create the Docker Compose File
Create a directory for your NPM deployment:
mkdir -p ~/nginx-proxy-manager && cd ~/nginx-proxy-managerCreate docker-compose.yml:
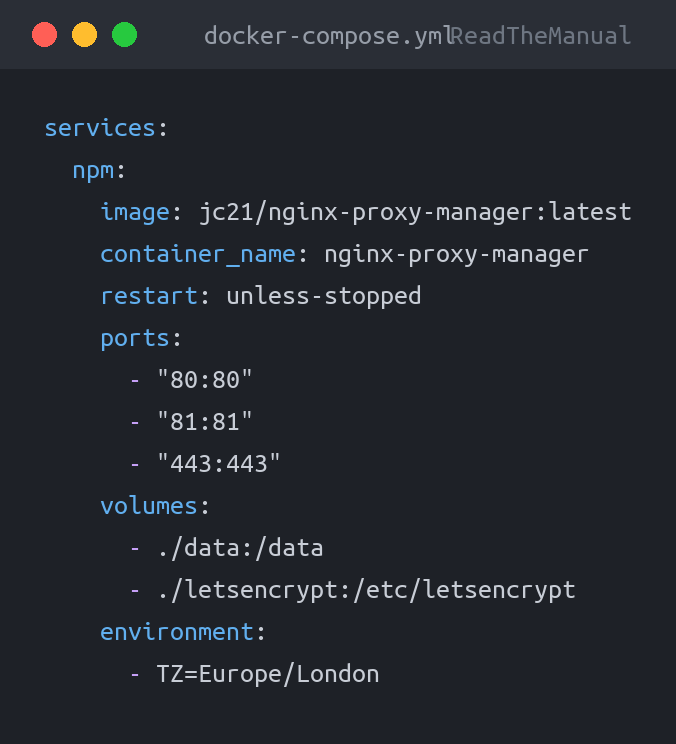
services:
  npm:
    image: jc21/nginx-proxy-manager:latest
    container_name: nginx-proxy-manager
    restart: unless-stopped
    ports:
      - "80:80"
      - "81:81"
      - "443:443"
    volumes:
      - ./data:/data
      - ./letsencrypt:/etc/letsencrypt
    environment:
      - TZ=Europe/London
That is the entire configuration. Three ports, two volumes, one environment variable:
- Port 80: HTTP traffic (incoming web requests and Let’s Encrypt HTTP validation)
- Port 81: The NPM admin interface
- Port 443: HTTPS traffic
- ./data: NPM’s database and configuration
- ./letsencrypt: SSL certificates
Some guides include a separate MariaDB or MySQL container for NPM. This is not required for most setups. NPM uses SQLite by default, which handles homelab-scale traffic without any issues. I have been running the SQLite-backed version with 15+ proxy hosts for over two years without a single database-related problem. Only add a separate database if you are running an unusually high number of proxy hosts or need advanced database features.
Step 2: Start the Container
docker compose up -dCheck the logs to verify it started cleanly:
docker compose logs -fYou should see NPM initialising its database and starting Nginx. Once you see the message about listening on ports 80 and 443, it is ready.
Step 3: First Login and Password Change
Navigate to http://your-server-ip:81 in your browser. You will see the NPM login page.
Default credentials:
Email:    [email protected]
Password: changeme
Log in, and NPM will immediately ask you to set a new admin email and password. Do this now. These are real default credentials that anyone who finds your NPM instance can use.
The admin panel on port 81 should not be exposed to the internet. It is an administrative interface with full control over your proxy configuration. If your server is publicly accessible, use a firewall rule to restrict port 81 to your local network only. On UFW: sudo ufw allow from 192.168.1.0/24 to any port 81. Better yet, access it through a WireGuard VPN.
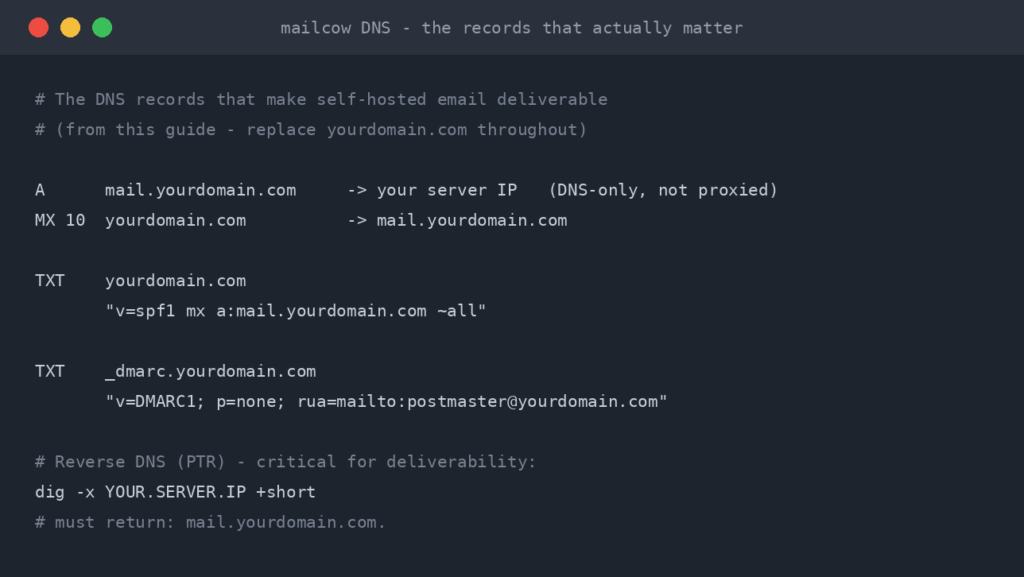
Step 4: Set Up DNS Records
Before you can add proxy hosts, your domain’s DNS needs to point to your server. For each service you want to proxy, create a DNS record:
cloud.yourdomain.com— A record —YOUR_SERVER_PUBLIC_IPvault.yourdomain.com— A record —YOUR_SERVER_PUBLIC_IPstatus.yourdomain.com— A record —YOUR_SERVER_PUBLIC_IP
Or, create a wildcard A record: *.yourdomain.com pointing to your server. This means any subdomain automatically resolves to your server, and you only need to manage proxy hosts in NPM.
For a homelab behind a home router, “your server’s public IP” is your home IP. If your ISP gives you a dynamic IP, pair this with a dynamic DNS service — DuckDNS or similar — and use CNAME records instead of A records.
Step 5: Add Your First Proxy Host
Let us proxy Uptime Kuma as an example. Suppose it is running on the same server on port 3001.
- In the NPM admin panel, click Hosts > Proxy Hosts > Add Proxy Host
- Fill in the details:
- Domain Names:
status.yourdomain.com - Scheme:
http - Forward Hostname/IP: The Docker host’s IP (e.g.,
192.168.1.100) or the container name if on the same Docker network - Forward Port:
3001 - Block Common Exploits: Tick this
- Websockets Support: Tick this (Uptime Kuma uses WebSockets for live updates)
- Domain Names:
- Click Save
At this point, http://status.yourdomain.com should load your Uptime Kuma instance. No port number needed. But we are not done — you need SSL.
Step 6: Add a Free SSL Certificate
This is where NPM earns its keep. Getting a Let’s Encrypt certificate is trivially easy:
- Edit the proxy host you just created (click the three dots > Edit)
- Click the SSL tab
- Select Request a new SSL Certificate from the dropdown
- Tick Force SSL (redirects HTTP to HTTPS)
- Tick HTTP/2 Support
- Enter your email address for Let’s Encrypt notifications
- Agree to the Let’s Encrypt terms
- Click Save
NPM will request a certificate from Let’s Encrypt, configure Nginx to use it, and set up automatic renewal. The entire process takes about 10 seconds. Your service is now accessible at https://status.yourdomain.com with a valid, trusted certificate.
Let’s Encrypt certificates are valid for 90 days. NPM handles renewal automatically, typically renewing around 30 days before expiry. You do not need to do anything. But if renewal fails (because your server was offline, DNS changed, or port 80 was blocked), NPM will show the certificate as expiring in the dashboard. Check it periodically, or better yet, set up Uptime Kuma to monitor your certificate expiry dates.
Cloudflare DNS challenge (for internal-only services)
If you do not want to expose ports 80 and 443 to the internet (e.g., services only accessible via VPN), you can use Cloudflare’s DNS challenge for certificate validation instead. This does not require any inbound ports — Let’s Encrypt validates ownership by checking a DNS TXT record that NPM creates via Cloudflare’s API.
To set this up:
- Move your domain’s DNS to Cloudflare (free tier is fine)
- Create a Cloudflare API token with DNS edit permissions
- In NPM, when requesting a certificate, select “Use a DNS Challenge” and choose Cloudflare as the provider
- Enter your API token
This is the setup I use for internal services that I access through WireGuard. They get real, trusted SSL certificates without ever being exposed to the internet.
Step 7: Proxy All Your Services
Repeat Step 5 and 6 for each service. Here are the settings for common homelab services:
| Service | Forward Port | WebSockets | Notes |
|---|---|---|---|
| Nextcloud | 8080 | No | Needs client_max_body_size in advanced config (see below) |
| Vaultwarden | 8080 | Yes | WebSocket needed for live sync. See Vaultwarden guide for details. |
| Uptime Kuma | 3001 | Yes | WebSocket needed for live dashboard |
| Portainer | 9443 | Yes | Scheme: https (Portainer serves its own HTTPS) |
| Gitea | 3000 | No | Straightforward proxy |
| Jellyfin | 8096 | Yes | WebSocket for live playback status |
Advanced configuration for specific services
Some services need extra Nginx directives. You can add these in the “Advanced” tab of any proxy host. For Nextcloud, add:
proxy_set_header Host $host;
proxy_set_header X-Real-IP $remote_addr;
proxy_set_header X-Forwarded-For $proxy_add_x_forwarded_for;
proxy_set_header X-Forwarded-Proto $scheme;

client_max_body_size 10G;
proxy_request_buffering off;
For Vaultwarden’s WebSocket support:
location /notifications/hub {
    proxy_pass http://YOUR_SERVER_IP:3012;
    proxy_set_header Upgrade $http_upgrade;
    proxy_set_header Connection "upgrade";
}

location /notifications/hub/negotiate {
    proxy_pass http://YOUR_SERVER_IP:8080;
}
Step 8: Access Lists for Private Services
Not every service should be publicly accessible. NPM’s access lists let you restrict access by IP address or require HTTP authentication.
- In NPM, go to Access Lists > Add Access List
- Give it a name (e.g., “Home Network Only”)
- Under the Access tab, add your allowed IPs:
allow 192.168.1.0/24(your local network)allow 10.0.0.0/24(your VPN subnet, if using WireGuard)deny all
- Optionally, add HTTP basic auth users under the Authorization tab
- Save, then apply this access list to any proxy host that should be restricted
I use access lists for administrative interfaces: Portainer, the NPM admin panel itself (yes, you can proxy NPM through itself), and database management tools. Public-facing services like a blog or status page get no access list.
The Cloudflare + NPM Combination
If you use Cloudflare for DNS (and you should consider it — the free tier is excellent), you get an additional layer of protection. Cloudflare acts as a CDN and DDoS shield in front of your NPM instance.
The typical setup:
- Domain DNS hosted on Cloudflare
- A records pointing to your public IP, with the orange cloud (proxy) enabled
- Cloudflare SSL mode set to “Full (Strict)” — this means Cloudflare verifies your Let’s Encrypt certificate
- NPM handles the actual proxying to your backend services
The traffic flow becomes: User > Cloudflare > Your Router > NPM > Backend Service. Cloudflare hides your real IP, provides DDoS protection, and caches static content. NPM handles the local routing and SSL termination.
When using Cloudflare in proxy mode, your real server IP is hidden. This is a significant privacy benefit. Anyone looking up your domain’s DNS will see Cloudflare’s IPs, not yours. However, be careful not to create DNS records that bypass Cloudflare (grey cloud instead of orange) for the same domain, as this exposes your real IP.
Reverse proxy configuration is a core skill in any infrastructure or DevOps role. Whether it is Nginx, HAProxy, Traefik, or a cloud load balancer, the concept is identical: route incoming requests to the right backend based on hostname, path, or headers. Running NPM in your homelab teaches you the same patterns you will use with AWS ALB, Azure Application Gateway, or bare-metal Nginx in production. The config syntax changes, but the thinking does not.
Troubleshooting
502 Bad Gateway
This means NPM reached the proxy host configuration but cannot connect to the backend service. The backend is either down, on the wrong port, or NPM cannot reach it. Check that the backend service is running (docker ps), verify the port number, and make sure the hostname or IP in the proxy host config is correct. If the backend is on the same Docker host, use the host’s LAN IP, not localhost or 127.0.0.1 (those refer to NPM’s container, not the host).
Let’s Encrypt certificate request fails
The most common cause is port 80 not being reachable from the internet. Let’s Encrypt needs to connect to your server on port 80 to validate domain ownership. Check that your router is forwarding port 80 to your server, that no firewall is blocking it, and that the DNS record actually points to your public IP. You can test from outside your network by asking someone to visit http://yourdomain.com — if they get nothing, the port is not open.
Services work locally but not from outside
If services load on your local network but not from the internet, it is a port forwarding or firewall issue, not an NPM issue. Verify that ports 80 and 443 are forwarded on your router. Some ISPs block port 80 on residential connections — if this is the case, you may need to use a non-standard port or a Cloudflare tunnel to work around it.
ERR_TOO_MANY_REDIRECTS with Cloudflare
This happens when Cloudflare’s SSL mode is set to “Flexible” and NPM is forcing SSL. Cloudflare connects to your server over HTTP, NPM redirects to HTTPS, Cloudflare sees the redirect and follows it over HTTP again, creating an infinite loop. Set Cloudflare’s SSL mode to “Full” or “Full (Strict)” to fix this.
What to Do Next
NPM is the gateway service. Everything else in your homelab connects through it. Now that it is running, here is what to proxy first:
- Install Nextcloud with Docker — self-hosted cloud storage that replaces Google Drive. Needs NPM for HTTPS and large file upload support.
- Self-Hosted Password Manager with Vaultwarden — requires HTTPS to function at all. NPM provides the certificate.
- Monitor Everything with Uptime Kuma — set up monitoring for your NPM instance itself, plus every service behind it. Monitor the proxy, not just the backends.
- Set Up WireGuard VPN — access your NPM admin panel and internal services securely from anywhere without exposing port 81 to the internet.
- Install Proxmox VE — if you are still running Docker on bare metal, Proxmox lets you virtualise everything and run multiple Docker hosts on one machine.
- Install Docker on Ubuntu 24.04 — the foundation NPM runs on, if you still need to set it up.
Once NPM is running and you have your first few proxy hosts configured with SSL, adding new services becomes trivially easy. Deploy a container, add a proxy host, tick the SSL box. Thirty seconds and your new service has a clean URL with HTTPS. That is the power of having a proper front door.
Watch out for this: If you are getting 502 errors after setting up a new proxy host, check whether you are using the container name or the host IP. If NPM and your service are on the same Docker network, use the container name. If they are on different hosts, use the IP.
Key Takeaways
- A reverse proxy gives you clean URLs, centralised SSL, and a single point of entry for all your services. It is the first thing to set up in any homelab.
- NPM uses SQLite by default and does not need a separate database container for homelab-scale deployments.
- Change the default admin credentials immediately.
[email protected]/changemeare public knowledge. - Let’s Encrypt certificates are free and NPM handles renewal automatically. There is no reason to run services without HTTPS.
- Use Cloudflare DNS challenge for internal-only services that should not expose ports 80/443 to the internet.
- Restrict the admin panel (port 81) to your local network or VPN. Never expose it to the public internet.
- Common 502 errors mean NPM cannot reach the backend. Use the host’s LAN IP in proxy host configs, not localhost.
- The Cloudflare + NPM combination provides DDoS protection, IP hiding, and caching in front of your homelab services.
Related Guides
If you found this useful, these guides continue the journey:
- Docker Compose for Beginners — manage NPM alongside your other containers
- DuckDNS Dynamic DNS Setup — pair with NPM for remote access on a dynamic IP
- Self-Host Nextcloud — one of the first services to put behind your proxy
- WireGuard VPN Setup — secure remote access to your proxied services
- Essential Docker Commands — troubleshoot container networking issues
- Build Your First Homelab in 2026 — the complete starting guide


ReadTheManual is run, written and curated by Eric Lonsdale.
Eric has over 20 years of professional experience in IT infrastructure, cloud architecture, and cybersecurity, but started with PCs long before that.
He built his first machine from parts bought off tables at the local college campus, hoping they worked. He learned on BBC Micros and Atari units in the early 90s, and has built almost every PC he’s used between 1995 and now.
From helpdesk to infrastructure architect, Eric has worked across enterprise datacentres, Azure environments, and security operations. He’s managed teams, trained engineers, and spent two decades solving the problems this site teaches you to solve.
ReadTheManual exists because Eric believes the best way to learn IT is to build things, break things, and actually read the manual. Every guide on this site runs on infrastructure he owns and maintains.
Enjoyed this guide?
New articles on Linux, homelab, cloud, and automation every 2 days. No spam, unsubscribe anytime.