Why You Should Own Your Files
I have been running Nextcloud in my homelab for over three years now. It replaced Google Drive, Dropbox, and iCloud across every device in my household. The honest version of that story is that it took me two attempts to get it right, and there were weeks where I genuinely considered going back to Google. Nextcloud is powerful, configurable, and mature. It is also the single most maintenance-heavy service in my entire stack.
From the homelab: I replaced Google Drive, Calendar, and Contacts with Nextcloud over a year ago. It runs on my Proxmox cluster and handles everything from file sync to shared calendars across all my devices. It is one of the first services I recommend to anyone starting their self-hosting journey.
I am telling you this upfront because every other Nextcloud tutorial makes it sound like a quick Docker pull and you are done. You are not. What you are doing is becoming your own cloud provider, and that comes with responsibilities: updates that break plugins, sync conflicts on mobile, cron jobs that silently stop running, and performance issues that creep in as your file count grows. I would still make the same choice today, but I want you going in with your eyes open.
This guide covers a production-grade Nextcloud deployment with Docker Compose, MariaDB, and Redis, not the SQLite demo setup that falls over the moment you add a second user. I will cover the performance tuning, backup strategy, and maintenance reality that most guides conveniently skip.
Prerequisites
Before you start, you will need:
- Docker and Docker Compose installed on your server. If you have not done this yet, follow the Docker installation guide for Ubuntu 24.04.
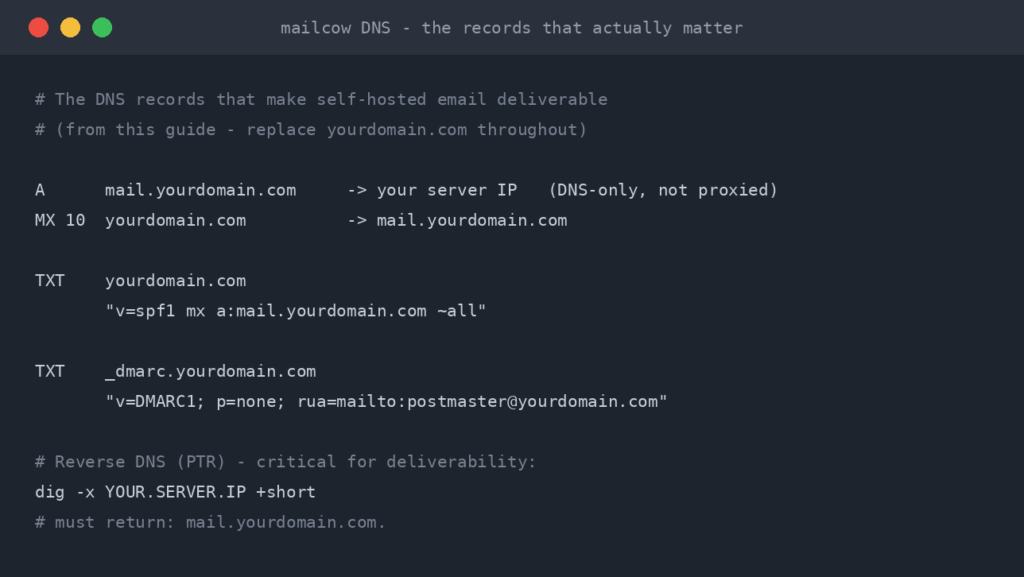
- A reverse proxy handling TLS termination. I use Nginx Proxy Manager, but Caddy or Traefik work too. Nextcloud needs HTTPS to function properly — the mobile and desktop sync clients will complain or refuse to connect over plain HTTP.
- A domain name pointing to your server (e.g.,
cloud.yourdomain.com). A free DuckDNS subdomain works if you do not own a domain. - At least 2 GB of RAM free for the Nextcloud stack, and sufficient storage for your files. Nextcloud itself is small, but your data is not. Plan for where your files will actually live.
If you are planning to store a significant amount of data (photos, documents, media), consider mounting an external drive or NAS share for the Nextcloud data directory rather than using the boot disk. I learned this the hard way when my 256 GB NVMe filled up with family photos inside two months. Separate your OS storage from your data storage.
Step 1: Create the Project Directory
Keep things organised from the start. Create a dedicated directory for your Nextcloud deployment:
mkdir -p ~/nextcloud && cd ~/nextcloudStep 2: Create the Docker Compose File
This is a three-container deployment: Nextcloud (the application), MariaDB (the database), and Redis (the memory cache). Do not use SQLite for anything beyond testing. It does not handle concurrent access, and you will hit locking issues the moment two devices try to sync simultaneously.
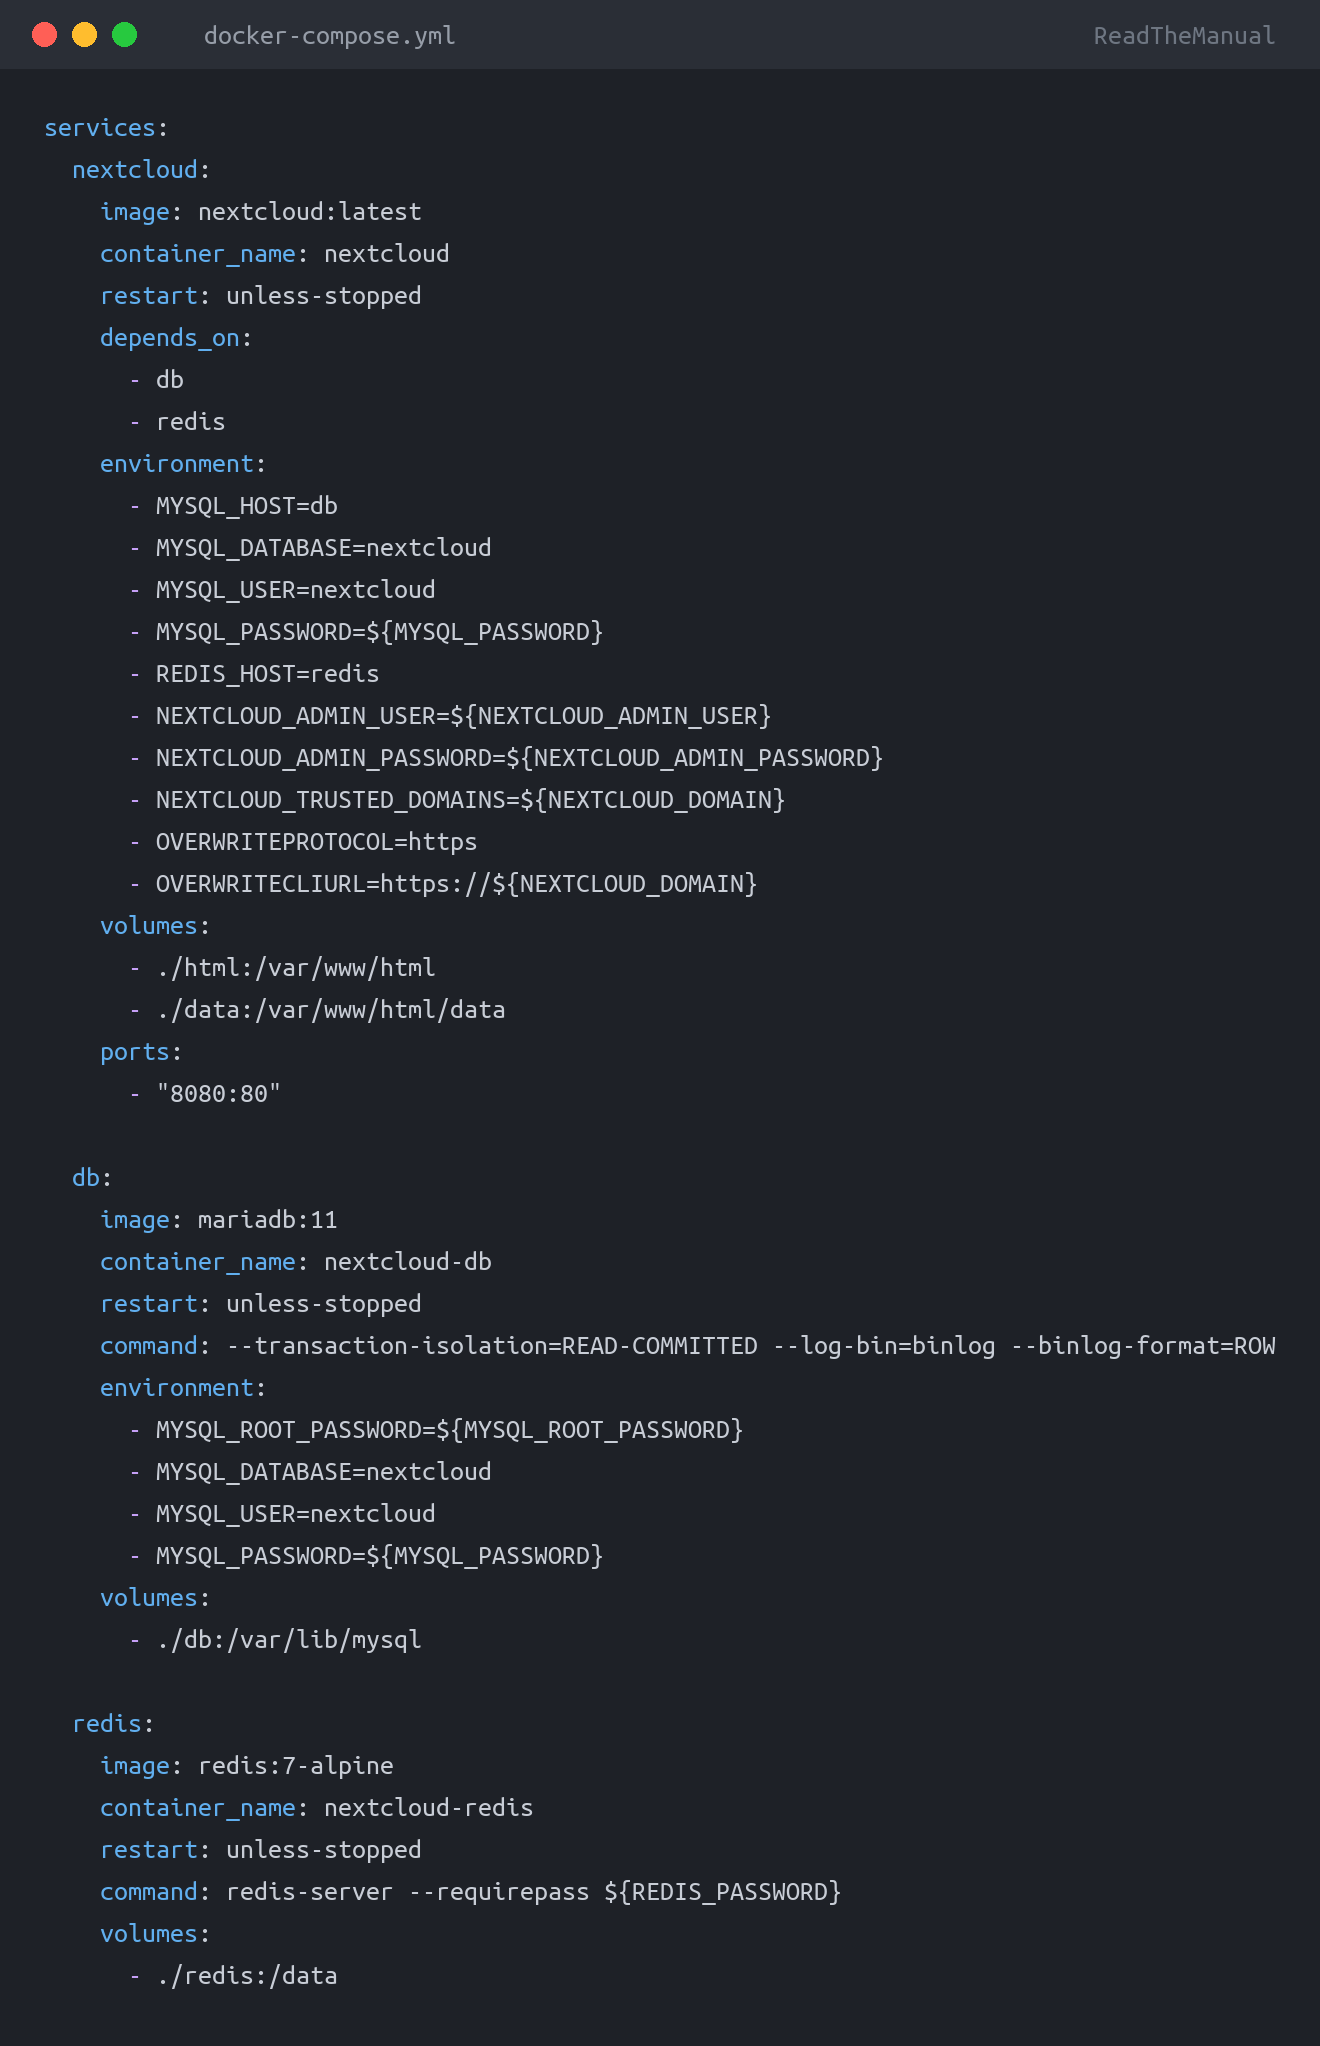
Create docker-compose.yml:
services:
  nextcloud:
    image: nextcloud:latest
    container_name: nextcloud
    restart: unless-stopped
    depends_on:
      - db
      - redis
    environment:
      - MYSQL_HOST=db
      - MYSQL_DATABASE=nextcloud
      - MYSQL_USER=nextcloud
      - MYSQL_PASSWORD=${MYSQL_PASSWORD}
      - REDIS_HOST=redis
      - NEXTCLOUD_ADMIN_USER=${NEXTCLOUD_ADMIN_USER}
      - NEXTCLOUD_ADMIN_PASSWORD=${NEXTCLOUD_ADMIN_PASSWORD}
      - NEXTCLOUD_TRUSTED_DOMAINS=${NEXTCLOUD_DOMAIN}
      - OVERWRITEPROTOCOL=https
      - OVERWRITECLIURL=https://${NEXTCLOUD_DOMAIN}
    volumes:
      - ./html:/var/www/html
      - ./data:/var/www/html/data
    ports:
      - "8080:80"

  db:
    image: mariadb:11
    container_name: nextcloud-db
    restart: unless-stopped
    command: --transaction-isolation=READ-COMMITTED --log-bin=binlog --binlog-format=ROW
    environment:
      - MYSQL_ROOT_PASSWORD=${MYSQL_ROOT_PASSWORD}
      - MYSQL_DATABASE=nextcloud
      - MYSQL_USER=nextcloud
      - MYSQL_PASSWORD=${MYSQL_PASSWORD}
    volumes:
      - ./db:/var/lib/mysql

  redis:
    image: redis:7-alpine
    container_name: nextcloud-redis
    restart: unless-stopped
    command: redis-server --requirepass ${REDIS_PASSWORD}
    volumes:
      - ./redis:/data
Now create the .env file for your secrets:
NEXTCLOUD_DOMAIN=cloud.yourdomain.com
NEXTCLOUD_ADMIN_USER=admin
NEXTCLOUD_ADMIN_PASSWORD=ChangeMeToSomethingStrong
MYSQL_PASSWORD=AnotherStrongPassword
MYSQL_ROOT_PASSWORD=YetAnotherStrongPassword
REDIS_PASSWORD=RedisPasswordHere
Those MariaDB command flags (--transaction-isolation=READ-COMMITTED --log-bin=binlog --binlog-format=ROW) are not optional. Nextcloud requires READ-COMMITTED isolation to avoid deadlocks during file operations. Skip them and you will get database lock errors under any real usage. This is one of the most common issues in Nextcloud Docker deployments and the cause is almost always a missing MariaDB configuration.
Step 3: Start the Stack
docker compose up -dWatch the logs to make sure everything starts cleanly:
docker compose logs -fThe first start takes a minute or two as Nextcloud runs its database migrations and creates the admin account. You should see messages about database tables being created. If you see connection refused errors for MariaDB, the database container might not be ready yet. Nextcloud will retry, so give it a moment.
Once it settles, Nextcloud will be accessible on http://your-server-ip:8080. Do not log in yet — set up your reverse proxy first.
Step 4: Configure Your Reverse Proxy
If you are using Nginx Proxy Manager:
- Create a new proxy host for
cloud.yourdomain.com - Point it to your server’s IP on port 8080
- Enable SSL with a Let’s Encrypt certificate
- Turn on Force SSL and HTTP/2
There is one extra step that catches everyone out. Nextcloud needs certain headers passed through correctly. In the Advanced tab of your proxy host, add:
proxy_set_header Host $host;
proxy_set_header X-Real-IP $remote_addr;
proxy_set_header X-Forwarded-For $proxy_add_x_forwarded_for;
proxy_set_header X-Forwarded-Proto $scheme;

client_max_body_size 10G;
proxy_request_buffering off;
That client_max_body_size line is critical. Without it, Nginx defaults to a 1 MB upload limit, and you will get cryptic errors when syncing anything larger. Set it to something reasonable for your use case. I use 10 GB because I sync video files occasionally.
Step 5: First Login and Essential Configuration
Navigate to https://cloud.yourdomain.com and log in with the admin credentials from your .env file. You will land on the Nextcloud dashboard. Before you start uploading files, there are several settings to configure.
Configure Redis caching
The Docker environment variables set up the database connection, but Redis needs to be configured in Nextcloud’s config file. Edit it:
docker exec -it nextcloud bash
apt update && apt install -y nano
nano /var/www/html/config/config.php
Add these lines inside the config array, before the closing );:
'memcache.local' => '\\OC\\Memcache\\APCu',
'memcache.distributed' => '\\OC\\Memcache\\Redis',
'memcache.locking' => '\\OC\\Memcache\\Redis',
'redis' => array(
  'host' => 'redis',
  'port' => 6379,
  'password' => 'RedisPasswordHere',
),
Replace the Redis password with the actual value from your .env file. Yes, this means the password sits in the config file in plain text. This is normal for self-hosted PHP applications. Protect the file with proper permissions (chmod 660) and move on.
Set up the cron job
Nextcloud needs a background task runner. The default is AJAX (runs when someone opens the browser), which is unreliable. Switch to system cron.
In the Nextcloud admin panel, go to Administration Settings > Basic settings and select Cron as the background jobs method.
Then set up the actual cron job on your host:
crontab -e
# Add this line:
*/5 * * * * docker exec -u www-data nextcloud php cron.php
This runs Nextcloud’s background tasks every five minutes. Without it, file scanning, cleanup jobs, and notification emails will not work properly. This is one of the most commonly missed steps, and the symptoms are subtle: things just feel slow and slightly broken without an obvious error.
Configure email
Go to Administration Settings > Basic settings and set up SMTP for email notifications. Nextcloud sends share notifications, password resets, and activity digests via email. Without SMTP configured, shared links will not send notification emails and password resets will silently fail.
Step 6: Adding Users and Connecting Devices
Go to Users in the top-right menu to create accounts for family members or housemates. Set storage quotas per user if you need to manage disk space.
For sync clients, Nextcloud has apps for every platform:
- Desktop: Download the Nextcloud client for Windows, macOS, or Linux from nextcloud.com
- Mobile: Install from the App Store (iOS) or Google Play (Android)
- WebDAV: Any WebDAV client can connect using
https://cloud.yourdomain.com/remote.php/dav/files/USERNAME/
On first connection, point the client to your domain, log in, and choose which folders to sync. I recommend selective sync rather than syncing everything — your phone does not need a copy of every file on your server.
The Nextcloud mobile app has an automatic photo upload feature that works like Google Photos or iCloud Photo Library. Enable it and your phone photos back up to your own server automatically. This single feature is the reason most people in my household stopped caring about which cloud provider they use — they barely notice the difference.
Step 7: Performance Tuning
A default Nextcloud installation will feel sluggish compared to Google Drive or Dropbox. Those companies throw enormous infrastructure at the problem. You have a single server. But there are several things you can do to close the gap significantly.
PHP memory limit
The default PHP memory limit is often too low. Increase it:
docker exec -it nextcloud bash
echo 'memory_limit=1024M' > /usr/local/etc/php/conf.d/memory-limit.ini
exit
docker restart nextcloud
Enable preview generation
Install the Preview Generator app from the Nextcloud App Store. Then run initial generation and add it to cron:
# Initial generation (can take hours with many files)
docker exec -u www-data nextcloud php occ preview:generate-all

# Add to crontab for ongoing generation
*/10 * * * * docker exec -u www-data nextcloud php occ preview:pre-generate
Without this, Nextcloud generates thumbnails on-the-fly when you browse folders, which makes the web interface feel painfully slow on large photo libraries.
The Maintenance Reality
Here is what the other guides will not tell you. Nextcloud requires ongoing maintenance, and it is not always smooth.
Updates can break things. Major version upgrades (e.g., 27 to 28) sometimes break apps or change behaviour. I run updates on a maintenance evening, never on a Friday, and I always check the release notes first. If an app I rely on has not been updated for the new version, I wait.
The admin warnings page will haunt you. Go to Administration Settings > Overview and you will likely see a list of warnings about missing indices, recommended settings, and suggested configurations. Work through them. They are not just nags — they affect performance and reliability.
File locking can misbehave. If a sync client crashes mid-upload, files can get stuck in a locked state. The fix is usually docker exec -u www-data nextcloud php occ maintenance:mode --on, wait a moment, then --off. Knowing this command exists will save you a stressful evening.
Back up before every major update. Not “I should back up,” but actually do it. Run docker exec -u www-data nextcloud php occ maintenance:mode --on, back up the database and data directory, then proceed. I have needed to roll back twice in three years. Both times, having that pre-update backup meant the difference between a minor inconvenience and a weekend of data recovery.
Backup Strategy
You need to back up three things: the database, the data directory, and the config.
#!/bin/bash
# nextcloud-backup.sh
set -euo pipefail

BACKUP_DIR="/home/teky/backups/nextcloud"
TIMESTAMP=$(date +%Y%m%d_%H%M%S)

mkdir -p "${BACKUP_DIR}"

# Enable maintenance mode
docker exec -u www-data nextcloud php occ maintenance:mode --on

# Dump the database
docker exec nextcloud-db mysqldump -u nextcloud -p"${MYSQL_PASSWORD}" nextcloud \
  > "${BACKUP_DIR}/db_${TIMESTAMP}.sql"

# Archive config and data
tar czf "${BACKUP_DIR}/nextcloud_config_${TIMESTAMP}.tar.gz" \
  -C ~/nextcloud html/config

# Disable maintenance mode
docker exec -u www-data nextcloud php occ maintenance:mode --off

echo "[$(date)] Backup completed"
For the data directory itself, use rsync rather than tar for incremental backups. A full tar of hundreds of gigabytes of files is impractical for nightly runs.
Running Nextcloud in production teaches you skills that translate directly to enterprise file sync platforms like SharePoint and OneDrive administration. Understanding WebDAV, database-backed applications, caching layers, and backup strategies for stateful services are all things that appear on infrastructure and systems administrator job descriptions. The complexity that makes Nextcloud maintenance-heavy is the same complexity you will manage at scale in enterprise roles.
Troubleshooting
Sync client stuck or showing conflicts
The most common sync issue is file locking. Check the Nextcloud log at Administration Settings > Logging for lock-related errors. If files are genuinely stuck, toggle maintenance mode on and off. For persistent conflicts, the sync client’s activity panel shows exactly which files are affected and why.
“Access through untrusted domain” error
You are accessing Nextcloud via a domain or IP that is not in the trusted domains list. Edit config.php and add the domain to the trusted_domains array. This catches everyone who tries to access via IP address after setting up a domain.
Slow web interface
If the web UI takes several seconds to load folders, check that Redis is connected (look in the admin overview for memory cache status), ensure the cron job is running (check Administration Settings > Basic settings for the last cron execution time), and run the preview generator. These three things account for 90% of performance complaints.
Upload fails for large files
Check your reverse proxy’s client max body size (see Step 4), your PHP upload limits, and available disk space. Nextcloud’s own limit can be set in Administration Settings > Basic settings. All three must allow the file size you are attempting.
What to Do Next
Nextcloud is a significant step toward owning your data. But a file sync platform on its own is just the beginning. Here is where to go from here:
- Set Up Nginx Proxy Manager — the reverse proxy that makes Nextcloud (and every other service) accessible with proper HTTPS. If you skipped this step, go back and do it now.
- WireGuard VPN on Ubuntu — access your Nextcloud instance securely from anywhere without exposing it to the public internet. A VPN is the safest way to reach your homelab remotely.
- Self-Hosted Password Manager with Vaultwarden — if you are self-hosting your files, self-host your passwords too. Runs alongside Nextcloud on the same Docker host.
- Monitor Everything with Uptime Kuma — know when Nextcloud goes down before your family tells you. Set up monitoring for every self-hosted service.
- Install Docker on Ubuntu 24.04 — the foundation this entire stack runs on, if you need to set up another host.
The maintenance overhead is real, but so is the peace of mind. Your files live on your hardware, backed up on your schedule, accessible on your terms. No storage limits, no scanning, no surprise pricing changes. That is worth a maintenance evening once a month.
Watch out for this: Watch your PHP memory limits. The default Docker config often sets them too low, and you will get cryptic errors during large file uploads. I set mine to 1G and the random upload failures disappeared.
Key Takeaways
- Always deploy Nextcloud with MariaDB and Redis, never with SQLite for real usage. SQLite cannot handle concurrent access from multiple devices.
- The MariaDB
--transaction-isolation=READ-COMMITTEDflag is mandatory. Without it, you will get database lock errors under normal use. - Set up system cron for background tasks immediately. The default AJAX method is unreliable and leads to subtle performance issues.
- Configure your reverse proxy to allow large uploads (
client_max_body_size) or file sync will silently fail on anything over 1 MB. - Nextcloud is maintenance-heavy compared to other self-hosted services. Budget a monthly maintenance window for updates, and always back up before major version upgrades.
- The automatic photo upload on mobile is the killer feature for household adoption. Set it up for every family member’s phone.
- Back up the database, config, and data directory separately. Use rsync for incremental data backups rather than full archives.
Related Guides
If you found this useful, these guides continue the journey:
- Docker Compose for Beginners — manage multi-container setups like Nextcloud with ease
- Nginx Proxy Manager Setup — put Nextcloud behind a reverse proxy with HTTPS
- Self-Host Vaultwarden — another essential self-hosted service to pair with Nextcloud
- Build Your First Homelab in 2026 — the complete guide to getting started
- Why Self-Host in 2026? — the case for digital sovereignty and owning your data
- Essential Docker Commands — troubleshoot and manage your containers


ReadTheManual is run, written and curated by Eric Lonsdale.
Eric has over 20 years of professional experience in IT infrastructure, cloud architecture, and cybersecurity, but started with PCs long before that.
He built his first machine from parts bought off tables at the local college campus, hoping they worked. He learned on BBC Micros and Atari units in the early 90s, and has built almost every PC he’s used between 1995 and now.
From helpdesk to infrastructure architect, Eric has worked across enterprise datacentres, Azure environments, and security operations. He’s managed teams, trained engineers, and spent two decades solving the problems this site teaches you to solve.
ReadTheManual exists because Eric believes the best way to learn IT is to build things, break things, and actually read the manual. Every guide on this site runs on infrastructure he owns and maintains.
Enjoyed this guide?
New articles on Linux, homelab, cloud, and automation every 2 days. No spam, unsubscribe anytime.