How to Install Vaultwarden with Docker (Self-Hosted Bitwarden Alternative)
In December 2022, LastPass disclosed that attackers had stolen encrypted password vaults for millions of users. Not metadata. Not email addresses. The actual vaults. The ones containing every password, every note, every saved card. LastPass assured everyone that vaults were safe as long as users had strong master passwords. Within months, security researchers linked over $35 million in cryptocurrency theft to cracked LastPass vaults.
From the homelab: I moved my entire password management to a self-hosted Vaultwarden instance. Same Bitwarden apps on every device, but the vault lives on my infrastructure, not someone else’s cloud. For something as critical as passwords, that matters.
I moved my entire family off LastPass to Vaultwarden shortly after that breach. Not because I thought my vault had been compromised, but because the breach revealed something I already suspected: trusting a third party with the keys to your entire digital life is a choice, not a requirement. And it is a choice you should question.
Vaultwarden is that alternative. A lightweight, self-hosted password manager that is fully compatible with all Bitwarden apps and browser extensions, runs on minimal hardware, and puts you in complete control of where your passwords live. This guide walks you through setting it up properly, from first container to family deployment, with the backup strategy that makes self-hosting passwords responsible rather than reckless.
Career Context: Identity and access management is a core competency in every infrastructure role. Understanding password vaults, secrets management, and credential lifecycle translates directly to enterprise tools like HashiCorp Vault, Azure Key Vault, and CyberArk. Self-hosting a password manager teaches you about TLS, database backups, and security hardening in a context where the stakes feel real, because they are.
What Is Vaultwarden?
Vaultwarden (formerly bitwarden_rs) is an unofficial, community-built server implementation of the Bitwarden API, written in Rust. It is not a fork of Bitwarden. It is a clean-room reimplementation that speaks the same protocol, which means every official Bitwarden client works with it: the browser extensions, the desktop apps, the mobile apps, and the CLI tool.
Why not just use the official Bitwarden server? Because the official self-hosted deployment requires Microsoft SQL Server (or a compatible database), multiple containers, and significantly more resources. Vaultwarden runs as a single container, uses SQLite by default, and comfortably operates on a Raspberry Pi. For a homelab or small family deployment, it is exactly what you need and nothing you do not.
Key features:
- Full Bitwarden client compatibility – every official app works unmodified
- Organisations and collections – share passwords with family members
- Attachments and Send – secure file sharing
- TOTP generation – built-in two-factor code support
- Admin panel – web-based user and configuration management
- Lightweight – typically uses under 50MB of RAM
Prerequisites
Before you start, you will need:
- Docker and Docker Compose installed on your server. If you have not done this yet, follow the Docker installation guide for Ubuntu 24.04.
- A domain name (or a free DuckDNS subdomain). Vaultwarden requires HTTPS to function properly, and the Bitwarden clients will refuse to connect over plain HTTP. If you do not own a domain yet, set up DuckDNS for a free subdomain that will work perfectly for this.
- A reverse proxy with TLS. I use Nginx Proxy Manager for this, which handles Let’s Encrypt certificates automatically. If you already have Caddy, Traefik, or plain Nginx with certbot, those work fine too.
- A machine that stays on. This is your password manager. If it is offline, nobody in your household can log in to anything new. A Pi, a mini PC, or a VM on your homelab server all work. Set up Uptime Kuma monitoring to alert you the moment it goes down.
Understand the responsibility. Self-hosting your passwords means you are responsible for uptime, backups, and security. If your server dies and you have no backup, your passwords are gone. This guide covers backups thoroughly because they are non-negotiable. If the idea of that responsibility makes you uncomfortable, there is no shame in using Bitwarden’s hosted service. It is a good product run by good people.
Step 1: Create the Docker Compose File
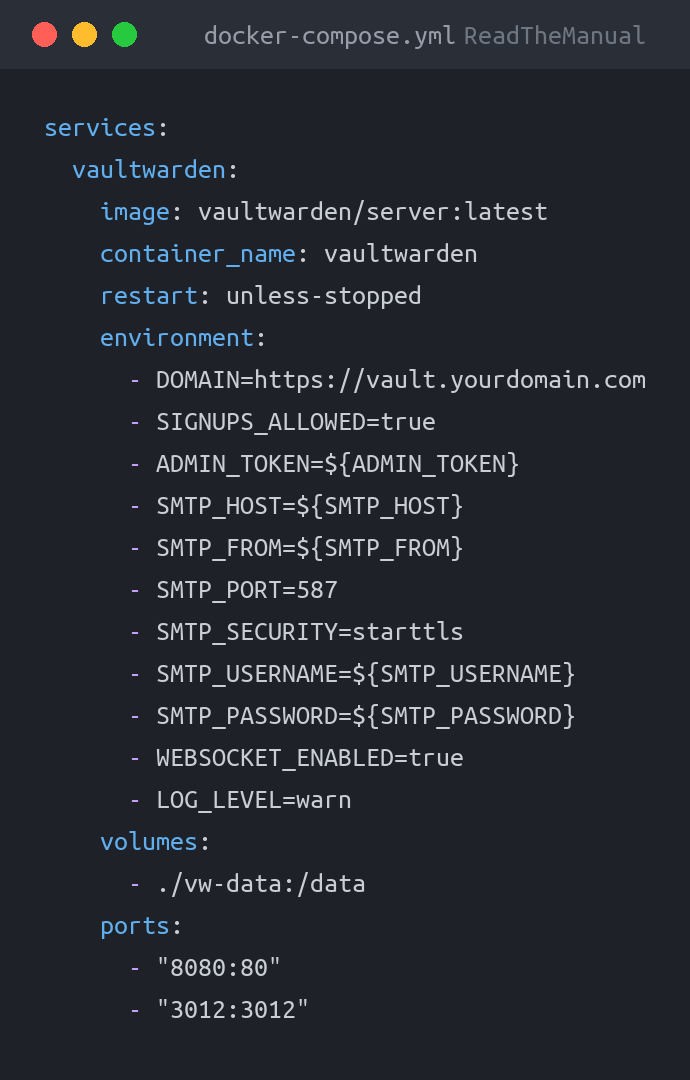
Create a directory for your Vaultwarden deployment and set up the compose file:
mkdir -p ~/vaultwarden && cd ~/vaultwardenCreate a docker-compose.yml file:
services:
  vaultwarden:
    image: vaultwarden/server:latest
    container_name: vaultwarden
    restart: unless-stopped
    environment:
      - DOMAIN=https://vault.yourdomain.com
      - SIGNUPS_ALLOWED=true
      - ADMIN_TOKEN=${ADMIN_TOKEN}
      - SMTP_HOST=${SMTP_HOST}
      - SMTP_FROM=${SMTP_FROM}
      - SMTP_PORT=587
      - SMTP_SECURITY=starttls
      - SMTP_USERNAME=${SMTP_USERNAME}
      - SMTP_PASSWORD=${SMTP_PASSWORD}
      - WEBSOCKET_ENABLED=true
      - LOG_LEVEL=warn
    volumes:
      - ./vw-data:/data
    ports:
      - "8080:80"
      - "3012:3012"
Now create a .env file alongside it for your secrets:
# Generate a secure admin token
ADMIN_TOKEN=$(openssl rand -base64 48)

# SMTP settings (for email verification and 2FA recovery)
SMTP_HOST=smtp.example.com
[email protected]
SMTP_USERNAME=your-smtp-user
SMTP_PASSWORD=your-smtp-password
Pro tip: Generate the admin token with openssl rand -base64 48 and save it somewhere safe before you need it. You will use this to access the admin panel. Losing it means you cannot administer Vaultwarden without editing the container’s environment directly. From Vaultwarden 1.28+, you can also use an Argon2 hashed admin token for better security. Run vaultwarden hash inside the container to generate one.
Step 2: Start the Container
docker compose up -dVerify it is running:
docker compose logs -f vaultwardenYou should see Vaultwarden starting up on port 80 inside the container. At this point it is accessible on http://your-server-ip:8080, but do not create an account yet. You need HTTPS first.
Step 3: Set Up HTTPS
This is not optional. The Bitwarden clients require HTTPS, and you are transmitting passwords. Running a password manager over plain HTTP would be negligent.
If you are using Nginx Proxy Manager (which I recommend for homelabs), the process is straightforward:
- Point your domain (e.g.,
vault.yourdomain.com) to your server’s IP via a DNS A record - In Nginx Proxy Manager, create a new proxy host pointing to your Vaultwarden container’s IP on port 8080
- Enable the SSL tab and request a Let’s Encrypt certificate
- Turn on “Force SSL” and “HTTP/2 Support”
- Under the “Custom Locations” tab or advanced config, add WebSocket support for path
/notifications/hubpointing to port 3012
For the WebSocket proxy (needed for live sync across devices), add this to the advanced configuration in Nginx Proxy Manager:
location /notifications/hub {
    proxy_pass http://your-server-ip:3012;
    proxy_set_header Upgrade $http_upgrade;
    proxy_set_header Connection "upgrade";
}

location /notifications/hub/negotiate {
    proxy_pass http://your-server-ip:8080;
}
Once HTTPS is working, navigate to https://vault.yourdomain.com. You should see the Bitwarden web vault login page.
Step 4: Create Your Account and Configure the Admin Panel
With HTTPS in place, create your first account through the web vault. Use a strong, unique master password. This is the one password you need to remember, so make it long and memorable rather than complex and forgettable. A passphrase of four or five random words works well.
Next, access the admin panel at https://vault.yourdomain.com/admin and enter the admin token from your .env file. From here you can:
- View and manage registered users
- Invite new users via email
- Configure SMTP settings
- Enable or disable features (attachments, Send, organisations)
- View server diagnostics
Pro tip: Once you and your family members have created accounts, disable public signups immediately. Set SIGNUPS_ALLOWED=false in your compose file and recreate the container. You can still invite new users via the admin panel. Leaving signups open on a public-facing instance is asking for trouble.
Step 5: Import Your Existing Passwords
Moving from another password manager is straightforward. Vaultwarden supports imports from LastPass, 1Password, Chrome, Firefox, KeePass, Dashlane, and dozens of others.
- Export from your current manager (most offer a CSV or JSON export)
- In the Vaultwarden web vault, go to Tools > Import Data
- Select your source format from the dropdown
- Upload the file
- Delete the exported file immediately after import. It contains all your passwords in plain text.
Critical: Exported password files are unencrypted plain text. Do not leave them on your desktop, in your Downloads folder, or anywhere they might be synced to a cloud service. Import, verify the import worked, then securely delete the file. On Linux: shred -u export.csv. Do not just move it to the recycle bin.
After importing, spend some time organising. Create folders for logical groupings: Finance, Social Media, Work, Infrastructure, Family Shared. It takes an hour now and saves you time every day afterwards.
Step 6: Set Up Family Sharing with Organisations
One of the best features Vaultwarden inherits from Bitwarden is organisations. These let you share passwords with family members without everyone needing to know the same master password.
Here is how I have mine set up:
- Create an organisation (e.g., “Lonsdale Family”) from the web vault
- Create collections within it: “Streaming Services,” “Home Network,” “Shared Accounts”
- Invite family members via their email addresses (SMTP must be configured)
- Assign permissions per collection. The kids can see the Wi-Fi password but not the router admin credentials.
Each family member creates their own account with their own master password. They see shared credentials alongside their personal vault, but their personal items remain private. It is clean separation with selective sharing, exactly how enterprise credential management works.
Step 7: Backups (Non-Negotiable)
I cannot stress this enough. If you self-host your passwords without a backup strategy, you are one dead SSD away from being locked out of every account you own. This is the part that separates responsible self-hosting from recklessness.
Vaultwarden stores everything in the vw-data directory:
db.sqlite3– the database containing all vaultsattachments/– any files attached to vault entriessends/– Bitwarden Send filesconfig.json– runtime configurationrsa_key*– RSA keys used for authentication tokens
Here is the backup script I run nightly via cron:
#!/bin/bash
# vaultwarden-backup.sh
# Run nightly via cron: 0 2 * * * /home/teky/vaultwarden/backup.sh

set -euo pipefail

BACKUP_DIR="/home/teky/backups/vaultwarden"
VW_DATA="/home/teky/vaultwarden/vw-data"
TIMESTAMP=$(date +%Y%m%d_%H%M%S)
RETENTION_DAYS=30

mkdir -p "${BACKUP_DIR}"

# Use sqlite3 .backup for a consistent snapshot
# This is safe even while Vaultwarden is running
sqlite3 "${VW_DATA}/db.sqlite3" ".backup '${BACKUP_DIR}/db_${TIMESTAMP}.sqlite3'"

# Archive the full data directory (attachments, keys, config)
tar czf "${BACKUP_DIR}/vw-data_${TIMESTAMP}.tar.gz" \
  -C "$(dirname ${VW_DATA})" \
  "$(basename ${VW_DATA})"

# Remove backups older than retention period
find "${BACKUP_DIR}" -name "*.sqlite3" -mtime +${RETENTION_DAYS} -delete
find "${BACKUP_DIR}" -name "*.tar.gz" -mtime +${RETENTION_DAYS} -delete

echo "[$(date)] Backup completed: db_${TIMESTAMP}.sqlite3"
# Make it executable and add to cron
chmod +x /home/teky/vaultwarden/backup.sh
crontab -e
# Add: 0 2 * * * /home/teky/vaultwarden/backup.sh >> /var/log/vaultwarden-backup.log 2>&1Critical: Store backups on a different physical device. Backing up to the same disk as Vaultwarden protects you against database corruption but not disk failure. I rsync mine to a separate machine nightly and keep an encrypted copy offsite. If this feels like overkill, remember what is in this database: every password you own.
Pro tip: Test your backups. At least once, copy a backup to a test machine, spin up a fresh Vaultwarden container pointing at it, and verify you can log in and see your data. An untested backup is not a backup, it is a hope.
Step 8: Hardening Your Instance
Once everything is working, lock it down:
Disable Public Signups
Update your docker-compose.yml:
- SIGNUPS_ALLOWED=falseSecure the Admin Panel
If you do not need persistent admin access, disable it entirely after initial setup:
# Remove or comment out the ADMIN_TOKEN line to disable the admin panel
# - ADMIN_TOKEN=${ADMIN_TOKEN}
You can always re-enable it temporarily when needed by adding the token back and recreating the container.
Rate Limiting
Vaultwarden includes built-in login attempt limiting. You can tune it with:
- LOGIN_RATELIMIT_MAX_BURST=5
- LOGIN_RATELIMIT_SECONDS=60
Fail2Ban Integration
For additional brute-force protection, configure fail2ban to watch Vaultwarden’s logs. Add a filter at /etc/fail2ban/filter.d/vaultwarden.conf:
[Definition]
failregex = ^.*Username or password is incorrect\. Try again\. IP: \. Username:.*$
ignoreregex =
And a jail in /etc/fail2ban/jail.d/vaultwarden.local:
[vaultwarden]
enabled = true
port = http,https
filter = vaultwarden
logpath = /home/teky/vaultwarden/vw-data/vaultwarden.log
maxretry = 5
bantime = 14400
findtime = 14400
Pro tip: For fail2ban to work, you need Vaultwarden to log to a file. Add LOG_FILE=/data/vaultwarden.log to your environment variables and ensure the real client IPs are being passed through your reverse proxy (check the X-Forwarded-For headers).
Step 9: Mobile and Browser Extensions
This is where self-hosting Vaultwarden really shines. You use the official Bitwarden apps, unchanged. No sideloading, no custom builds.
- Install the Bitwarden app from your phone’s app store (iOS or Android)
- Before logging in, tap the settings gear icon on the login screen
- Under “Self-hosted Environment,” enter your server URL:
https://vault.yourdomain.com - Log in with your account credentials
For the browser extension (available for Firefox, Chrome, Edge, Brave, and Safari):
- Install the Bitwarden extension from your browser’s extension store
- Click the settings gear before logging in
- Set the server URL to your self-hosted instance
- Log in
Auto-fill works identically to Bitwarden Cloud. Your phone can use Bitwarden as its system-wide autofill provider. The browser extension fills login forms automatically. The experience is indistinguishable from the hosted service, except the data never touches anyone else’s servers.
Troubleshooting Common Issues
Mobile App Cannot Connect
Almost always a TLS issue. The Bitwarden apps require a valid, trusted certificate. Self-signed certificates will not work on mobile. Use Let’s Encrypt via your reverse proxy. If you are on an internal-only network without a public domain, look into DNS challenge validation with Let’s Encrypt or use a split-horizon DNS setup with a real certificate.
Live Sync Not Working
If changes made on one device take time to appear on another, WebSocket notifications are not getting through. Verify that port 3012 is proxied correctly and that your reverse proxy is passing Upgrade and Connection headers. Check the nginx configuration example in Step 3 above.
Import Fails or Duplicates Items
Some exporters produce malformed CSV files, particularly with entries containing commas or newlines in notes fields. Try the JSON export format if CSV fails. If you get duplicates, it is usually because you ran the import twice. You can purge the vault from Settings > Danger Zone and reimport cleanly.
Admin Panel Returns 404
Ensure ADMIN_TOKEN is set in your environment. If it is empty or not set, Vaultwarden disables the admin panel entirely. Recreate the container after adding or changing the token.
High Resource Usage
Vaultwarden is typically very light. If you see unexpected CPU or memory usage, check the log level. Setting LOG_LEVEL=warn or LOG_LEVEL=error reduces logging overhead. Also ensure you are not running icon caching on a large vault without sufficient disk space.
You Are Self-Hosting Your Passwords. Here Is What Else to Take Back.
Getting your passwords off someone else’s servers is a significant step toward digital sovereignty. But it is just one piece. If this is the first service you have self-hosted, it will not be the last. Once you experience what it feels like to own your infrastructure rather than rent it, you start looking at everything differently.
Here is where to go next:
- Build Your First Homelab – if you set up Vaultwarden on a spare machine, this guide helps you turn that machine into a proper platform for everything else
- Nginx Proxy Manager – the reverse proxy that makes all your self-hosted services accessible with proper HTTPS, if you have not set it up already
- Uptime Kuma Monitoring – because your password manager going down without you knowing about it is not acceptable. Monitor it.
- Free Dynamic DNS with DuckDNS – if you do not own a domain, DuckDNS gives you a free subdomain that pairs perfectly with Vaultwarden for remote access
- Linux File Permissions Deep Dive – understanding who can read your Vaultwarden data directory matters. Permissions are security.
- Install Docker on Ubuntu 24.04 – the foundation everything here runs on, if you skipped it
Every service you move to your own infrastructure is one less place where a corporate breach, a policy change, or a ToS update can leave you locked out of your own data. Passwords are the most critical piece, and you have just taken that back.
Watch out for this: Back up your Vaultwarden data directory religiously. If you lose that SQLite database without a backup, you have lost every password. I run automated backups to a separate host nightly.
Key Takeaways
- Vaultwarden is a complete Bitwarden-compatible server that runs in a single Docker container on minimal hardware. All official Bitwarden clients work with it unmodified.
- HTTPS is mandatory, not optional. Password managers must encrypt in transit. Use a reverse proxy with Let’s Encrypt.
- Backups are the price of sovereignty. Self-hosting passwords without tested backups is worse than using a cloud provider. Automate it, store backups offsite, and test restores.
- Harden after setup: disable signups, secure or remove the admin panel, set rate limits, and consider fail2ban for brute-force protection.
- Family sharing works brilliantly. Organisations and collections give you granular, per-user access control over shared credentials.
- Self-hosting passwords is a responsibility, not just a project. Treat it with the same seriousness you would production infrastructure, because for your household, it is.
Related Guides
If you found this useful, these guides continue the journey:
- Docker Compose for Beginners — manage Vaultwarden alongside your other services
- Nginx Proxy Manager Setup — HTTPS is essential for a password manager
- Why Self-Host in 2026? — the case for owning your most sensitive data
- Self-Host Nextcloud — another essential sovereignty service
- Essential Docker Commands — manage and troubleshoot your containers


ReadTheManual is run, written and curated by Eric Lonsdale.
Eric has over 20 years of professional experience in IT infrastructure, cloud architecture, and cybersecurity, but started with PCs long before that.
He built his first machine from parts bought off tables at the local college campus, hoping they worked. He learned on BBC Micros and Atari units in the early 90s, and has built almost every PC he’s used between 1995 and now.
From helpdesk to infrastructure architect, Eric has worked across enterprise datacentres, Azure environments, and security operations. He’s managed teams, trained engineers, and spent two decades solving the problems this site teaches you to solve.
ReadTheManual exists because Eric believes the best way to learn IT is to build things, break things, and actually read the manual. Every guide on this site runs on infrastructure he owns and maintains.
Enjoyed this guide?
New articles on Linux, homelab, cloud, and automation every 2 days. No spam, unsubscribe anytime.