Why Ubuntu 24.04 Is the Docker Host You Want
I run Docker across six hosts in my homelab, from mini PCs running Proxmox VMs to Raspberry Pis tucked behind the TV. Every single one of them started the same way: a clean Ubuntu install and a Docker setup that takes about ten minutes.
From the homelab: Ubuntu is what most people start with, and it is a solid choice for Docker hosting. I use it on several of my homelab nodes alongside Debian. The Docker installation process is essentially identical between the two.
Ubuntu 24.04 LTS (Noble Numbat) is the current long-term support release, which means five years of security patches without major version jumps. For a Docker host, that stability matters. You don’t want your container platform shifting underneath you every six months. I’ve been bitten by that on rolling-release distros, and the 3am debugging sessions aren’t worth the newer kernel.
This guide covers the proper way to install Docker on Ubuntu 24.04, not the snap version, not the outdated docker.io package from Ubuntu’s repos, but Docker Engine from Docker’s own repository. I’ll also cover the post-install configuration that most tutorials skip, and the first containers worth running once you’re up.
Prerequisites
Before you start, make sure you have:
- A machine running Ubuntu 24.04 LTS (server or desktop, both work identically)
- sudo access on that machine
- A working internet connection (Docker’s repo needs to be reachable)
- At least 2 GB of RAM and 20 GB of free disk space (more if you plan to run several containers)
If you’re setting up a dedicated Docker host VM in Proxmox or similar, give it at least 4 GB RAM and 50 GB disk. Containers are lightweight individually, but they accumulate fast. I started with 20 GB on one host and hit 95% disk usage within a month from image layers alone.
If you’re working on a fresh server and need to get comfortable with the basics first, have a read of Linux commands that actually get you hired before continuing.
Step 1: Remove Any Existing Docker Packages
Ubuntu ships with older, unofficial Docker packages in its default repositories. These conflict with the official Docker Engine. Remove them first, even if you don’t think they’re installed:
sudo apt remove docker docker-engine docker.io containerd runc 2>/dev/null
sudo apt autoremove -y
Don’t worry if it says “unable to locate package” for any of these. That just means they weren’t installed, which is fine.
If you previously installed Docker via snap, remove that too: sudo snap remove docker. The snap version runs in a confined sandbox that causes permission issues with volume mounts and networking. I’ve seen this trip people up more than once, particularly on Ubuntu Desktop where snaps are the default for many packages.
Step 2: Set Up Docker’s Official Repository
This is the part most quick-start guides rush through. We need to add Docker’s GPG key and apt repository so that apt can pull packages directly from Docker.
Install the prerequisites
sudo apt update
sudo apt install -y ca-certificates curl gnupg
Add Docker’s official GPG key
sudo install -m 0755 -d /etc/apt/keyrings
sudo curl -fsSL https://download.docker.com/linux/ubuntu/gpg -o /etc/apt/keyrings/docker.asc
sudo chmod a+r /etc/apt/keyrings/docker.asc
Add the Docker repository to apt sources
echo \
  "deb [arch=$(dpkg --print-architecture) signed-by=/etc/apt/keyrings/docker.asc] https://download.docker.com/linux/ubuntu \
  $(. /etc/os-release && echo "${VERSION_CODENAME}") stable" | \
  sudo tee /etc/apt/sources.list.d/docker.list > /dev/null
Then update your package index so apt knows about the new repository:
sudo apt updateYou should see a line referencing download.docker.com in the output. If you don’t, something went wrong with the repository setup. Double-check the commands above.
Step 3: Install Docker Engine
Now install Docker Engine, the CLI tools, containerd, and the Docker Compose plugin in one command:
sudo apt install -y docker-ce docker-ce-cli containerd.io docker-buildx-plugin docker-compose-pluginThis installs everything you need:
- docker-ce – The Docker Engine (daemon)
- docker-ce-cli – The
dockercommand-line tool - containerd.io – The container runtime Docker sits on top of
- docker-buildx-plugin – Extended build capabilities (multi-platform builds)
- docker-compose-plugin – Docker Compose v2, integrated as
docker compose(no hyphen)
Note that Docker Compose is now a plugin, not a separate binary. The command is docker compose (with a space), not docker-compose (with a hyphen). The old standalone docker-compose is deprecated. If you see tutorials referencing the hyphenated version, they’re outdated.
Step 4: Verify Docker Is Running
Docker should start automatically after installation. Check it:
sudo systemctl status dockerYou should see output like:
● docker.service - Docker Application Container Engine
     Loaded: loaded (/usr/lib/systemd/system/docker.service; enabled; preset: enabled)
     Active: active (running) since Sat 2026-04-05 10:15:32 BST; 1min ago
   Main PID: 1234 (dockerd)
     Memory: 48.3M
        CPU: 1.204s
     CGroup: /system.slice/docker.service
             └─1234 /usr/bin/dockerd -H fd:// --containerd=/run/containerd/containerd.sock
The key line is Active: active (running). If it says failed or inactive, check the journal: sudo journalctl -xeu docker.service. For more on reading systemd status output, see mastering systemctl.
Now run the hello-world container to confirm everything works end to end:
sudo docker run hello-worldYou should see “Hello from Docker!” followed by a description of what just happened. If you see that, Docker is installed and working.
Post-Install Configuration
The installation is done, but there are several configuration steps that separate a properly set up Docker host from one that’ll cause you problems later. Most tutorials stop at hello-world. Don’t.
Add your user to the docker group
By default, Docker commands require sudo. You can fix this by adding your user to the docker group:
sudo usermod -aG docker $USERLog out and back in (or run newgrp docker) for this to take effect. Then test without sudo:
docker run hello-worldBe aware that adding a user to the docker group grants root-equivalent privileges on the host. Anyone in that group can mount the host filesystem into a container and read or write anything. On a shared server, think carefully about who gets this access. On a dedicated homelab Docker host where you’re the only user, it’s fine.
Enable Docker on boot
Docker should already be enabled to start on boot after installation, but verify it:
sudo systemctl enable docker.service
sudo systemctl enable containerd.service
Configure log rotation
This is the one everyone forgets. Docker containers write logs to JSON files on the host by default, and those files grow without limit. I’ve had containers fill a 50 GB disk with logs in under a week. Configure log rotation in the Docker daemon config:
sudo mkdir -p /etc/docker
sudo tee /etc/docker/daemon.json > /dev/null <<'EOF'
{
  "log-driver": "json-file",
  "log-opts": {
    "max-size": "10m",
    "max-file": "3"
  },
  "storage-driver": "overlay2"
}
EOF
Then restart Docker to apply:
sudo systemctl restart dockerThis limits each container’s log file to 10 MB and keeps a maximum of 3 rotated files. Adjust these values based on your disk space, but having some limit is non-negotiable.
The daemon.json file is also where you’d configure insecure registries, default network settings, DNS servers, and more. Keep it minimal to start and add to it as needed. If you run a private registry like Gitea Packages, you’ll configure it here.
Check your versions
Confirm everything is installed and note the versions for your records:
docker version
docker compose version
Expected output (versions will vary):
Client: Docker Engine - Community
 Version:           27.x.x
 API version:       1.47

Server: Docker Engine - Community
 Version:           27.x.x

Docker Compose version v2.x.x
Your First Useful Containers
The hello-world container proves Docker works, but it’s not useful. Here are four containers I’d recommend running first on any new Docker host, in order of priority.
Portainer – Container Management UI
Portainer gives you a web interface for managing containers, images, volumes, and networks. It’s not a replacement for the CLI, but it’s excellent for getting a quick overview of what’s running.
docker volume create portainer_data

docker run -d \
  --name portainer \
  --restart=always \
  -p 8000:8000 \
  -p 9443:9443 \
  -v /var/run/docker.sock:/var/run/docker.sock \
  -v portainer_data:/data \
  portainer/portainer-ce:latest
Access it at https://your-server-ip:9443 and set an admin password on first login.
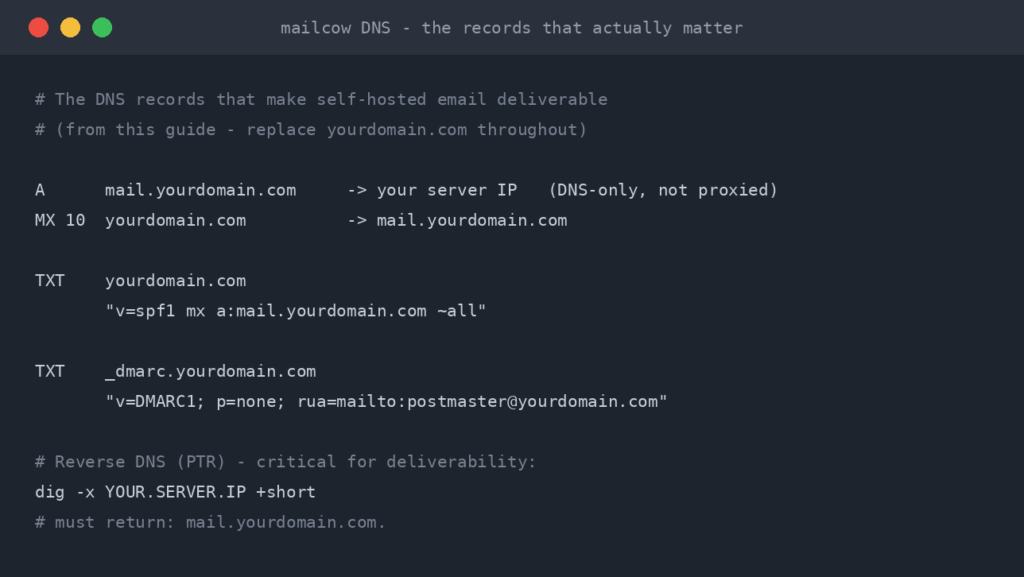
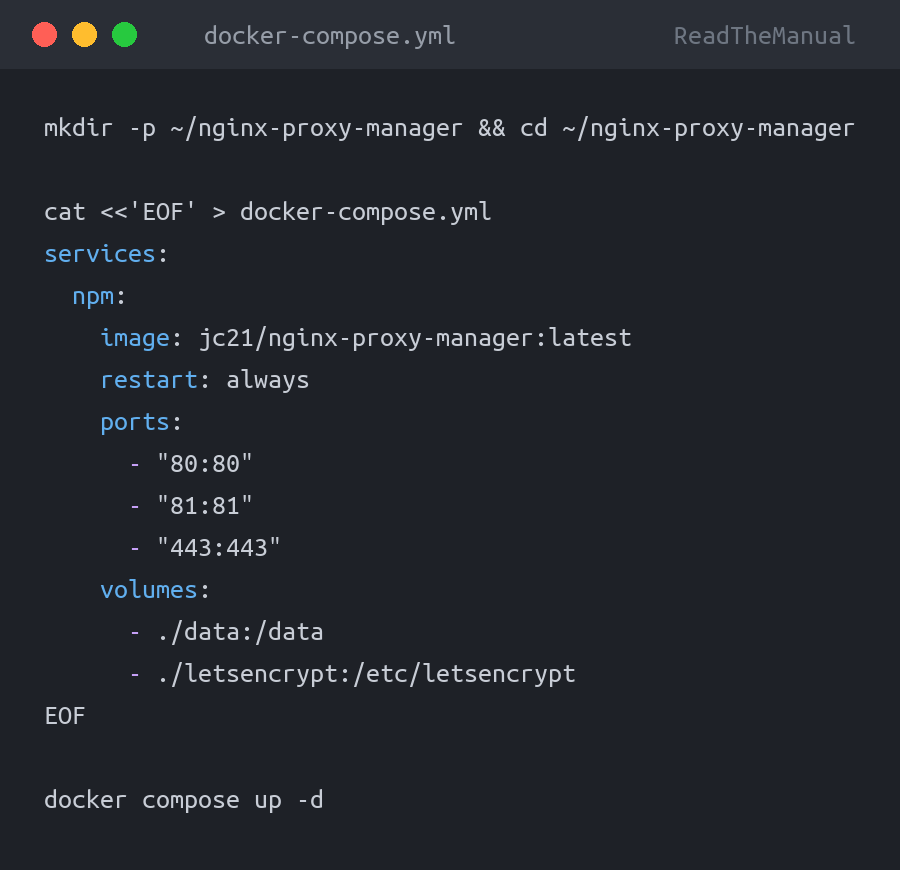
Nginx Proxy Manager – Reverse Proxy Made Simple
If you’re going to run multiple web-facing containers, you need a reverse proxy. Nginx Proxy Manager gives you a GUI for managing proxy hosts, SSL certificates (via Let’s Encrypt), and redirects.
mkdir -p ~/nginx-proxy-manager && cd ~/nginx-proxy-manager

cat <<'EOF' > docker-compose.yml
services:
  npm:
    image: jc21/nginx-proxy-manager:latest
    restart: always
    ports:
      - "80:80"
      - "81:81"
      - "443:443"
    volumes:
      - ./data:/data
      - ./letsencrypt:/etc/letsencrypt
EOF

docker compose up -d
Admin UI is on port 81. Default login: [email protected] / changeme. Change these immediately. If you want to access your services remotely and your ISP gives you a dynamic IP, set up DuckDNS for free dynamic DNS so your domain always points to your home network.
Uptime Kuma – Monitoring
You should monitor your services from day one, not after the first outage. Uptime Kuma is a self-hosted monitoring tool that checks HTTP endpoints, TCP ports, DNS, and more. If you want the full walkthrough with notifications and status pages, see our complete Uptime Kuma setup guide.
docker run -d \
  --name uptime-kuma \
  --restart=always \
  -p 3001:3001 \
  -v uptime-kuma:/app/data \
  louislam/uptime-kuma:latest
Access it at http://your-server-ip:3001. I wrote a full guide on setting up Uptime Kuma for homelab monitoring if you want to go deeper.
Pi-hole – Network-Wide Ad Blocking
If this Docker host sits on your home network, running Pi-hole as a container gives you DNS-level ad blocking for every device on the network.
docker run -d \
  --name pihole \
  --restart=always \
  -p 53:53/tcp \
  -p 53:53/udp \
  -p 8080:80 \
  -e TZ="Europe/London" \
  -e WEBPASSWORD="changethis" \
  -v pihole_etc:/etc/pihole \
  -v pihole_dnsmasq:/etc/dnsmasq.d \
  pihole/pihole:latest
If you’re running Pi-hole alongside other containers that serve web content, be careful with port 80. In the example above I’ve mapped Pi-hole’s web UI to port 8080 to avoid conflicts. Also note that Ubuntu 24.04 may have systemd-resolved listening on port 53. If Pi-hole fails to start with a port binding error, disable the stub resolver: sudo sed -i 's/#DNSStubListener=yes/DNSStubListener=no/' /etc/systemd/resolved.conf && sudo systemctl restart systemd-resolved.
Once you are comfortable with running containers, consider deploying Vaultwarden as a self-hosted password manager. It runs as a single container and gives you full control over your credentials instead of trusting a third-party cloud vault.
Troubleshooting
These are real issues I’ve hit across my own hosts, not theoretical problems from documentation.
DNS resolution fails inside containers
Symptoms: containers can’t pull images, can’t reach external APIs, apt update inside containers fails. This is almost always caused by Ubuntu’s systemd-resolved stub resolver. Containers inherit the host’s DNS settings, and 127.0.0.53 (the stub resolver address) isn’t reachable from inside a container’s network namespace.
Fix: Add explicit DNS servers to your daemon.json:
sudo tee /etc/docker/daemon.json > /dev/null <<'EOF'
{
  "log-driver": "json-file",
  "log-opts": {
    "max-size": "10m",
    "max-file": "3"
  },
  "storage-driver": "overlay2",
  "dns": ["1.1.1.1", "8.8.8.8"]
}
EOF

sudo systemctl restart docker
Or, if you run your own DNS (Pi-hole, for instance), point it to that instead.
Permission denied on mounted volumes
You bind-mount a host directory into a container, and the application inside can’t write to it. This happens because the container’s process runs as a specific UID (often not 1000), and the host directory is owned by your user.
Fix: Check what UID the container expects (docker exec container_name id) and set ownership accordingly:
# Example: many containers run as UID 1000
sudo chown -R 1000:1000 /path/to/mounted/directory
Some containers use environment variables like PUID and PGID to let you specify the user. LinuxServer.io images are good about this.
Disk space disappearing fast
Docker images, stopped containers, and build cache accumulate silently. After a few months of pulling images and rebuilding, you can lose gigabytes to unused data.
Fix: Run a cleanup periodically:
# See what's using space
docker system df

# Remove stopped containers, unused networks, dangling images, and build cache
docker system prune -f

# Nuclear option: also remove unused images (not just dangling)
docker system prune -a -f
Be careful with docker system prune -a, as it removes all images not associated with a running container. If you’ve pulled large images you plan to use later, they’ll be deleted and need re-downloading. The non -a version is safer for routine cleanup.
“Cannot connect to the Docker daemon”
You run a docker command and get told the daemon isn’t running, but you’re sure it is.
Most likely causes:
- You forgot to add your user to the
dockergroup, or you haven’t logged out and back in since doing so - The Docker service genuinely crashed. Check with
sudo systemctl status docker - You’re in a new shell session where
newgrp dockerhasn’t been run
Docker is one of the most in-demand skills in infrastructure roles. According to every job board I check, containerisation experience appears in about 70% of DevOps and platform engineering job descriptions. Learning Docker on Ubuntu in your homelab gives you hands-on experience that translates directly to production environments. The commands are identical whether you’re running containers on a mini PC under your desk or across a Kubernetes cluster in a datacentre.
Running Ubuntu? Here’s What to Do Next
Now that Docker is running, here are five articles to help you build on this foundation:
- Linux Commands That Actually Get You Hired – The core command-line skills every infrastructure role expects. If you’re navigating around your Docker host and feel unsure, start here.
- Mastering systemctl: Service Management – You just used
systemctlto check Docker’s status. This guide goes deep on managing services, reading logs, and troubleshooting failures. - Raspberry Pi 5 as a Docker Host – Want a second Docker host for under 100 quid? The Pi 5 handles lightweight containers surprisingly well.
- Self-Hosted Monitoring with Uptime Kuma – Now that you’re running services, you need to know when they go down. Set up monitoring before you need it, not after.
- Self-Hosted Password Manager with Vaultwarden – Take your passwords off someone else’s servers. Runs as a single Docker container and works with all Bitwarden apps.
- Free Dynamic DNS with DuckDNS – Access your Docker host remotely even with a changing IP address. Ten-minute setup, no cost.
- Docker for Career Changers – If you’re learning Docker to break into infrastructure or DevOps, this covers how to position the experience on your CV and what employers actually look for.
Key Takeaways
- Always install Docker Engine from Docker’s official repository, never from Ubuntu’s default repos or via snap
- Docker Compose v2 is now a plugin, so the command is
docker compose(space, not hyphen) - Configure log rotation in
/etc/docker/daemon.jsonimmediately, or container logs will eventually fill your disk - Add DNS servers to
daemon.jsonif containers can’t resolve external domains, as this is Ubuntu’s most common Docker gotcha - Adding a user to the
dockergroup grants root-equivalent access, so be deliberate about who gets it - Run
docker system pruneperiodically to reclaim disk space from unused images and stopped containers - Start with Portainer, a reverse proxy, and monitoring before piling on more services
Related Guides
If you found this useful, these guides continue the journey:
- Essential Docker Commands You Need to Know — The core Docker commands every homelab operator should know by heart
- Docker Compose Beginner’s Guide — Learn to manage multi-container applications with Docker Compose
- How to Install Docker on Debian 12 — Install Docker on the most stable server OS available
- Grafana and Prometheus Homelab Monitoring — Set up proper monitoring for your homelab with Grafana and Prometheus
- Nextcloud Docker Setup Guide — Deploy your own cloud storage with Nextcloud in Docker


ReadTheManual is run, written and curated by Eric Lonsdale.
Eric has over 20 years of professional experience in IT infrastructure, cloud architecture, and cybersecurity, but started with PCs long before that.
He built his first machine from parts bought off tables at the local college campus, hoping they worked. He learned on BBC Micros and Atari units in the early 90s, and has built almost every PC he’s used between 1995 and now.
From helpdesk to infrastructure architect, Eric has worked across enterprise datacentres, Azure environments, and security operations. He’s managed teams, trained engineers, and spent two decades solving the problems this site teaches you to solve.
ReadTheManual exists because Eric believes the best way to learn IT is to build things, break things, and actually read the manual. Every guide on this site runs on infrastructure he owns and maintains.
Enjoyed this guide?
New articles on Linux, homelab, cloud, and automation every 2 days. No spam, unsubscribe anytime.